Helena is a Strength-based Tank that has great damage resistance and even greater crowd control. By rotating through your cooldowns with Veteran of War attacks efficiently you’ll keep your Shields Up and your Toughness high.
This guide will teach you the basics of playing Helena in Fellowship, how to use her abilities, and which talents to use for the best build. If you are looking for tank-specific advice, check out our Tanking Guide for Fellowship.
Other Hero Guides
In the event you were looking for a different character guide for Fellowship, please use one of the buttons below to find what you’re looking for.
Tanks
Healers
DPS
Table of Contents
- Helena’s Abilities
- Toughness Mechanic
- Veteran of War Mechanic
- How to Play Helena — Basic Ability Guide
- Helena Talents and Build Progression
- Gearing and Stat Priority
- Block is very effective during large pulls
- Her powerful 120s CD lockdown Grand Melee her do pulls other tanks can’t
- High damage and threat output
- Struggles with bosses and pressures the healer more
- No self-sustain at all.
- Very low mobility and no free movement skills.
Season 2 Changes
Unique to Helena, her weapons now give a huge amount of armor comparable to another two armor pieces. This increases her base physical damage reduction significantly, and makes % Armor increase talents even more effective.
The old Razor Shrapnel talent was replaced with Unscarred Soul, giving a 20% Damage reduction and 50% Strength Damage Reflection while she has her Empowered Shield Slam barrier up. This, combined with the new Linked Heavy Metal Cloak legendary which allows for two stacks of Hold the Line and gives the ability Cooldown Acceleration further enables Shield Slam / Barrier based builds.
The popular Fated Strike weapon lost its expertise bonus, had its damage lowered, and the CDR effect no longer affects its own ability so it’s now a static 1 minute cooldown. Cooldown Reduction and Haste are still Helena’s favorite stats and it’s still very effective, but Al’zerac’s Shackle from Darkfrost Arms has crept its way up into the meta and is a more viable choice between the two.
Tanks overall now have lost access to the Sin-Binding Stone Damage Reduction relic, and in place have received the Obsidian Sigil relic that grants 30% damage reduction to yourself for 9 seconds on a 60 second cooldown.
Tanks like this relic. This is a good relic.
Helena’s Abilities
| Ability/Icon | Name | Cast / Recast | Range / Radius | Effect |
|---|---|---|---|---|
 | Measured Strike | GCD | ↔ 5yd ↻ 5yd | Strike target enemy, dealing 62% Strength physical damage to them and nearby enemies. Veteran of War Reduces the cooldown of Shield Slam and Shield Throw by 1.5 seconds. |
 | Power Strike | GCD 6.0s | ↔ 5yd | Perform a heavy strike, dealing 350% Strength physical damage to a target. Veteran of War Reduces the cooldown of Shield Slam and Shield Throw by 1.5 seconds. |
 | Shield Slam | GCD 7.5s (2) | ↔ 5yd ↻ 5yd | Deals 373% Strength physical damage to your target and 69% Strength physical damage to other enemies near your target. Shield Slam gains Cooldown Acceleration equal to your Haste. Shield Slam generates 20% Toughness. Lingering Concussion Shield Slam applies Lingering Concussion to your main target, causing them to deal 3% reduced damage to you for 12 seconds. Lingering Concussion stacks up to 5 times. Veteran of War Reduces the cooldown of Shockwave by 3.0 seconds. |
 | Shield Throw | GCD 21.0s | ↔ 30yd ↔ 5yd | Throw your shield at target enemy dealing 297% Strength physical damage. The shield bounces up to 5 additional nearby enemies. Veteran of War Reduces the cooldown of Shockwave by 3.0 seconds. |
 | Shockwave | GCD 30.0s | Self ↻ 10yd | Slam sword and shield together, creating a forceful explosion, dealing 333% Strength physical damage to enemies in a large radius. Enemies that take damage from Shockwave have reduced movement speed for 5 seconds, starting at 90% and diminishing by 10% every 0.5 seconds. Veteran of War Reduces the cooldown of Shields Up by 6 seconds. |
 | Charge | GCD 20.0s | ↔ 30yd | Charge at target enemy, dealing 314% Strength physical damage and Stunning them for 2 seconds. Veteran of War Reduces the cooldown of Shield Slam, Shield Throw, Shields Up, and Shockwave by 6 seconds. |
 | Shields Up | Instant 30s (2) | Self | Raise your shield, increasing your Toughness by 60% and increasing your Block chance by 25% for 12 seconds. Shields Up gains Cooldown Acceleration equal to your Haste. Each time you successfully block an attack, you generate 3% Toughness. Shields up has a 1.1 second window after casting which prevents all toughness damage. |
 | Taunt | Instant 8s | ↔ 30yd | Taunt the target, forcing it to attack you for 6 seconds. Taunt also sets your threat to the highest on the target. |
 | Bash | Instant 12s | ↔ 5yd | Interrupt the target’s spellcasting and prevent it from casting for 4 seconds. Must interrupt a spell, or it will have no effect. |
 | Sweeping Strike | GCD 30s | ↔ 5yd ↻ 5yd | Deals 326% Strength physical damage to your target and other nearby enemies. Enemies hit by Sweeping Strike bleed for 52% Strength physical damage every 1.5 seconds for 12 seconds. |
 | Iron Wall | Instant 90s | Self | Your Toughness cannot be reduced for 12 seconds. |
 | Grand Melee | GCD 120s | Self ↻ 20yd | For the next 10 seconds, Incite all enemies in a large radius around you, forcing them to only use Auto Attacks and only attack you. All allies within the radius of Grand Melee take 20% reduced magic damage while it is active. |
 | Hold the Line | Instant 30s | Self | Instantly resets the cooldown of your Shield Slam ability and causes your next Shield Slam within 12 seconds to be Empowered. Empowered Shield Slam Your next Shield Slam applies a barrier on you, absorbing up to 2387% Strength damage taken. The barrier lasts for 8 seconds. |
 | Siegebreaker | Instant SPIRIT ABILITY | Self | For the next 20 seconds, the cooldown reduction granted by your Veteran of War is doubled. While Siegebreaker is active, you take 25% reduced damage and your Shield Slam, Shield Throw and Shockwave abilities deal 25% increased damage. Spirit Ability When you activate your Spirit ability you gain Spirit of Heroism, granting +30% haste for 20 seconds. |
Toughness Mechanic
Toughness is Helena’s unique class feature, displayed as a bar on the right of the character.
Your total Toughness has a cap equal to 770% of your Strength, then every 1% of each secondary statistic increases the final amount by 2%.
The more Toughness you have, the less damage Helena takes, determined by which notch of the Toughness bar is filled up to.

Each notch of the bar shows a quarter of your Toughness, and gives a set amount of Damage Resistance (DR):
- 75%+ gives 35% DR
- 75% to 50% gives 25% DR
- 50% to 25% gives 15% DR
- 25% to 0% gives 5% DR
You lose 1 point of Toughness for each pre-Toughness damage point taken. It is worth noting that barriers do NOT prevent Toughness from dropping.
Managing your Toughness during pulls and bosses is key when playing Helena.
Veteran of War Mechanic and Helena’s Rotation
Many of Helena’s basic abilities have a Veteran of War effect, which lowers the cooldown of other abilities. The goal of these cooldowns is to reduce the cooldown of Shields Up as often as possible. To do this, you’ll cast Shockwave and reduce its cooldown through Shield Throw and Shield Slam.

Haste reduces Helena’s ability cooldowns, Spirit gives a chance for Veteran of War to trigger twice. Due to this randomness there is no set rotation, but instead a rough priority system.
- Shockwave – CDR for Shields Up + Strong Damage.
- Shield Slam – CDR for Shockwave + 20% Toughness.
- Hold the Line – Reset Shield Slam, increase your Toughness and go again.
- Shield Throw – CDR for Shockwave.
- Charge – CDR for Shockwave, Shield Slam, Shield Throw AND Shields Up. Ideally used when as many of these abilities are on cooldown as possible, but not mandatory. It can also be used to CC enemy casts or to get between packs. It should not be held for too long, though.
- Sweeping Strike – DPS Button. Can press earlier if you’re good on health + Toughness. If you’re dying, skip it (Barring talents)
- Power Strike – CDR Shield Slam and Shield Throw. With the Sword and Board talent, Empowered Shield Slam will be a bonus.
- Measured Strike – Filler GCD. Not often used. Better than Power Strike at 5+ targets (if ignoring priority damage and talents)
How to Play Helena — Basic Ability Guide
As Helena, your objective is to keep your Toughness as high as possible as consistently as you can. To do this, you will be using Shields Up as frequently as you can through managing your defensive cooldowns and Veteran of War rotation. These abilities will keep your Toughness high, so the more consistent your rotation is, the tankier you are.
Shields Up also has a mechanic in that after it has been pressed, for 1.1 seconds during the animation you cannot take toughness damage but it will still protect you.
You will want to use Shields Up after your first GCD (It’s usable off the global cooldown), and then thereafter when:
- You have less than 40% toughness.
- Your block chance buff has expired.
- You’re approaching two charges, you have missing Toughness, and you’re about to use Shockwave or Charge.
- When there is a large hit incoming to get value from its 1.1s i-frame window.
After you start the pull, you’ll follow the general rotation as outlined above, while spreading your defensive cooldowns out as often as you can.
If the Shields Up block effect is still active, Shield Slams are a good way to keep your toughness topped up over a fight. Immediately after using your Shield Slam, consider your Toughness level and damage you’re taking and use Hold the Line to reset its cooldown instantly if you won’t overcap, or in urgent need of an additional barrier over your HP.
Hold the Line‘s cooldown is short, and can be reduced further through talents, so use it early and use it often.
Iron Wall prevents your Toughness from dropping. In effect, this is 35% DR for 12 seconds. Generally, use it after you’re out of Shields Up charges to buy yourself some time to get them back. You don’t need to be at 100% Toughness to use it, but ideally, you want to be above ~60% so you can be brought above the 75% threshold through blocks or your next Shield Slam. You want to be at 100% Toughness by a few seconds in, so plan accordingly.
Grand Melee is your other long defensive cooldown. This ability is a very powerful AoE lockdown and CC. Incite will stop casters, bleed auto-attacks, un-kickable abilities, and pretty much any non-boss mechanic for 10 seconds. Enemies will still be hitting you, so make sure you keep managing your Toughness during large pulls.
Not all casts of Grand Melee are made equal. Because enemies are still attacking you, it’s best used on packs of enemies with abilities worth stopping. Also, watch your positioning, as it has a very large 20-yard radius. If you’re standing out of position, you will pull an extra unwanted pack.
Bosses can’t be affected by Grand Melee, but it still applies a 20% Magical DR to all allies, so it’s still useful to cast on Boss AoEs or soak mechanics.
Siegebreaker is Helena’s Spirit Ability. Other than increasing your damage, using it will reduce the damage you take pre-Toughness, give you a 30% haste and cause Veteran of War to double proc every hit for 20 seconds. The increased attack rate and double CDR will manage your Toughness, similar to Iron Wall.
Helena Talents Build Progression
As Helena, it’s best to start out focusing on your defensive talents, and then round off the top end of the build with damage. In particular, pushing for Toughness management as especially in the early game it is difficult to keep high. The following is our recommended Gleaming Shield build that focuses on Toughness management and a little bit of offense later on.
Note that Helena runs a lot of one-point talents, giving a fair amount of versatility between builds or even dungeons.
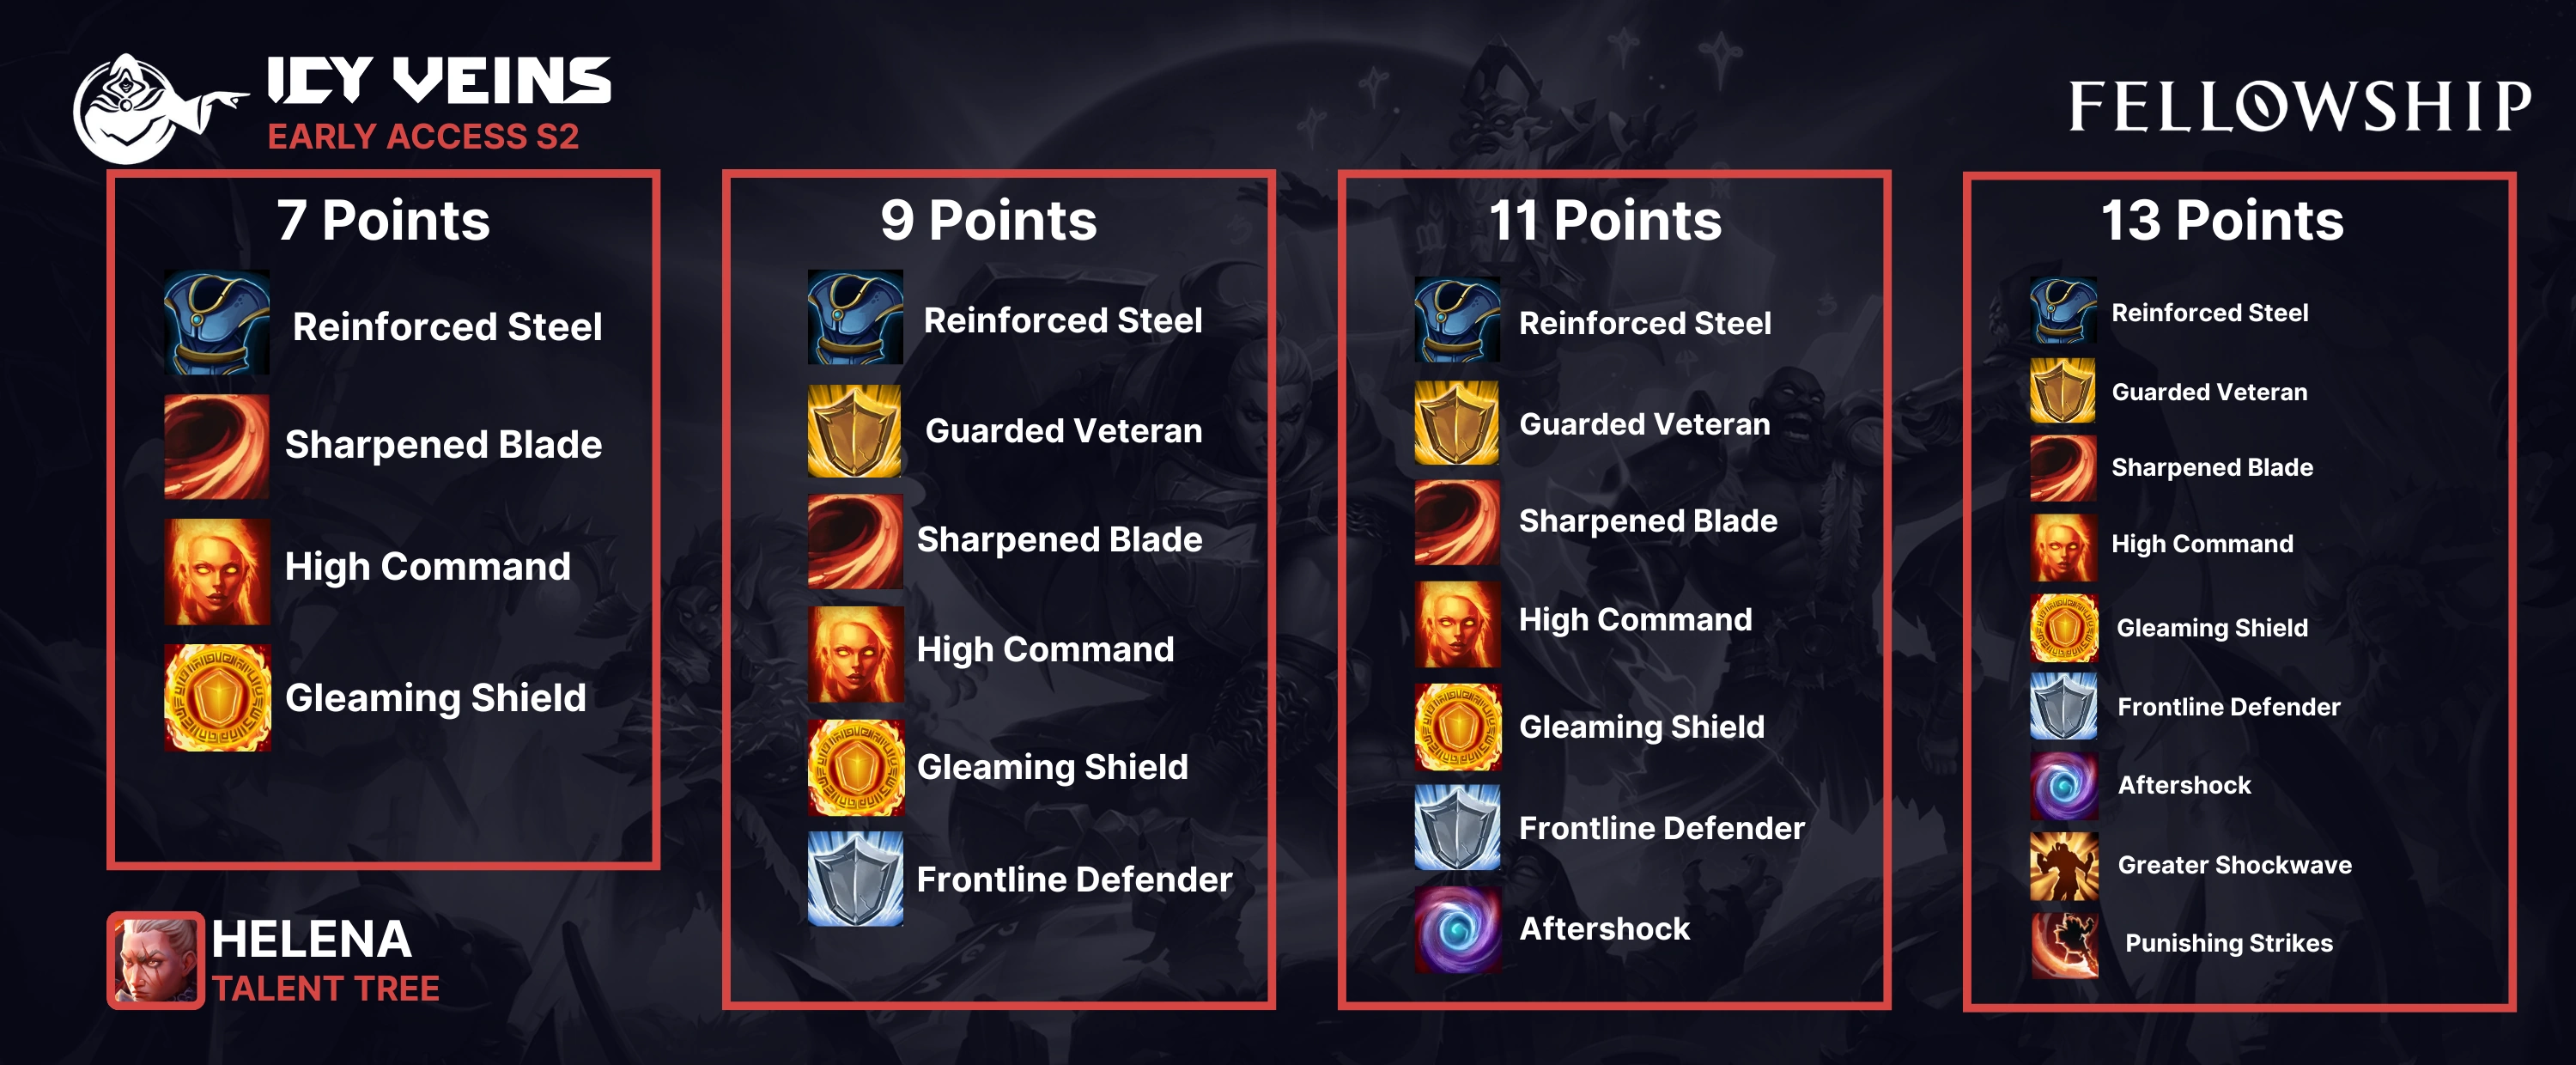
Quick Reference Talent Table
| Talent Points Total | Talent Tree (Row + Column |
|---|---|
| 2 Points | 1C |
| 3 Points | 1C + 2A |
| 4 Points | 1C + 2A + 2B |
| 5 Points | 1C + 2A + 3B |
| 6 Points | 2A + 3B + 5C |
| 7 Points (Contender) | 2A + 3B + 5C + 6A |
| 8 Points | 2A + 2B + 3B + 5C + 6A |
| 9 Points (Adept) | 2A + 2B + 3B + 4A + 5C + 6A |
| 10 Points | 2A + 2B + 3B + 4A + 5C + 6A + 2C |
| 11 Points (Champion) | 2A + 2B + 3B + 4A + 5C + 6A + 3A |
| 12 Points | 2A + 2B + 3B + 4A + 5C + 6A + 3A + 2C |
| 13 Points (Paragon) | 2A + 2B + 3B + 4A + 5C + 6A + 3A + 2C + 6C |
Sword and Board (1C) is the better out of the three first talents – it’s effective early game, helps with healers who don’t have a lot of stats yet, but falls off later so we swap it out as you get more rows and points.
Reinforced Steel (1A) and later Guarded Veteran (1B) are solid 1 point defensive talents to improve your armor and block %. If dropping one point to take something else, drop Guarded Veteran first.
Sharpened Blade (3B)‘s 20% attack speed reduction will reduce damage from auto-attacks, the largest source of damage from big pulls. This does not stack with Al’Zerac’s Shackle, and should be swapped out if running Darkfrost Arms.
High Command (4A) will reduce the cooldown of Hold the Line and give you more casts of Shield Slam.
Gleaming Shield (5C) will give you extra block and generally make keeping you alive easier. By the mid-game you’ll be able to cast Shields Up more often and get even more value out of it. Pretty much a universal must-have.
Front Line Defender (6A) is another great one-point talent, making your Toughness stronger across the board.
Aftershock (3A), Greater Shockwave (6C) and Punishing Strikes (2C) are a set of damage-only talents to push Helena’s DPS to help burn packs and time dungeons. In Season 2, survivability is improved across the board – but if you feel you need more tankiness to push the content you’re doing, swap these out with something more defensive.
Other Noteworthy Talents
Magic Ward (4B) is good for Helena as magic damage is her weakness compared to physical damage and all her armor. It can be cancelled outright with Grand Melee, but this doesn’t affect bosses.
Second Wind (5A) is a little awkward. It is strong – the strength bonus isn’t just more damage but also more tankiness as it increases your Toughness bar as well. But, it cannot generate charges during this buffed window which leaves its uptime to only around 25%, making other talents more consistent and effective.
For Martial Command (5B) there’s not a lot of instances where party-wide DR during a specific spirit window is useful. Saving Siegebreaker during bosses with lots of outgoing AoE such as in Stormwatch can make them a lot more comfortable, in place as a DR Relic. As of Season 2, it does generate 2 additional spirit every Shield Throw, further enabling Spirit-based builds. It can also be strong as a swap in for the Shadow Lord modifier.
Master of War (6B) is a very strong and popular 1-point talent, but it does nothing if you don’t use the extra casts of Grand Melee. We haven’t recommended it early in this build because of this, but if your route is more effective with the grand melee timings, this is stronger than other 1-pointers.
Remember to not take talent trees as is and adjust for any legendary or weapon trees you get, or content you are doing.
Gearing and Stat Priority
Substats have the following effect for Helena:
- Critical Strike – Chance for damage and healing effects to crit, doubling their effect.
- Expertise – Increases all damage, healing and absorption effects triggered by Helena.
- Haste – Decreases cooldowns, increases attack speed and GCD speed, and the tick rate of damage and healing effects.
- Spirit – Every % of Spirit gives a chance to double the cooldown reduction effect of Veteran of War. Whenever this effect is triggered, generate one spirit point for her Spirit Ability.
The formula for Spirit effects is Spirit% / (1 + Spirit%). 20% Spirit = 0.2/1.2 = 16.667% chance.
Item level is king and will have the greatest effect on your damage and survivability. However, when choosing substats we need to consider the following.
Critical Strike benefits Helena’s damage, and Shield Based builds. As of Season 2, shields have a crit % chance to take half-damage. These only apply to barriers generated by Helena.
Expertise increases her damage and absorption from Empowered Shield Slam. It doesn’t have any bonus effect on Toughness other than the usual substat gain.
Haste decreases the cooldowns of every GCD attack AND Shields Up. Because Veteran of War CDR is flat, this makes Haste even stronger.
Spirit increases the frequency of her ultimate slightly and offers the chance to double Veteran of War CDR. Double reduction can result in 12 seconds off Shields Up or 6/12 seconds off Shockwave, which reduces the amount of filler GCDs you need to do. However, it is unpredictable and unreliable. Sometimes it will proc when you don’t need it, such as only a few seconds left on a cooldown.
All substats increase the total cap of Toughness by 2% per 1% of each stat.
Gearing Priority
- Champion+ Weapon Tree
- Legendary Item
- Item Level on pieces that give Armor
- Completed Set Bonus
- Item level on other pieces
Substat Prioirty
- Haste
- Expertise = Crit
- Spirit
It’s worth noting that secondary stats on gear have diminishing returns. Because Toughness scales with each % of substat, it’s worth going a little bit wide when it’s ‘cheap’.
Changelog
For a full list of Open Beta -> Early Access updates, please see our post documenting all changes.