
Meiko is an Agility-based Tank that excels in self-sustain and absorption. Her powerful combo-based Palm, Kick, and Fist attacks will keep you buffed and topped up — but make sure you keep rhythm; otherwise, you’ll find yourself dropping like a rock.
This guide will teach you the basics of playing Meiko in Fellowship, how to use her abilities, and which talents to use for the best build. If you are looking for tank-specific advice, check out our Tanking Guide for Fellowship.
Other Hero Guides
In the event you were looking for a different character guide for Fellowship, please use one of the buttons below to find what you’re looking for.
Tanks
Healers
DPS
Table of Contents
- Meiko’s Abilities
- Meiko’s Combo Finishers — Fighting Techniques
- Stone Shield Mechanic
- How to Play Meiko — Basic Ability Guide
- Meiko Talents and Build Progression
- How to Tank as Meiko — Warden of the Temple Build
- Gearing and Stat Priority
- Legendaries and Legendary Builds
- High self-sustain that scales with damage and talents.
- Great mobility with direction based dashes and a free-aimed leap.
- Very effective when tanking bosses.
- Very squishy without her main defensive buffs.
- Aggro management late-game can be difficult.
- Ultimate is weak offensively, particularly in AoE situations.
Meiko’s Abilities
Meiko’s abilities scale off her main-stat, Agility. The below damage is based on 1,000 Agility. Instant abilities can be used during the Global Cooldown.
| Ability/Icon | Name | Cast / Recast | Range / Radius | Effect |
|---|---|---|---|---|
 | Spirit Palm | GCD | ↔ 5yd | Deals 564 – 689 damage to target enemy. Grants access to Palm Technique finishers. |
 | Wind Kick | GCD | ↔ 5yd | Deals 352 – 431 damage to your target and other enemies near your target. Grants access to Kick Technique finishers. |
 | Earth Fist | GCD | ↔ 5yd | Deals 564 – 689 damage to target enemy. Grants access to Fist Technique finishers. |
 | Fighting Techniques | Instant Combo | ↔ 5yd | Grants access to Finishing Moves based on Combo Builders used. For more details, see Meiko’s Combos. |
 | Stone Shield | Instant 30s (2) | Self ↻ 8yd | Summon 3 stones around you that deal 707 – 864 damage 4 times to all nearby enemies. Each stone increases your armor by 20%, up to a maximum of 60% and while at least one stone is active, they soak 25% of all damage you take. Each stone has a health value equal to 616% agility. Every 1% of each secondary statistic increases the final amount by 2% Stone Shield gains Cooldown Acceleration equal to your Haste. |
 | Shatter Earth | GCD 60s | ↔ 30yd ↻ 8yd | Leap and slam the ground at target location, dealing 3906 – 4774 damage to all enemies in the area and leave an area of quaking earth that deals 740 – 905 damage every 1 second to any enemy standing in the effect for 6 seconds. |
 | Gust | Instant 30s (2) | ↔ 10yd | Quickly travel forward a short distance. |
 | Taunt | Instant 8s | ↔ 30yd | Taunt the target, forcing it to attack you for 6 seconds. Taunt also sets your threat to the highest on the target. |
 | Stagger | Instant 12s | ↔ 5yd | Interrupt the target’s spellcasting and prevent it from casting for 4 seconds. Must interrupt a spell, or it will have no effect. |
 | Serenity | Instant 10s | Self | Instantly heal yourself for 2520 – 3080. Each time you Auto Attack an enemy, Serenity gains +40% increased healing, stacking up to 50 times. |
 | Cyclone | Instant 60s | Self ↻ 15yd | Create a Cyclone of strong winds that instantly pulls in enemies within the radius to you. Interrupts spells. |
 | Stone Stomp | Instant 120s | Self ↑8y | Send a shockwave through the ground in front of you, dealing 957 – 1170 damage to all enemies and Stunning them for 3 seconds. |
 | Twin Souls: Bulwark | GCD 180s | Self | Split your soul into the Sibling of Wind and Sibling of Earth for 20 seconds. Sibling of Earth Summon the Sibling of Earth, who taunts all enemies in a 10yd radius around them every 1.5 seconds. If the Sibling of Earth is destroyed before the duration ends, Twin Souls: Bulwark ends. Sibling of Wind (YOU) As the Sibling of Wind, you take 20% of any damage dealt to Sibling of Earth. |
 | Twin Souls: Army of One | GCD SPIRIT ABILITY | Self | Split your soul into the Sibling of Wind and Sibling of Earth for 20 seconds. You deal 20% more damage for the duration. Sibling of Earth (YOU) While Twin Souls: Army of One is active, you take 40% reduced damage. Sibling of Wind Summon the Sibling of Wind, who swiftly teleports to and strikes nearby enemies up to 40 times dealing 343 – 420 damage with each strike. Spirit Ability When you activate your Spirit ability you gain Spirit of Heroism, granting +30% haste for 20 seconds. |
Meiko’s Combo Finishers — Fighting Techniques
Meiko’s Combo Finishers are her unique class feature. Her Palm, Kick, and Fist are combo attacks that allow you to use various finishing moves instantly during your global cooldown. There are three types, and two finishers per type. The first attack determines which type of finisher, and the second attack chooses which of the pair to use.

For example, Spirit Palm followed by Wind Kick allows you to use Double Palm Strike, while Spirit Palm followed by Earth Fist allows you to use Spirited Vortex.
Meiko will always remember the last two attacks you do, so if you then pressed Wind Kick, your finishing move will become Earthfist Barrage.
Here’s an easy to read table with all of Meiko’s combos and finishers.
| Finisher Ability | Name | Setup Combo | Effect |
|---|---|---|---|
 | Double Palm Strike | Spirit Palm > Wind Kick | Strike the enemy with both palms, dealing 182% Agility damage. Grants Spirited Strikes for 30 seconds. Spirited Strikes +20% Magic Damage Reduction +5% Parry |
 | Spirited Vortex | Spirit Palm > Earth Fist | Meiko creates a vortex of winds around her, providing +5% Dodge Chance and dealing 42% Agility damage every 2 seconds for 30 seconds to all nearby enemies. Enemies damaged by Spirited Vortex deal 10% reduced damage and have 35% reduced Movement Speed for 5 seconds. |
 | Rising Storm | Wind Kick > Spirit Palm | Perform a powerful jump kick, dealing 88% Agility damage to your target and nearby enemies. Damage is reduced beyond 3 targets. Grants you 2 charges of Stormfall. Stormfall Your next Lashing Stormkick deals 100% increased damage. |
 | Lashing Stormkick | Wind Kick > Earth Fist | Perform a roundhouse kick, dealing 90% Agility damage to your target and nearby enemies. Damage is reduced beyond 3 targets. Lashing Stormkick heals you for 200% of the damage it deals. |
 | Rising Earth | Earth Fist > Spirit Palm | Uppercut target enemy, dealing 176% Agility damage. Grants you 2 charges of Earthfall. Earthfall Your next Earthfist Barrage deals 100% increased damage. |
 | Earthfist Barrage | Earth Fist > Wind Kick | Pummel your target with 5 quick punches, dealing 55% Agility every 0.3 seconds, leading into a final powerful uppercut for 193% Agility damage. You can move while channeling Earthfist Barrage. Earthfist Barrage heals you for 200% of the damage it deals. |
Stone Shield Mechanic
Stone Shields are Meiko’s tank defensive mechanic and worth highlighting due to how important they are. When applied, they appear on the UI next to the character. The bar is the health, and the 3 yellow orbs are how many shields you have left.

Each stone increases your armor by 20%, up to a maximum of 60% and while at least one stone is active, they soak 25% of all damage you take. It’s important to note that without Stone Shield, Meiko is very squishy. So it has to be managed effectively through cooldown management, kiting, spirit refunds, and talents.
Stone Shield also does a ton of damage. Don’t sit at 2 casts ready to go until you hit 0, use the second charge when it’s ready. Stone Shield also has no duration, so pre-cast it at the start of the dungeon and in between pulls. An exception to this would be if you’re expecting a large burst of damage or tankbuster from a boss soon.
One other quirk of Stone Shield is that they do not take damage while doing the spell animation, even though they’re still providing mitigation.
How to Play Meiko — Basic Ability Guide
Spirited Strikes and Spirited Vortex combo finishers are both powerful defensive buffs that also assist with keeping threat, so keep them up 100% of the time. Vortex without any talents or buffs reduces damage dealt by enemies by 10% and gives a 15% dodge bonus, so it should be applied first.
After that, you will use the Rising Earth > Earthfist Barrage finishers against 1-2 targets and the Rising Storm > Lashing Stormkick finishers in packs of 3 or more as filler combos. These abilities will heal you and have other effects, so the more consistent your rotation is, the tankier you are.
Meiko can use Gust to kite and to move between packs quickly, as well as Shatter Earth to jump on them. This will keep the dungeon at a rapid pace. Shatter Earth is one of your strongest damaging abilities, so it should be kept on cooldown unless you’re about to use it to jump to another pack.
Cyclone can be used as an AoE interrupt or to pull enemy ranged and casters into the group. Stone Stomp can be used when targets are grouped up enough in front of you to act as a second group interrupt / stun. Both of these abilities can interrupt not only spells but also non-kickable abilities as well, if the target can be CC’d.
Twin Souls: Bulwark will effectively stop you from taking almost all damage from enemies for a short period of time. When Bulwark is off cooldown, prepare to do a large pull to get the most value out of it. Bulwark is valuable at the start of the dungeon where you can do a large pull, and then use the extra time to setup your Spirited Buffs.
Finally, Twin Souls: Army of One will do a large burst of damage but also make you take significantly less damage for 20 seconds. Never use Bulwark and Army of One at the same time, as their effects do not stack effectively.
Meiko Talents and Build Progression
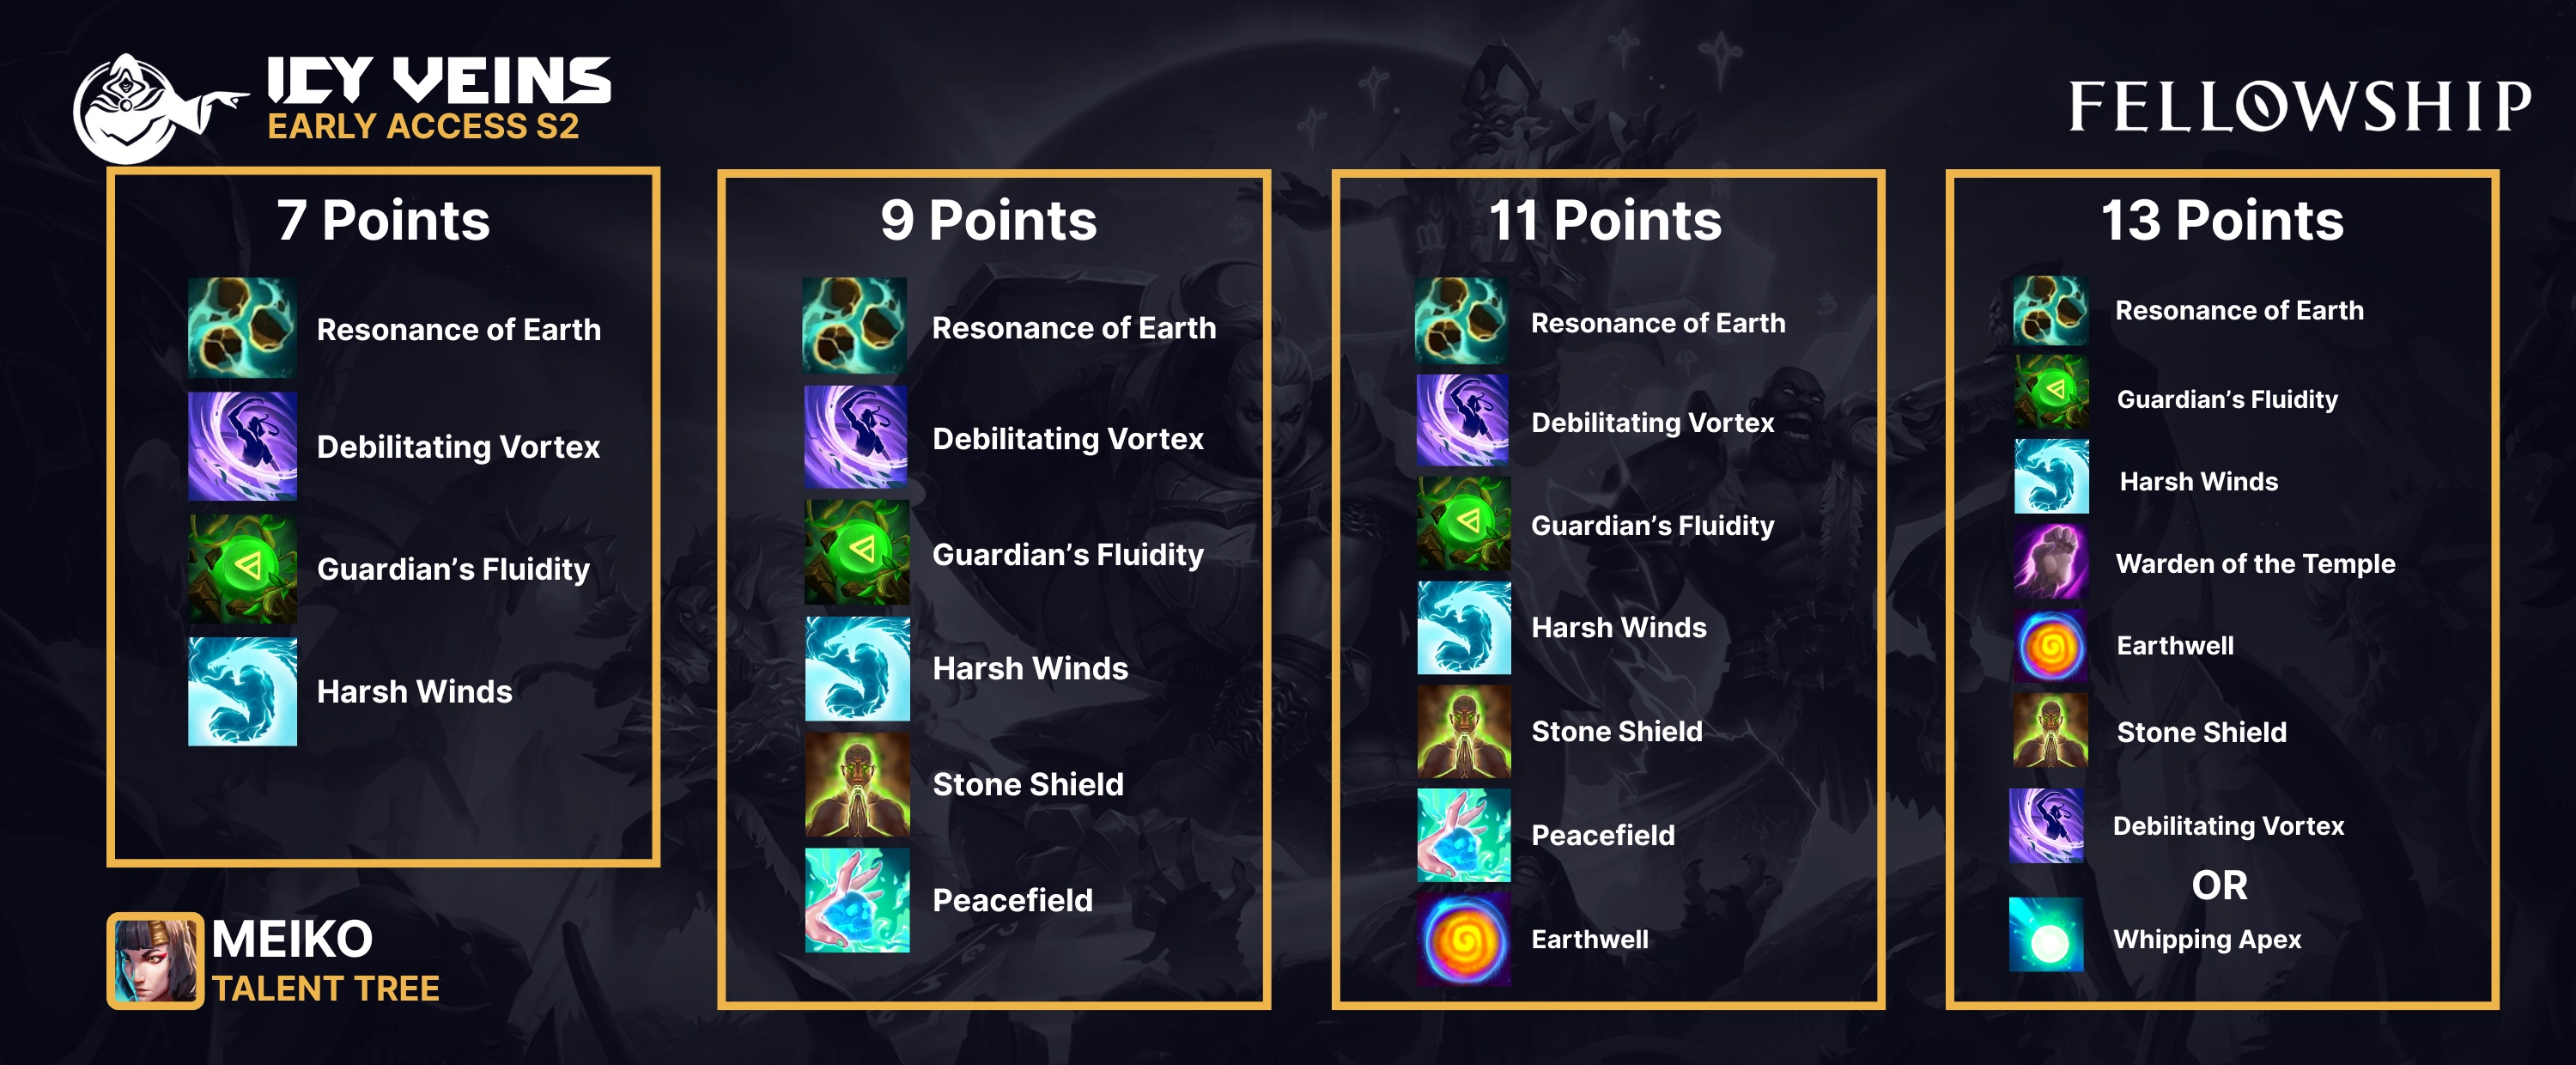
Below is the build we recommend for Meiko that focuses on manually sustaining your buffs for a net benefit through Warden of the Temple, and sustaining your Stone Shields through Serenity and Spirit.
Quick Reference Talent Table
| Talent Points Total | Talent Tree (Row + Column |
|---|---|
| 2 Points | 1A |
| 3 Points | 1A + 2B |
| 4 Points | 1A + 3B |
| 5 Points | 1A + 3B + 2B |
| 6 Points | 1A + 3B + 3A |
| 7 Points (Contender) | 1A + 3B + 3A + 2B |
| 8 Points | 1A + 3B + 3A + 2B + 6B |
| 9 Points (Adept) | 1A + 3B + 3A + 2B + 6B + 6A |
| 10 Points | 1A + 3B + 3A + 2B + 6B + 1C |
| 11 Points (Champion) | 1A + 3B + 3A + 2B + 6B + 1C + 6A |
| 12 Points | 1A + 3B + 3A + 2B + 1C + 5A |
| 13 Points (Paragon) | 1A + 3B + 3A + 2B + 1C + 5A + 6B |
Talent Picks
Resonance of the Earth (1A) gives you a strong extra source of DR that helps you survive more and makes your shields last longer than without them. Very effective when using stone shield’s i-frames to protect against tankbusters. Pretty much always run this.
Debilitating Vortex (3B) applies effectively a 100% uptime 20% auto-attack slow to every enemy you encounter, which will be useful later game as pulls start doing way more damage. This is on top of the 10% damage reduction it already applies. Replace this with another two pointer when you get a Darkfrost Talon, as the slow does not stack. Our pick is Whipping Apex, around 12-13 points.
Guardian’s Fluidity (3A) simply gives you more Stone Shields. This functions defensively, but also offensively as well as Stone Shield does very solid damage to groups of enemies.
Harsh Winds (2B) is taken because this will boost your AOE damage quite a bit, and the bonus dodge helps in particular against boss auto-attacks later on. It also stacks with Warden of the Temple.
At 10 points, Earthwell (1C) further boosts your tankiness when doing single-target / boss pulls, and gives you a very effective dump for your Serenity stacks, increasing the longetivity of all your Stone Shields.
Warden of the Temple (5A) is core to this build late game. By significantly buffing your Palm combos, it makes them even more rewarding to press other than just maintaining your buff. Serenity stacks will come online as you get more talent points and the extra 15% dodge + damage from Vortex is extremely powerful.
Other Noteworthy Talents
Rumbling Stone (2C) is an offensive pick for dealing more damage with your Earth abilities, in particular Shatter Earth and Stone Shield. This is best ran with the appropriate legendaries, rather than by itself.
Will of Stone (2A) can make it more convenient to play Meiko, particularly when on a starting pull with zero buffs up. In the late game, it will allow you to start working on your Temple of the Warden stacks sooner, not having to spend 4 GCDs to setup. This is mostly a playstyle choice.
Whipping Apex (3C) is a new talent as of Season 2. It shouldn’t be taken before Earthwell, as Earthwell has the added benefit of buffing your Stoneshields when casting Serenity, but when combined the two talents will allow you to use both kick and punch combos to generate stacks very quickly.
Thundering Kicks (4C) costs 1 Talent Point as of Season 2, providing much more value as the 20% increased critical chance not only applies to damage dealt, but also healing. This and Finishing Strikes (6C) can be taken as one-point swap-ins if you’re not feeling pressured to be more tanky.
For one point, Peacefield (6A) greatly increases your self-healing output. Peacefield’s healing stacks both with Expertise and can Crit – meaning it Expertise gives even more healing, and the regen can crit off of a Critical’d Serenity. When built around, this self-sustain is very powerful and can help reduce reliance on the healer (or allow the healer to do more damage.)
Stone Guard (6B) restores your shield’s health gradually when fighting and in a burst when using Serenity. By late game, this will restore a shield to full and then you can even proc Spirit Refund to go from 1-2 Stones back to 3 during Earthwell’s invulnerability period. This effect does fall off a bit later, as stone shields start break quickly due to all the incoming damage.
Remember to change out any offensive or defensive talents as needed if you feel like you’re having trouble surviving. When it comes to tanking, if being more defensive lets you get through a dungeon with one less overall pull, it’s better than doing more damage.
Remember to not take talent trees as is and adjust for any legendary or weapon trees you get, or content you are doing.
How to Tank as Meiko — Warden of the Temple Build
Warden of the Temple
Warden of the Temple changes the way you’ll play Meiko completely. Instead of just maintaining your buffs, you’ll be setting up 3 stacks with Kick / Fist combos and then using a Palm combo. It’s more difficult to handle than playing normally, but rewarding when executed well.
When initiating, your first priority is to get buffs up, ignoring Warden. Start with Vortex to assist with damage and aggro, then setup Strikes.
Next, work through your other combos (Kicks for 4+ targets, and punches for smaller groups, priority damage or survivability) until you have 3 stacks, and then alternate between both starting with reapplying Vortex.
Note that in general, stacks are built faster with kicks versus punches. You can use this to your advantage if you need to get stacks quickly, or are in a comfortable position and ready to use punches for more damage or Earthwell charges.
Generally, you’ll alternate between Vortex and Strikes, but Spirit Refunds have a unique interaction with Warden in that one refund will allow you to get three stacks without setting up Stormfall / Earthfall again. If this happens and Vortex isn’t falling off soon, you can fit two sets of Strikes in.
Ultimately, do not stress about over-lapping buffs when playing Warden. Uptime and consuming stacks is more important. If you are going to drop a buff and you are still in the middle of a fight, consider reapplying early because you can very quickly die without them.
Before performing the Palm Strikes combo, check your Serenity stacks and use it if it’s close to the cap of 50. Every Strikes hit will give you an extra 25 serenity stacks. When combined with Earthwell and Whipping Apex, Serenity will constantly be pumping your Stone Shield uptime and self-sustain.
Don’t be shy to overheal, as with Warden of the Temple you’ll get stacks back quickly and help out your healer.
One last optimization you can do with Warden is if you get a Spirit Refund and get to 3 stacks with your last Stormfall / Earthfall, you can reapply the buff before you use a Palm combo to get a few more seconds out of your existing buffs.
Tanking as Meiko
To effectively tank as Meiko, you want to spread your defensive abilities out as much as possible from pull to pull. Earlier in the game, you will be able to tank large packs easily but in later dungeons your Stone Shield will break much faster. With the above talent choices, by keeping the GCD rolling you can help maintain your shields.
A full 50 stack Serenity cast when combined with Earthwell will protect Stone Shield for 5 seconds, and can heal upwards of 50% or more total HP.
Within this 5 seconds, it gives a period where a spirit refund can generate an entire new shield, too.
Serenity only has a 10-second cooldown so with Earthfist Barrage + Earthwell + Warden’d Strikes it’s not unreasonable to be able to cast it every ~15 seconds with full stacks. This is extremely effective against bosses, or in a pinch in a large pull to be more defensive.
If you use Serenity with no shields and apply them after, the invulnerability will still apply.
With all of this extra maintenance, you’ll often end up with 2 charges of Stone Shield. These should be used for damage, unless you’re expecting something big in the next few seconds.
Depending on your gear, difficulty, and how aggressive you are at pulling, you may run into situations when you simply run out of everything. If this happens, it’s recommended to use Gust and start kiting the enemies while your Stone Shield recharges.
Finally, as the packs get close to dying, mentally plan ahead and reset your Palm buffs before heading to the next group, so they’re ready for the pull. It’s always better to keep your buffs up than to let them drop while you build Warden stacks.
Gearing and Stat Priority
Substats have the following effect for Meiko:
- Critical Strike – Chance for damage and healing effects to crit, doubling their effect.
- Expertise – Increases all damage, healing and absorption effects triggered by Meiko.
- Haste – Increases attack speed, channeling speed of Earthfist Barrage and the tick rate of damage and healing effects.
- Spirit – Spirit increases the chance of refunding Earthfall and Stormfall charges spent. When a charge is refunded, Meiko gains Spirit Armor, increasing her Armor by 50% for 12 seconds, and also regenerates one Stone Shield. Every time a Spirit Refund procs, Meiko generates two spirit points for her Spirit Ability.
The formula for Spirit effects is Spirit% / (1 + Spirit%). 20% Spirit = 0.2/1.2 = 16.667% chance.
Item level is king and will have the greatest effect on your damage and survivability. However, when choosing sub-stats, we need to consider the following.
Critical Strike increases Meiko’s damage, and in turn her healing.
Expertise also increases her damage and healing, making Serenity even more powerful.
Haste doesn’t do anything for Meiko other than reduce Earthfist Barrage’s channel time and Stone Shield’s cooldown. But, due to the stone shield maintenance talents and Guardian’s Fluidity, these effects aren’t that useful compared to other stats. Haste is bad on Meiko, unless running a Barrage-based build.
Spirit increases the frequency of her ultimate slightly, offers refunds on combo charges, and most importantly Spirit Armor. Meiko’s ultimate is poor compared to other Heroes, but Spirit Armor increases tankiness significantly. At around 20% Spirit, the armor buff has practically 100% uptime.
On top of that, spirit refunds give her extra stone shields, and makes Warden much more comfortable. Spirit should be pushed until the diminishing returns start getting heavy.
All substats increase the total health of Stone Shield by 2% per 1% of each stat.
Gearing Priority:
- Purple+ Weapon Tree
- Legendary Item
- Item Level on pieces that give Armor
- Completed Set Bonus
- Item level on other pieces
Substat Priorities
- Expertise / Crit
- Spirit (to ~20%)
- Haste
It’s worth noting that secondary stats on gear have diminishing returns. Spirit in particular has double-diminishing returns so it’s best to cap out around 20%.
Best Meiko Weapon
Darkfrost Talon grants Al’zerac’s Shackle which damages and freezes a target for 3 seconds, who then bursts giving a 65% movement slow and 40% attack speed slow to all enemies around them, with only a 30 second cooldown. This gives Meiko another method for interrupting, and the slow can effectively replace Debilitating Vortex and free up 2 talent points, as they do not stack and only the stronger effect is applied. This should be sought after as a priority.
Fists of Fate grants the ability Fated Strike which does cleaving damage and gives a massive 200% Cooldown Haste to all of your abilities for 6 seconds.
This cooldown haste will boost your Stone Shield uptime significantly, as well as affects your other big cooldowns such as Bulwark and Stone Stomp. This can still be an effective option for Meiko.
It is worth using a ingots to reroll other weapons for Darkfrost Talon (or Fists of Fate if you prefer). An arcane ingot on any other weapon will guarantee you get either weapon (As there are only 4 weapons for tanks at the moment.)
Click here for more details on Weapons and Weapon Traits
Best Meiko Relics
As with most tanks, the new Obsidian Sigil in Season 2 will be the best in slot, granting 30% Damage Reduction on yourself for 9 seconds.
Next up is Saltwash Elixir, granting an emergency 40% HP heal for yourself.
Grimoire of Resurrection is good to keep on the tank as if you’re least likely to die (and if you do, it’s probably a wipe anyway), so you’ll have the most chance to use it.
Ancient Wardstone will be extra utility to do pulls with excessive debuffs.
Any of the routing relics in last, or in special scenarios where special routing will save more time than the other relics.
Click here for more details on Relics
Meiko Legendaries and Meiko Legendary Builds
See below for a list of Meiko’s Legendaries, their effects, and our recommended builds.
Meiko Legendary Builds
Meiko Legendary List
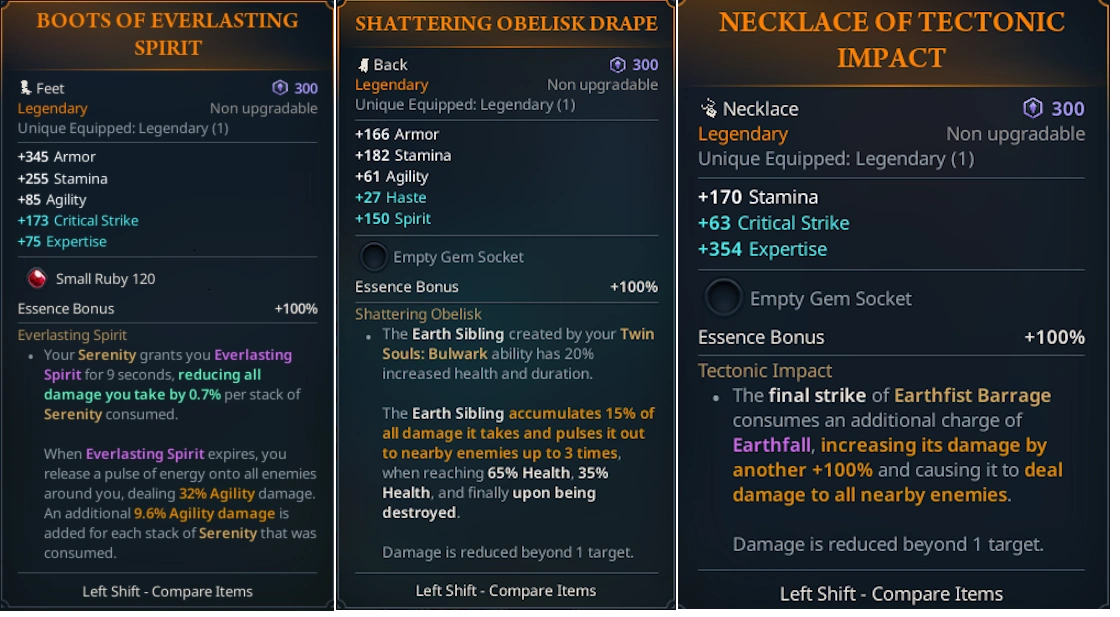
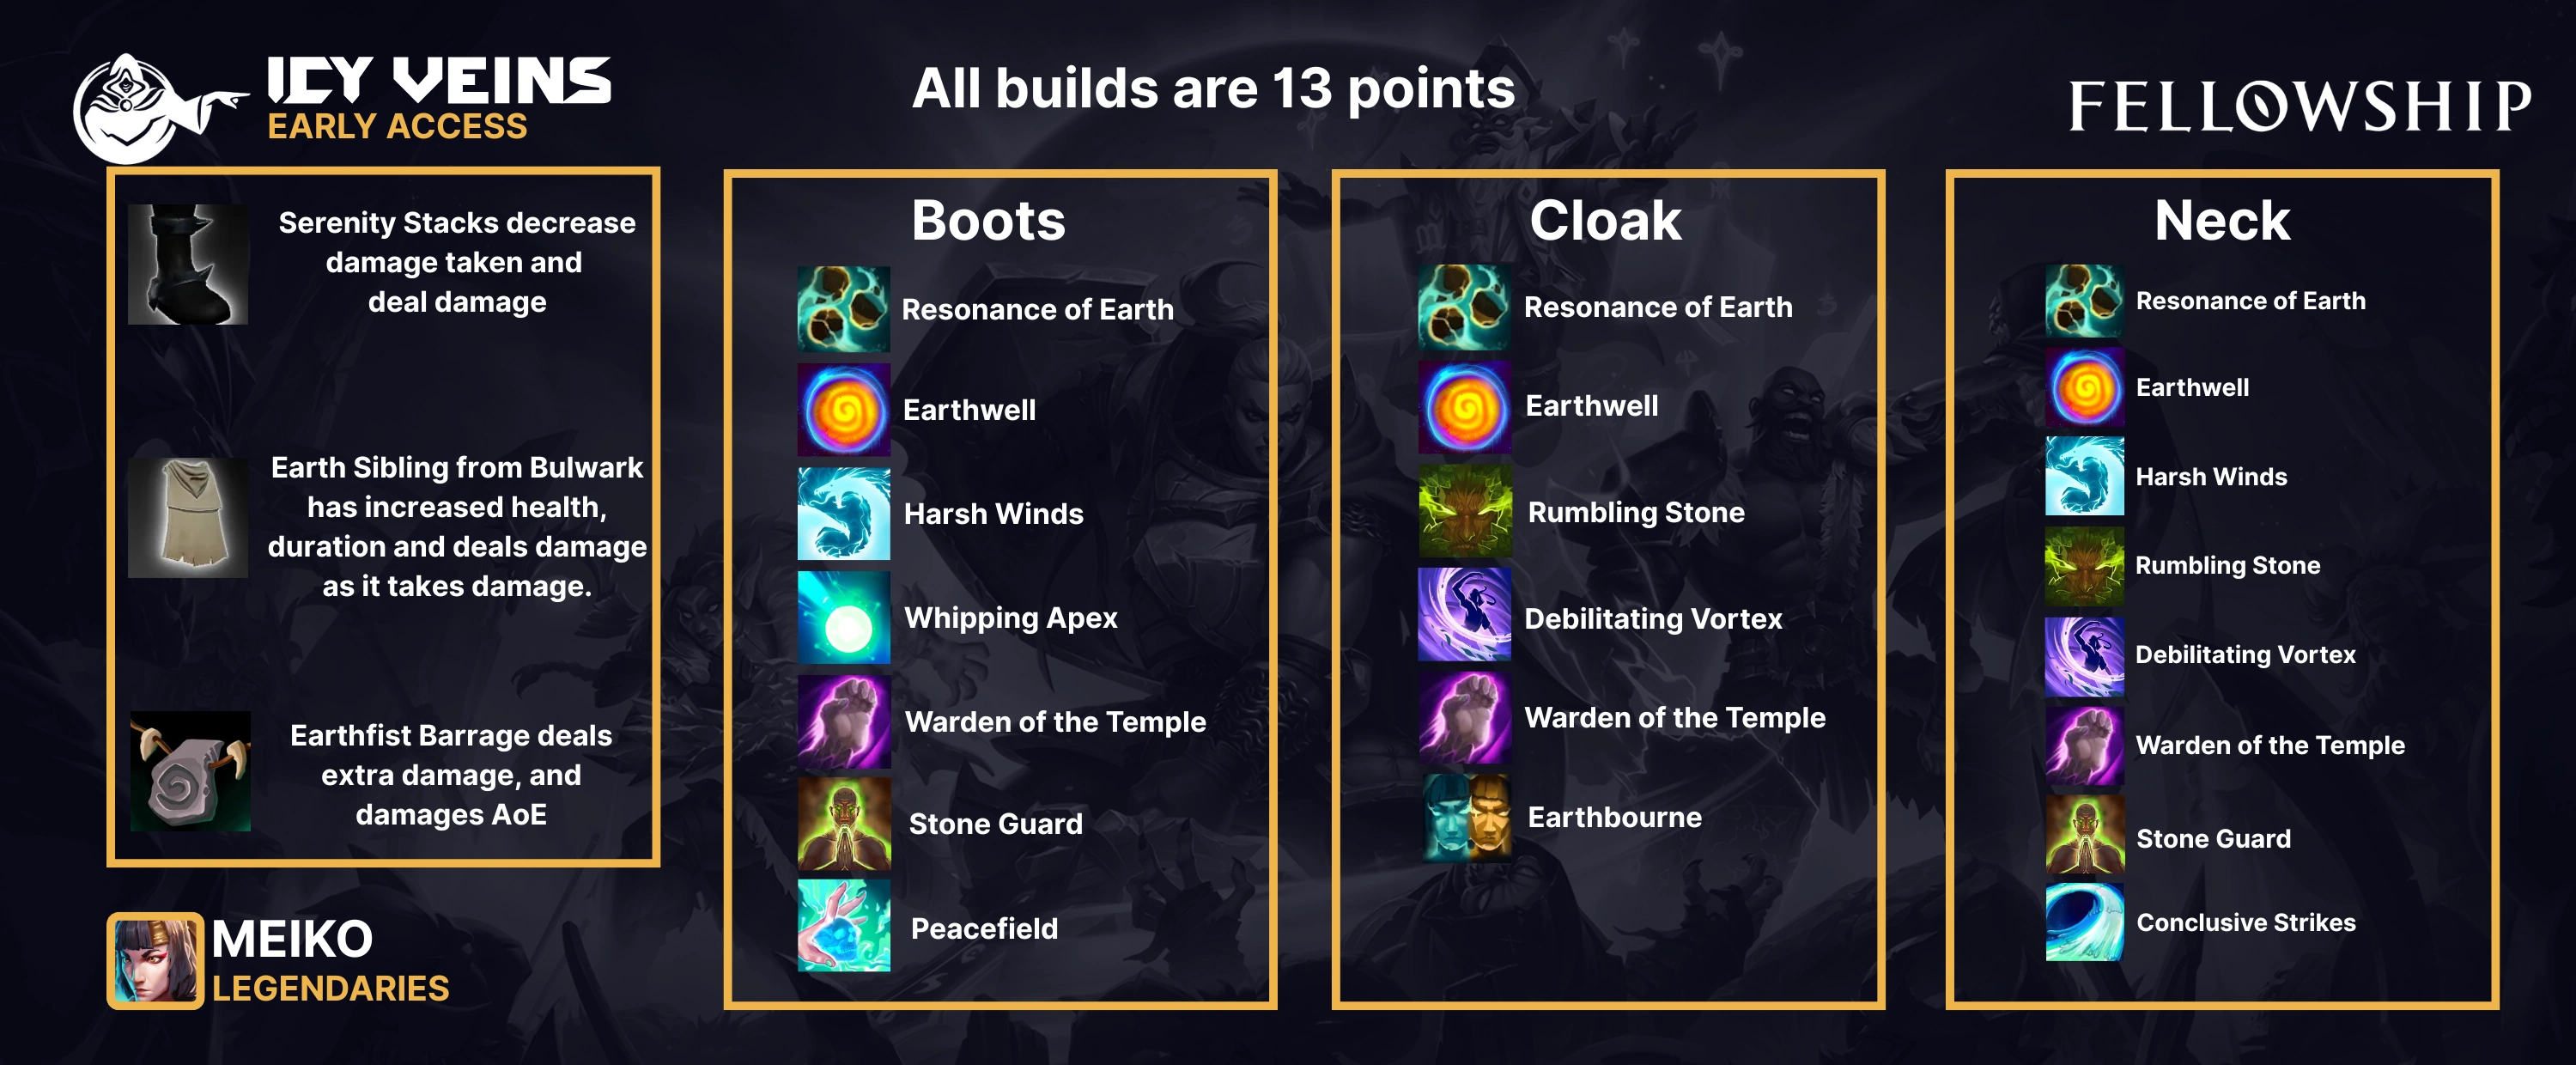
Boots of Everlasting Spirit
Serenity will give you an extra source of DR and damage. Effectively, you can use Warden of the Temple, Earthwell, and Whipping Apex to spam Serenity every 10 seconds to sustain yourself, take less damage and dish out tons, everything a tank could want and more. Run this with the recommended talent build above.
In this case you will also be better off generating stacks of serenity on a priority target using Earthen Barrage than your kick combos.
We recommend boots over the other legendaries, if possible.
Shattering Obelisk Drape
This tool-tip doesn’t seem like much at first glance, but if you run Earthbourne you can use Bulwark every ~second pull comfortably, or every pull if doing large ones.
The key will be cooldown management. You will be less tanky in-between Bulwarks compared to other builds, and should be prepared as such. Stack up your Serenity to 50 and make use of Earthwell as soon as the clone dies.
Make sure to use Stone Stomp right after to get the biggest reduction you can on Bulwark. A Fated Strike weapon is recommended to help manage your cooldowns in this build.
Use Bulwark aggressively, and on bosses to do extra damage. The build has less Stone Shield management compared to other builds, so keep that in mind and use your clone to give your other defensive cooldowns a break.
Necklace of Tectonic Impact
This is the comfy legendary build. By building entirely around Earthfist Barrage, you can spam the same two fist combos to deal damage, keep aggro and sustain yourself, all without involving any kick combos.
Maintain your Warden buffs as normal and use fist combos entirely. There is no reason to do a kick combo in this build.
Haste has the greatest effect when using this build as well.
Drop Debilitating Vortex for Guardian’s Fluidity if you’re using a Darkfrost Talon
Meiko Set Bonuses
Meiko has an interaction with PPM in that due to having a very fast GCD and off-global cooldowns such as finishing strikes can trigger PPM, she gets extra procs over the average character.
Unfortunately the set bonuses don’t help Meiko that much, but if choosing one either Torment of Bael’Aurum (4% Agility + Heal when low) or Draconic Might (Critical strikes can increase Agility by 15% for 10 seconds) are best.
Drakheim’s Absolution (20% increased agility after ultimate) increases her agility, which stacks with the increased 20% damage during her ultimate.
Dark Prophecy (Abilities have a chance to increase haste by 25% for 20 seconds) procs often, but the haste bonus doesn’t do much unless running the Necklace / Earthfist Barrage build.
As such, Meiko will prefer all 35% gem slots in the long term.
Meiko Gem Priority and Build
Be sure to look at our gems guide to get an understanding of gems in Fellowship first.
As a general guideline, here is a priority list for gem upgrades for Meiko:
- Emerald
- Sapphire
- Amethyst
- Diamond
- Ruby
- Topaz
In Early Access Season 2, Sapphire received significant buffs as well as Meiko’s Spirit Ability.
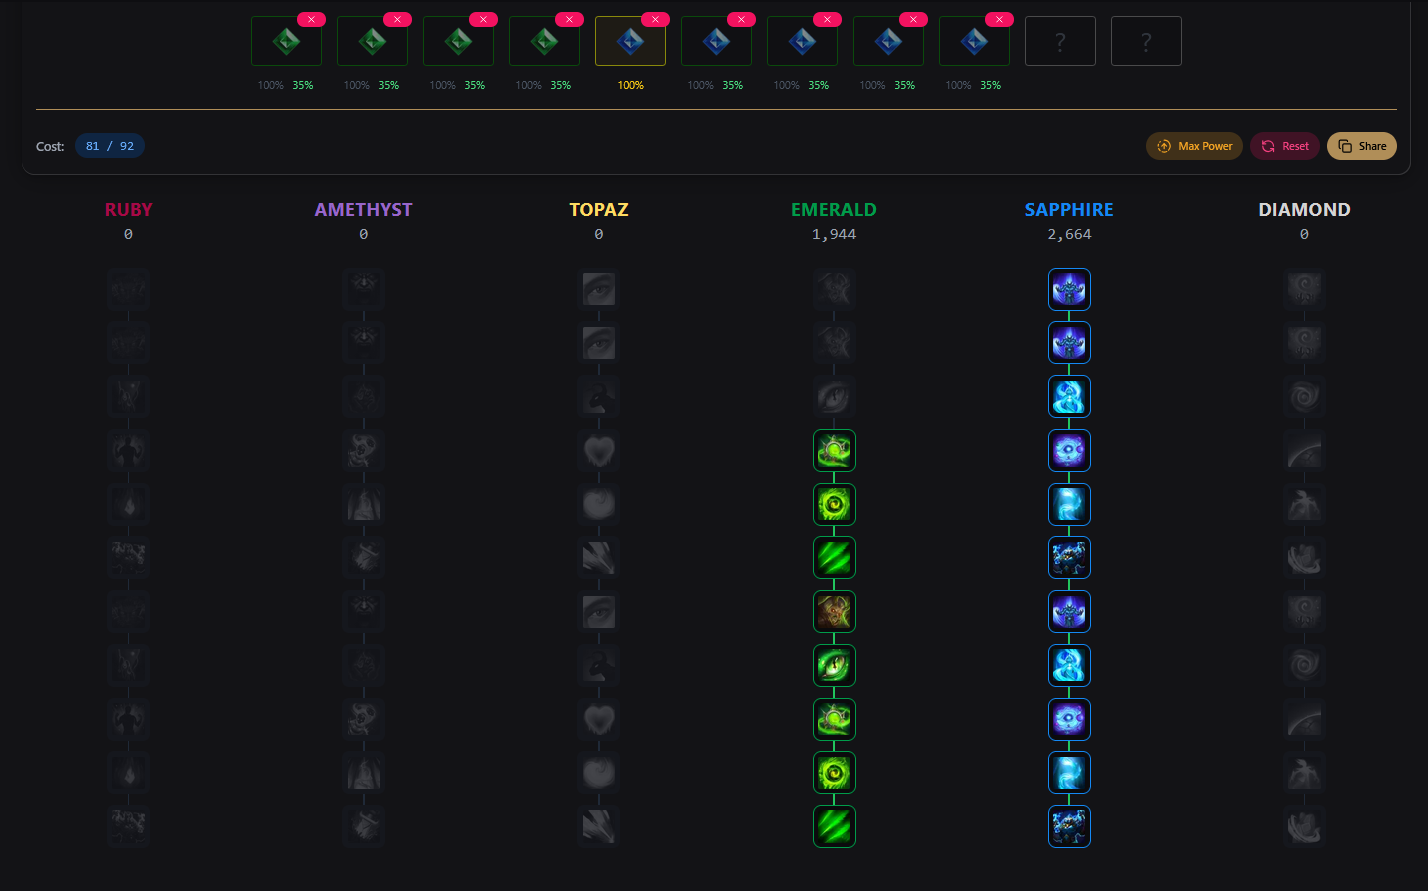
As you start stacking more gems and materials for fusion and re-rolling, you can start building towards best in slot. Assuming full 35% essence sockets + 100% essence from the legendary, you will be able to use either:
- 10 / 9
- 10 / 6 / 6
- 10 / 8 + 1x 2 Piece Set
- 10 / 6 / 3 + 1x 2 Piece Set
This is the full breakdown of gems using Fellowsguide’s Gem Tool. We recommend a full Sapphire build with the 2-slot bonus, Drakheim’s Absolution. With all 10 Sapphire bonuses, you’ll effectively be able to use her Spirit Ability every minute, making it an ability to use regularly in between the other defensive cooldowns. The extra agility from Drakheim’s won’t just be extra damage, but also extra tankiness.
8 tiers of Emerald will reach the Sentinel’s Bastion – II perk for extra shields every minute and extra substats to make Stone Shields stronger – but you can also opt to go for 10 / 6 / 3 instead.
Extra Tips for Meiko
Here is a collection of extra tips and tricks for Meiko for specific abilities and situations.
- Wind Kick and the relevant combo finishers all do their AoE around the target you hit. As such, ignore the animation and focus on the target most central in the pack.
- Finishers are off-global cooldown, and will be used ideally after every second combo. This means the best window to use other off-global cooldown abilities will be after your first combo every time, to avoid GCD clipping.
- Twin Souls: Bulwark is an extra player on the field that takes damage, meaning you can use it to spread damage out even further with group stacking mechanics, or even solo them. It can also cause some DPS / Healer only boss mechanics to target you, so be aware.
Changelog
Feb 22nd, 2026
- Updated for Season 2
Dec 11th, 2025
- Updated damage numbers after Meiko Changes
- Added new builds for specific legendaries
- Expanded Legendary details
- Added Weapon details
- Added Gem details
Oct 13th, 2025
- Updated talent tree to be more comfortable to play early game
- Added Legendary notes
- For a full list of Open Beta -> Early Access updates, please see our post documenting all changes.