Maybe you joined the raid tier a little late, or maybe your static dissolved after someone pre-pulled one too many times. Don’t worry, wherever you’re at in AAC Heavyweight Savage, we’ve got all the essentials for each fight. In this article we’ll be going over the must-knows for the seductively sinister Vamp Fatale. Here’s what you need to know to get started, and key mechanics to remember.
Unique Mechanics
Whenever a player is hit by one of the boss’ AOE abilities, she will gain a stack of Satisfied. When she hits 8 stacks, the size of some of her abilities becomes larger. Most notably this includes Vamp Stomp and Half Moon.
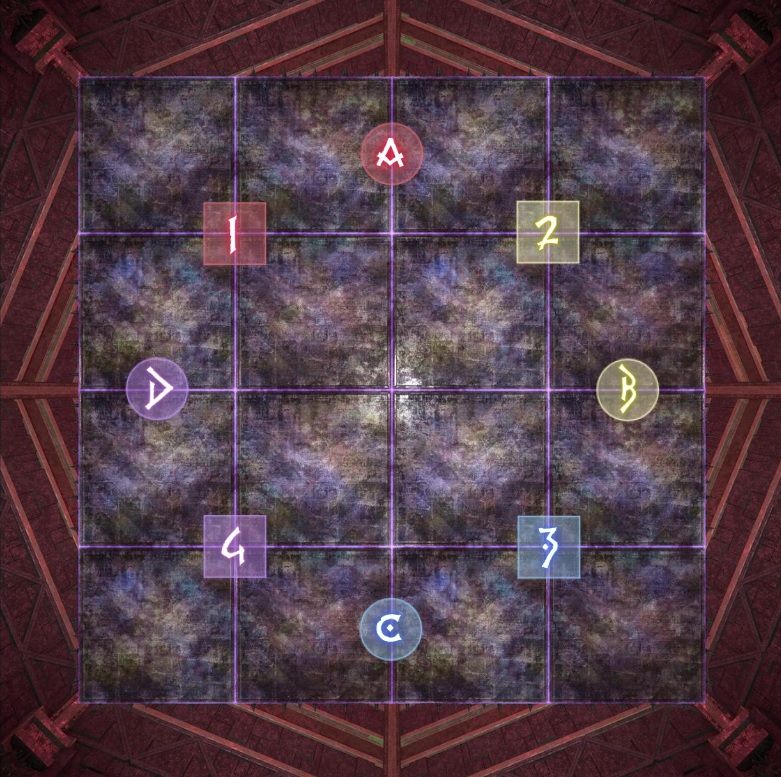
Pre-Pull
For this fight, you’ll need light parties and clock spots. Your clocks spots will be a little different than usual, with melees taking the east and west cardinals. This is to help melees deal with Vamp Stomp easier and hopefully maximize their uptime.
Waymarkers
Most Challenging Mechanics
While the fight has a whole suite of mechanics to deal with, three in particular are worth mentioning. Aetherletting, the second adds phase, and Hell in a Cell.
STATIC AETHERLETTING
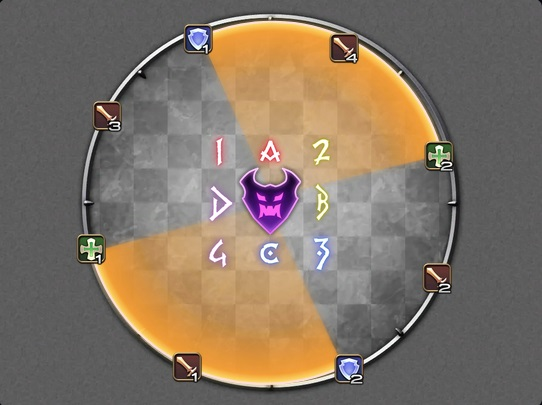
Aethterletting targets one support and one DPS with an AOE, which leaves behind an X or cross shaped mark. This marker later shoots out line AOEs once all markers are dropped. During the drops, players will also need to dodge cleaves coming from the boss. While initial groups solved this by splitting supports and DPS, Static Aetherletting makes this mechanic trivial.
Using this strategy, all players have a static spot slightly counterclockwise their normal clock spot. All players need to do is dodge the cleaves (just move back and forth between the safe zones) and go out when their marker is about to drop. Melees can keep uptime, just stay at max range so you can drop your marker safely.
ADDS PHASE
The second adds phase can also be challenging. There are three waves of adds which will consist of two flails and one deadly doornail. The flails will eventually enrage, leaving a spicy bleed that’s hard to heal through. The doornail, meanwhile, while spawn an electric field that slowly grows over time. Leave it too long and it will engulf most of the arena, making movement difficult. And if Vamp Fatale ends the phase with a doornail alive, it will deal massive damage and kill most of the party. Also, there’s a bunch of sawblades you need to dodge while dealing with all this.
If you’re a DPS, this part you will need to pay attention to. Melees should hit the doornail until the electric field grows too large. Afterwards, they should split to deal with the flails before they enrage. Ranged players will need to split their focus between the flails and the doornail, prioritizing the latter.
HELL IN A CELL
This mechanic spawns four towers that need to be soaked by one player each. Light party 1 will take the first set, using a variation of snake prio from P8S. Supports will look north then clockwise, tank takes the first tower, healer second. DPS will look northwest and counterclockwise, ranged takes the first tower, melee second. Alternatively, all players can look north and then clockwise, provided they remember the order is tank->healer->melee->ranged. Players in the towers are confined to a cell where they must kill an add before time expires.
The other players meanwhile need to deal with incoming cleaves from Vamp Fatale. Ultrasonic Spread targets one player of each role with a cleave (tanks treat this as a tankbuster), while Ultrasonic Amp will targets player with a cleave shared by 3 other players. Either one can be first To position correctly for this, look for the gaps between the towers. Whichever gap is the largest will be where the tank goes. Looking at that space, healer will take the space to the right, and DPS will take the space to the left. After the first set of towers are soaked, the mechanic repeats with light parties dealing with the opposite mechanic they started with.

For full details on the raid, be sure to read the full guide for M9S here!