This guide has been updated for Fellowship’s Season 3.
Aeona is an Intellect-based Healer who can heal her allies by using her time-manipulation powers. Her damaging abilities allow Aeona to heal her allies based on the damage she deals. Aeona’s playstyle revolves around utilizing her damaging abilities and staggered healing effects to keep her allies healthy.
This guide will teach you the basics of playing Aeona in Fellowship, how to use her abilities, and which talents to use for the best build.
Other Hero Guides
In the event you were looking for a different character guide for Fellowship, please use one of the buttons below to find what you’re looking for.
Tanks
Healers
DPS
Table of Contents
- Aeona’s Abilities
- Stagger: Aura of Deferred Fate Mechanic
- Aeona Basic Ability Guide
- Aeona’s Talents Build Progression
- Rotations
- Stat Priority
- Set Bonuses
- Aeona Gems
- Aeona Weapons
- Hero Traits
- Necklace Traits
- Blessings
- Aeona Legendaries
- Unique aura passive provides party-wide mitigation, providing higher effective hp for the party.
- Incredible damage output.
- Strong utility CC through her AoE silence.
- Stagger mechanic is tricky to understand at first with low visual clarity.
- Mana and Chrona resources require careful management.
Season 3 Changes
Aeona has been massively changed from the previous season. Her stagger mechanic has no limit last season, but it is now capped at 50% of the hero’s max HP. In addition, her Stagger cleanses are no longer a percentage of their max health; the amount cleansed is now based on Aeona’s Intellect.
Ability Changes
The biggest change is to Aeona’s Aura of Deferred Fate (Passive). The Stagger is now capped at 50% of the target’s maximum health, and the damage converted into Stagger has been reduced from 50% to 30%.
Aeona’s Amend Fate and Restore Continuity now cleanses Stagger based on Aeona’s Intellect rather than the target’s max health. They now also heal the target for 275% of the amount of Stagger that was cleansed.
Flash Revision’s healing has been buffed. Echoes of Ruin now generates 9 Chrona, giving us a reason to use the ability since last season it was mainly just a Mana sink.
Talent Changes
Like the other heroes in the roster, Aeona lost her defensive traits. She has 3 new talents to replace her defensive talents from last season:
- Edge of Ruin doesn’t provide any utility, but is another option for increasing our DPS.
- Karmic Dispersion is an additional group-wide healing option, however Oblivion and Restore Continuity are more than enough without this talent.
- Vestige of Eternity simply increases the healing we do through damage by 10%.
Some of Aeona’s talents have been adjusted, with one being reworked entirely.
- Kind Rewind was buffed, now costing only 1 talent point, and decreases the cooldown of our Temporal Barrage by 2 seconds per hit rather than 1.
- Temporal Shift now costs 1 talent point instead of 2.
- Paradoxical Twist cleave damage has been buffed, and the Stagger cleanse has been reduced.
- Continuum Shift now grants +25% damage to Entropy’s Claim, making it a good pair for Aeona’s Bands of the Withering Shores legendary.
Legendary Changes
Aeona’s legendary Boots and Necklace from last season have been shifted to the Wrist and Ring slot, respectively. Her legendary cloak now grants more Cooldown Acceleration for half a second when using Oblivion.
Aeona’s Abilities
| Ability/Icon | Name | Cast / Recast | Range / Radius | Effect |
|---|---|---|---|---|
 | Aura of Deferred Fate (Passive) | N/A | Converts 30% of damage taken into delayed damage, represented by the stagger on each allied health bar. This delayed damage is dealt over 15 seconds. Each player can only have 50% of their max HP in stagger before taking full damage. | |
 | Chronomatic Shell | N/A | Self | Reduces all damage Aeona takes by 10%. |
 | Time Shard | 2.0s | ↔ 30yd | Fling a shard of coalesced temporal energy at the target enemy, dealing 954 – 1,166 magic damage to it. Deferred Fate: Relay 100% of any damage dealt by Time Shard heals the ally with the lowest health within your Aura of Deferred Fate. Generates 5 Chrona. |
 | Echoes of Ruin | GCD | ↔ 30yd | Release splinters of ruinous energy into the target enemy and up to 2 additional enemies nearby it, dealing 270 – 330 magic damage every 2 seconds over 18 seconds. Deferred Fate: Relay 100% of any damage dealt by Echoes of Ruin heals the ally with the lowest health within your Aura of Deferred Fate. Generates 9 Chrona. |
 | Entropy’s Claim | 1.45s 20s CD | ↔ 30yd | Erode the vitality of the target enemy, causing their body to react as if their life force were slipping away, dealing 2,002 – 2,447 magic damage every 1.5 seconds over 6 seconds. Deferred Fate: Relay 100% of any damage dealt by Entropy’s Claim heals the ally with the lowest health within your Aura of Deferred Fate. |
 | Temporal Barrage | 2.0s 12s CD | ↔ 30yd | Channel for 2 seconds, launching bolts of temporal energy towards target enemy or ally. Each bolt deals 2,052 – 2,508 magic damage to an enemy or heals ally for 7,830 – 9,570 health. Can move while channeling. Deferred Fate: Relay 100% of any damage dealt by Temporal Barrage heals the ally with the lowest health within your Aura of Deferred Fate. Generates 4 Chrona per bolt. |
 | Flash Revision | 1.5s | ↔ 30yd | Borrow time to mend a single ally, healing them for 1,090 – 1,333 health. Stagger is applied to the target for 35% of the healing as temporal debt ripples through their being. Generates 5 Chrona. |
 | Restore Continuity | GCD | Self | Costs 50 Chrona. Instantly cleanse all allies of 50% of the accumulated Stagger stored in their Aura of Deferred Fate, up to 50% of the target’s max health. Converging Timelines Grants Aeona +100% Cooldown Acceleration for 0.5s at baseline. Generates Mana based on the amount of Stagger cleansed. |
 | Revert Magic | GCD | ↔ 30yd | Remove all Harmful Magic Effects from a targeted ally. |
 | Amend Fate | GCD 6.0s CD | ↔ 30yd | Costs 30 Chrona. Instantly cleanse target ally of 50% of the accumulated Stagger stored in their Aura of Deferred Fate, up to 50% of the target’s max health. Converging Timelines Grants Aeona +100% Cooldown Acceleration for 0.5s at baseline. Generates Mana based on the amount of Stagger cleansed. |
 | Oblivion | GCD | ↔ 30yd | Costs 30 Chrona. Instantly blast target enemy with a collapsing vortex of unstable chrona, dealing magic damage based on your Intellect and Expertise to them. Converging Timelines Grants Aeona +100% Cooldown Acceleration for 0.5s at baseline. Deferred Fate: Relay 100% of any damage dealt by Oblivion heals all allies within your Aura of Deferred Fate. |
 | Time Skip | Instant 15.0s CD | Self | Instantly teleport forward a short distance. Can be used during Global Cooldown and while casting or channeling. |
 | Unfolding Doom | 2.0s 45.0s CD | ↔ 30yd | Deliver a heavy strike of temporal energy to the target, dealing xmagic damage. Unfolding Doom tears at the threads of their destiny, increasing all damage you deal to them by 20% for 20 seconds. Deferred Fate: Relay 100% of any damage dealt by Unfolding Doom heals the ally with the lowest health within your Aura of Deferred Fate. Generates 20 Chrona. |
 | Fleeting Hour | Instant | Self | You step into the flow of time itself, and it quickens your touch, granting you +50% Cooldown Acceleration for 20 seconds. The cooldown of Fleeting Hour does not count down until its active duration ends. Can be used during Global Cooldown and while casting or channeling. |
 | Intercession | Instant 300s CD | Self | Instantly Silence all enemies in the target area for 7 seconds. |
 | Epoch Break | GCD SPIRIT ABILITY | Self | Invoke the strands of time to reshape a pivotal moment. Time stops for the next 6 seconds, pausing all allies’ health bars and halting your cooldowns. Any Damage and Healing dealt during Epoch Break is stored to be dealt all at once when Epoch Break expires. During Epoch Break, your abilities have no Mana or Chrona cost. Spirit Ability When you activate your Spirit Ability, you will gain Spirit of Heroism, granting you 30% Haste and 600% Mana Recovery for 20 seconds. |
Stagger: Aura of Deferred Fate Mechanic
Aura of Deferred Fate is Aeona’s unique passive that is applied to herself and all allies in her party. It converts 30% of damage taken into delayed damage, represented by the Stagger on each allied health bar. Players can only have up to 50% of their max HP before they begin taking full damage. The stagger effect is represented by the darker section with wavy lines.

This stagger damage is distributed over 15 seconds, giving us plenty of time to react, heal, and/or cleanse through the use of Amend Fate and Restore Continuity. Amend Fate is our single-target cleanse, and Restore Continuity is our party-wide cleanse. Our goal is to offset the staggered damage by using our damaging abilities with Deferred Fate: Relay and by reducing the stagger damage by cleansing it with our Amend Fate and Restore Continuity abilities.
An important thing to note about the Amend Fate and Restore Continuity spells is that you will gain back Mana based on the amount of stagger you cleanse.
Aeona Basic Ability Guide
Your primary goal as a healer is to keep you and your group alive. A core element of any caster, whether it’s a DPS or a healer, is to Always Be Casting (ABC). When you have no healing to do or are ever in doubt of what to cast next, use Echoes of Ruin or Time Shard as a filler.
Having a strong understanding of each of your abilities will allow not only your group to survive more comfortably, but also how to deal damage to eliminate threats and crush dungeon timers faster.
Damage
Aeona’s Deferred Fate: Relay on her damage abilities allows the damage she deals to convert into healing for her allies. Barring any talents taken, all of Aeona’s damaging abilities are single-target.
- Time Shard is our first main filler spell. It can generate Chrona, which is used for Aeona’s more powerful Chrona spending abilities.
- Echoes of Ruin is our second main filler spell that also generates some Chrona on use. Echoes of Ruin is also an instant cast, so it can be used while moving.
- Unfolding Doom is an ability that increases the damage we deal and generates a good amount of chroma in a single cast. Ideally, we should be using Unfolding Doom to open on a priority target.
- Temporal Barrage is a powerful cooldown that we will be looking to have a high uptime on. It can be used to damage an enemy or to target an ally. When your party is taking damage, using it against an enemy allows for party-wide healing. When a single ally is being focused on, using it on the ally will help keep them up. It’s recommended to use it on the tank during trash mob fights to offset any tank-busting damage.
- Oblivion is a damaging Chrona spender we use when there isn’t much stagger to cleanse now or in the immediate future.
- Entropy’s Claim is the DoT to use off-cooldown. It is a great way to generate Chrona, and it does a high amount of single-target damage.
- While Fleeting Hour isn’t a skill that does damage, it increases our damage dealt through the cooldown reduction it provides our other skills.
A general tip to reduce DPS/HPS loss is to minimize overcapping on our unique resource, Chrona.
Chrona
Aeona generates a unique resource called Chrona. Chrona is represented by the pink bar under the blue Mana bar.
She can generate Chrona through Time Shard, Echoes of Ruin, Entropy’s Claim, Temporal Barrage, Flash Revision, and Unfolding Doom. Chrona is used in her more powerful spells. She can spend Chrona through her Oblivion, Amend Fate, and Restore Continuity abilities.
Revert Magic
Many enemies in Fellowship can apply harmful effects to party members. The ones that we can interact with through our dispel ability, Revert Magic, are the harmful magical effects applied to party members. The best way to tell whether a party member needs a dispel is to look at your party frames. A party member affected by a harmful magical effect will have the top-left section of their health bar covered in blue. This effect will have a blue border of the same shade.

A non-magical effect is something that we cannot remove with our Revert Magic dispel. Non-magical effects will have a red border, and the party frame will not have the blue section on the top-left.

If you find yourself struggling to keep up with a large number of dispels, such as the ones in Sailor’s Abyss or Silken Hollow, consider taking an Ancient Wardstone relic with you.
Aeona’s Ultimate – Epoch Break
Epoch Break is Aeona’s ultimate ability. This ability pauses all of Aeona’s cooldowns, allows her to use Chrona abilities for no Chrona, and freezes allied health until the ability expires. When the ability expires, all the damage and healing you dealt while it was active happens all at once. The best time to use this is when your tank is doing a big pull, to offset the unavoidable damage from enemies. Another good time to use it is if you’re expecting the party to take a substantial amount of damage in the near future, or to regain some Mana Regeneration from the Spirit of Heroism buff gained after activating your spirit ability.
Mana Management
Aeona has a few tools to manage her Mana. Early on, she may run into Mana problems. Why this might happen is a multifaceted problem. Reasons can include:
- Party members aren’t taking enough damage, resulting in not having much Stagger to cleanse for mana returns from Amend Fate and Restore Continuity.
- She doesn’t have access to the Chrona Tap talent until the second talent row is unlocked.
- Spamming Echoes of Ruin is costly.
Things that will help with managing Mana include the aforementioned Chrona Tap talent. It grants 1.5% max Mana back for each cast of a Chrona spending ability.
While Spirit procs can be nice for refunding Mana costs and granting some extra Chrona, it’s not a reliable way to manage your Mana.
Aeona’s Talent Build Progression
| Talent Icon | Talent Name | Description |
|---|---|---|
 | Entropic Burst | When your Entropy’s Claim expires, it erupts, applying Entropic Burst on all enemies near the target, dealing 246% Intellect magic damage over 9 seconds to them. Damage is reduced beyond 5 targets. |
| Erasure | Each time your Oblivion deals damage, it deals an additional 25% damage over 12 seconds, accumulatively. The damage dealt heals all allies affected by Aura of Deferred Fate. |
 | Uchronia | Each time you spend Chrona, you are granted 1 stack of Uchronia. Once you have 3 stacks of Uchronia your next Oblivion, Amend Fate, or Restore Continuity is Free. |
 | Chrona Tap | Each time you use Chrona you gain 1 stack of Chrona Tap for 9 seconds. Chrona Tap replenishes 1.5% of your Maximum Mana per stack when it expires. The duration is not refreshed when stacks are added. |
| Quickening | Your Time Shard has a 20% chance to grant you Quickening, causing your next Flash Revision to be Free, Instant Cast, and does not apply Stagger. |
| Kind Rewind | Your Time Shard reduces the cooldown of Temporal Barrage by 2 seconds when cast toward an enemy with Echoes of Ruin active. |
| Hastening Doom | While Unfolding Doom is active on an enemy, your Haste is increased by +20%. |
 | Synchonicity | When you are above 50% Chrona you deal 15% more damage with your abilities that do not spend Chrona. When you are below 50% Chrona you generate 25% more Chrona. |
| Echoes of Ruin | Your Fleeting Hour causes all enemies with Echoes of Ruin to languish in ruin, instantly taking damage equal to a full duration of Echoes of Ruin. |
| Temporal Shift | While channeling Temporal Barrage, each tick grants a benefit to Fleeting Hour. While Fleeting Hour is active, its duration is extended by 0.3 seconds. While Fleeting Hour is on cooldown, its cooldown is reduced by 0.3 seconds. |
 | Resonant Fate | When your Deferred Fate: Relay overheals, you are granted Resonant Fate. The overhealinig is stored in Resonant Fate up to a maximum of 3660% Intellect. (max value shown as 100 stacks). Your next Flash Revision on an ally with less than 50% health consumes Resonant Fate, instantly healing them for an additional amount equal to the stored overhealing. Resonant Fate cannot gain stacks for 20 seconds after it has been consumed. |
| Paradoxical Twist | While Fleeting Hour is active on you, Temporal Barrage is empowered. When targeting an enemy, Temporal Barrage deals 35% more damage to your primary target and causes additional bolts to hit up to 2 enemies near the target for 30% of the power. When targeting an ally, each bolt of Temporal Barrage cleanses the target of Stagger equal to 2% of their maximum health. |
 | Oblivion’s Embrace | Any overhealing done by Oblivion on a player applies a shield on that player absorbing 50% of the overhealing amount, stacking up to 30% of the targets maximum health. Oblivion’s Embrace lasts for 8 seconds. Oblivion critical strikes deal 20% more damage. |
 | Continuum Shift | Your Entropy’s Claim deals 25% more damage. When you cast Unfolding Doom, Your next Time Shard, Echoes of Ruin, or Entropy’s Claim is enhanced. –Time Shard’s cast time is doubled and deals 900% more damage, and generates 900% increased Chrona. –Echoes of Ruin applies to up to 20 targets. –Entropy’s Claim Stuns the target while it is active. |
 | Karmic Dispersion | Your Entropy’s Claim now has Deferred Fate: Mass Relay, causing it to heal up to 4 allies for 50% of any damage it deals. |
| Echoes of Divinity | Each time your Amend Fate or Restore Continuity cleanses Stagger from an ally, they are granted Echoes of Divinity. Echoes of Divinity clears additional Stagger equal to 5% of the target’s max health over 5 seconds. |
 | Vestige of Eternity | The Healing caused by your Deferred Fate: Relay and Deferred Fate: Mass Relay is increased by 10%. |
It is important to note that the talents you take on Aeona will depend entirely on the kind of content you are currently progressing through. Sometimes you will not need as much healing and can focus on dealing some more damage. Other times, you will need more passive damage mitigation to survive otherwise deadly attacks. The recommended talent progression below focuses on maximizing your ability to restore Mana, healing, and damage output. Remember not to take talent trees as is and adjust for any legendary or weapon trees you get, or content you are doing.
However, there are a few exceptions. Aeona has some core talents that are always recommended to use. Her core talents include Uchronia, Chrona Tap, and Synchonicity. These core talents are important for Aeona since they support our Mana and Chrona Management, and Aeona can struggle without them.
Quick Reference Talent Table
As you are leveling up, you can refer to this quick reference table. The 14 talent point build in this table will change when you enter and begin to push Eternal.
This guide will refer to talents by name and the row (1-6) and column (A-C) they are located in.
| Talent Points Total | Talent Tree (Row + Column) |
| 2 Points | 1C |
| 3 Points | 1C, 2C |
| 4 Points | 1C, 3A |
| 5 Points | 1C, 2C, 3A |
| 6 Points | 1C, 2C, 3A, 4B |
| 7 Points | 1C, 2C, 3A, 4A, 4B |
| 8 Points | 1C, 2C, 3A, 4A, 4B, 6B |
| 9 Points | 1C, 2C, 3A, 4B, 5A |
| 10 Points | 1C, 2C, 3A, 4A, 4B, 5A |
| 11 Points | 1C, 2A, 2C, 3A, 4A, 4B, 5A |
| 12 Points | 1C, 2A, 2C, 3A, 4A, 4B, 5A, 6B |
| 13 Points | 1C, 2A, 2C, 3A, 4A, 4B, 5A, 5B |
| 14 Points | 1C, 2A, 2C, 3A, 4A, 4B, 5A, 5B, 6B |
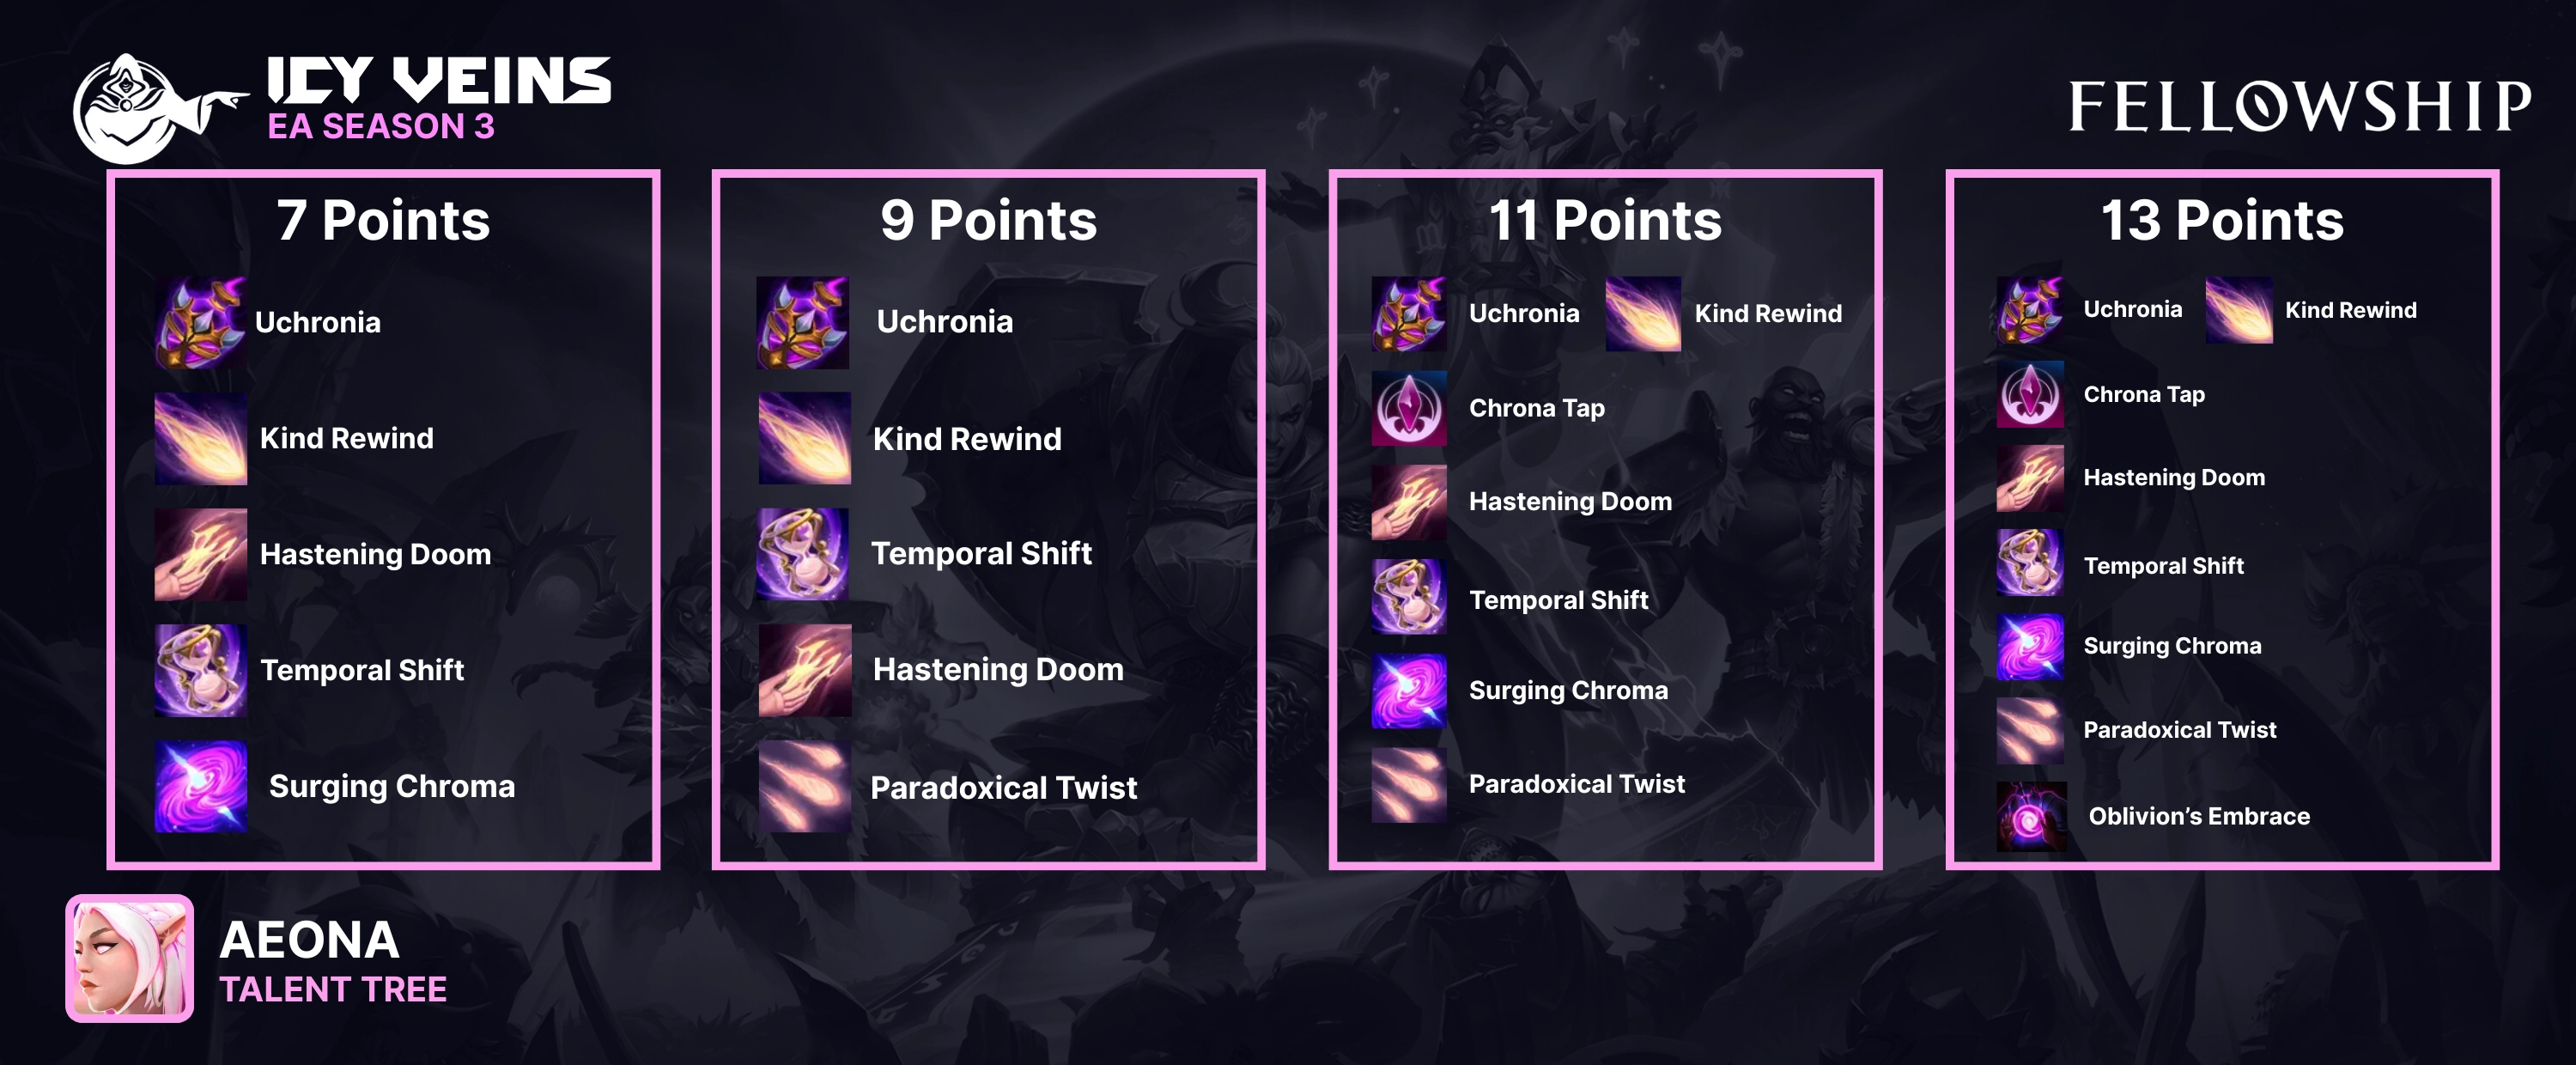
With this leveling build, we are looking to maximize our damage output.
- Uchronia – This talent is a great addition since it gives us a free cast of any Chrona spending ability. It feels very good to use the free cast on Restore Continuity, since it normally costs 50 Chrona. This is a core talent for all Aeona builds.
- Hastening Doom – This increases our Haste while Unfolding Doom is active. This will allow us to channel Temporal Barrage for less time and increase the tick rate of our DoTs. This is a core talent for all Aeona builds.
- Temporal Shift – A powerful talent to combine with Paradoxial Twist, allowing us to maintain our Fleeting Hour buff for longer and reduce the cooldown of the ability when it’s not active.
- Surging Chrona – A decent 1-point filler talent for increasing our DPS potential. It’s easy to overcap on Chrona using this talent.
- Paradoxial Twist – Powerful on its own, but shines best when used in conjunction with Temporal Shift. When targeting an enemy with Temporal Barrage, the bolts that split off will also interact with the Temporal Shift talent.
- Oblivion’s Embrace – This gives the party higher effective HP through the overshields produced by Oblivion as well as increased Critical Strike damage on the ability. Good for dealing and preventing damage.
Rotations
Since Aeona heals through the damage she deals, there is an optimal rotation to maximize our DPS output. Her rotation cycles between generating and spending her Chrona resource. Keep in mind that while there is an optimal rotation for DPS, Aeona is a healer first and will need to be flexible with her rotations in order to keep the group healthy.
Generating Chrona
When generating Chrona, we want to use our 3 main generators: Unfolding Doom, Entropy’s Claim, and Temporal Barrage. Fleeting Hour reduces the cooldown of these abilities, allowing us to have a higher uptime on our powerful generating abilities.
When needing to use a Filler spell, use either Time Shard or Echoes of Ruin. Time Shard does almost 1/4th the amount of damage that Echoes of Ruin does to a single target in one cast, but costs less mana and is able to generate a small amount of Chrona. Echoes of Ruin can be costly to spam, but can provide a decent amount of passive healing and a fair amount of Chrona.
DPS Rotation
The rotation will start with our Chrona generators, using fillers when below 90 Chrona. We want to begin spending around 90 Chrona to easily get a Uchronia proc. Until we get our ideal gear, we won’t be able to rotate through only our main abilities, so we will need to utilize Filler spells to fill the gap.
Here is an example of our DPS rotation:
- Unfolding Doom
- Entropy’s Claim
- Fleeting Hour
- Temporal Barrage
- If Chrona <90, use a Filler spell
- If Chrona >90, Oblivion x3
Following step 6, you will have a free cast of a Chrona ability with the Uchronia talent. If you expect to need a group-wide cleanse in the next 5 seconds or so, save your Uchronia proc for use on Restore Continuity. Otherwise, use Amend Fate to cleanse someone with heavy stagger or Oblivion if no one is heavily staggered.
Ideally, we want to be using Entrophy’s Claim and Temporal Barrage off cooldown. If we are pooling our resources to make full use of Unfolding Doom’s damage buff, we should look to use Unfolding Doom while we are at or below 80 Chrona to avoid overcapping.
Single Target Healing
When needing to heal a single target, such as your tank, you will be utilizing a handful of skills that directly target them: Flash Revision, Temporal Barrage, and Amend Fate.
Flash Revision is a single-target heal that increases the target’s current health and their Stagger bar, up to 100% max health. If things are going awry, you can easily keep the target alive by spamming Flash Revision and following up with a cleanse through Amend Fate. Another good option to keep your ally alive is to target them with Temporal Barrage. Once you get Paradoxical Twist, you will be looking to use your Temporal Barrage against enemies as much as possible, but sometimes targeting an ally cannot be avoided in order to keep them alive.
Stat Priority
Secondary stats have the following effect for Aeona:
- Haste – Increases your casting speed, the tick rate of your damage-over-time (DoT), reduces the channeling time of your Temporal Barrage, and reduces your global cooldown (GCD).
- Spirit – Increases the chance to trigger a “Spirit Refund” whenever you use an ability that costs Mana, causing you to instantly refund the Mana cost of that ability. Each time you trigger the “Spirit Refund” you gain 1 Spirit Point toward your Spirit Ability charge and generate 30 Chrona.
- Critical Strike – Chance for damage and healing effects to crit, doubling their effect.
- Expertise – Increases your damage, healing, and the effectiveness of your absorbs.
Intellect is by far your highest priority stat as it increases your base healing and damage, which means that item level will be your highest priority. The extra Stamina from higher item level pieces also greatly increases your survivability.
The secondary stats that we prioritize may change depending on the legendary that we have equipped.
It’s worth noting that secondary stats on gear have diminishing returns. Keeping this in mind, we should look to spread our secondary stats out.
Highlighted below is how you should generally prioritize your secondary stats:
Haste > Critical Strike > Expertise > Spirit
Haste is Aeona’s best secondary stat. The tick rate of her DoTs increases as her Haste increases.
Critical Strike doubles the effectiveness of our Healing and Damaging effects, including any shields she provides. The chance of mitigating 50% of the incoming damage to the shield is equal to the amount of Critical Strike you have.
Expertise increases your Healing and Damage output by a flat amount. This stat is ranked lower on our secondary stat priority since it has a lower impact.
Spirit is our last choice for our secondary stats as it has the least impact on our healing throughput. However, due to the Diminishing Returns, we will still want to allocate some of our stats from gear into Spirit.
Gearing Priority
- Necklace Traits
- Weapon Traits
- Legendary Item
- Substat Priority
- Gems
- Completed Set Bonus
Substat Priority
- Haste
- Critical Strike
- Expertise
- Spirit
Set Bonues
Set bonuses on gear can be huge boosts to our power, but time consuming to accomplish. It’s generally a good idea to hold off on farming for a specific set until you hit Paragon or if you’re feeling stuck at any particular capstone.
You can equip up to 4 set bonuses total: 2 sets from any non-capstone dungeon and 2 sets from any capstone dungeon. Keep in mind that gear pieces cannot have both a set bonus and a socket.
Below are the different set bonuses that are worth the time to farm for.
| Set Bonus | Dungeon(s) | Reasoning |
|---|---|---|
| Seal of the Heskyr | – Scryer’s Peak – Ruins of Regath – Xul, the Blood Molnolith | BiS for every hero this season, this increases our overall gem power and enables us to activate more gem bonuses. |
| Torment of Bael’Aurum | – Wraithtide Vault | It combines increasing our damage and healing through increasing our Intellect and survivability with the emergency heal when we reach a low threshold. |
| Dark Prophecy | – Heart of Tuzari | When this procs, it greatly increases our Haste. The Haste gained by this is not affected by diminishing returns. |
| Sin Warding | – Empyrean Sands, – Sailor’s Abyss | Increases our max HP, allowing us to survive more damage, as well as increasing our base healing & damage through the Expertise increase. The extra Expertise gained from set bonuses and gems is not affected by diminishing returns. |
You can learn more about set bonuses here.
Gems
Gems are powerful augments to socketed gear that grants you additional effects when you reach the threshold of each tier.
A breakdown of each Gem:
- Topaz gems grant Haste, which significantly impacts our damage output.
- Emerald increases Expertise which is a flat healing increase, and provides CDR to all abilities, including our weapon ability.
- Amethyst increases Critical Strike which increases the impact of our damage and our healing.
- Rubies increase Aeona’s primary stat, Intellect.
- Diamonds increase all secondary stats but at a much lower rate than specific gems.
- Sapphires increases the benefits of your Epoch Break spirit ability and grants passive stats.
Early on, we will want to equip any gems we have. Our priority is Topaz > Amethyst > Ruby > Emerald > Diamonds > Sapphire.
The priority shifts once you’re able to gain more gem power. Emerald is a great gem to prioritize since we benefit greatly from the reduced cooldowns it grants us at 450 and 1500 Emerald gem power. It may be a good idea to run Ruby, Topaz, and Amethyst as well, to increase your Intellect, Haste, and Critical Strike stats.
As you progress, the other gems you’ll want to invest in will be different depending on what build you are running.
Weapons
In this section, we will discuss the best option for this build and go over all the other options available.
The primary weapon that most Aeona players use is Elheryn’s Guiding Sandglass, also known as Twilight Skybolt.
- Twilight Skybolt is our BiS weapon ability since it’s an instant cast ability that allows you to get back to casting your rotation sooner. Additionally, all weapon abilities are off GCD, which means that you can use this while your abilities are on GCD. This weapon provides amazing single-target damage and is great for spot healing when needed.
- Zeraleth’s Scythe is decent for dealing large single-target damage while also providing healing to yourself, and any overhealing on yourself heals your party instead. The 3.0-second channel time is the main downside.
- Nature’s Fury is a great choice if you need to have a big burst heal your party. It also bounces to 4 enemies within range to deal damage. A great option for group healing and damage, but less valuable than Twilight Skybolt is.
- Repository of Frozen Light is capable of a significant amount of healing, especially in encounters where there are frequent, small ticks of damage being dealt to the party. The drawback is that there is no offensive aspect to this weapon, and its cast time takes away from your main rotation.
Hero Traits
Formerly Weapon Traits, Hero Traits are tied to any piece of gear that drops, as well as any weapon of Epic or higher rarity. There are 3 categories of Hero Traits: Major, Defensive, and Heroic. You can choose 2 Defensive, 2 Heroic, and 1 Major trait per weapon.
Defensive Traits
The Defensive Traits that we want to take will either increase our overall health pool and decrease damage taken. The best Defensive Traits include King of the Hill and Heart of Stone.
| Icon | Name | Description |
|---|---|---|
 | King of the Hill | This trait reduces all damage taken and will be active as long as you stay above 80% health. A strong choice since it’s a passive trait. |
 | Heart of Stone | Synergises with King of the Hill and gives us more health to survive more/bigger hits from enemies. |
Heroic Traits
Heroic Traits are weapon traits that increase your secondary stats and/or your primary stat. The Heroic Traits we want to take increase our primary stat or the secondary stats that we wish to prioritize. The best Heroic Traits to take include Hunter’s Focus and Vengeful Soul.
| Icon | Name | Description |
|---|---|---|
 | Hunter’s Focus | This is our #1 focus for any trait. Haste is incredibly important for Aeona, and we tend to focus on one target at a time in order to get value from Unfolding Doom. Try to stack as many as you can. |
 | Vengeful Soul | This trait has a chance to increase our primary stat, Intellect, when we hit a critical. It has 2.0 PPM and emergency self-healing built in. |
Major Traits
Major traits augment your weapon by enhancing its effects. The best Major Traits we can take depend on which weapon you use. We typically want the option between one cooldown-reduction-focused trait and one that focuses on healing and damage output.
If you choose to use Twilight Skybolt, the BiS Master Traits are Heroic Brand and Martial Initiative, with an honorable mention to Emerald Judgement.
| Icon | Name | Description |
|---|---|---|
 | Martial Initiative | Due to Twilight Skybolt having 2 charges and a low cooldown, this trait is a great option to take. Try to pair this with Visions of Grandeur to increase uptime. |
 | Visions of Grandeur | This trait gains increased Spirit generation on hit and resets the cooldown of our weapon ability upon the use of our Spirit Ability. It’s amazing on its own, but even better when paired with Martial Initiative. |
 | Emerald Judgement | A great option to add more damage without needing to activate your weapon ability. The knock-up this can inflict on enemies may interrupt them, but the results can be mixed. |
Necklace Traits
New to season 3 are Necklace traits. These are unlocked once you obtain a necklace that is Epic rarity or higher. To view and choose your necklace traits, visit the Shrine of Infusion.
The best Necklace traits give us a second chance at life when things go south.
- The Boar is our first pick for preventing getting killed by a single instance of big damage.
- The Mountain is another trait in the same vein as The Boar.
- The Stag looks to be a great option when paired with the Signet of the Chrono Trigger legendary. This legendary helps with the uptime of Unfolding Doom, which, in turn, increases the uptime of The Stag.
- The River seems to be a great pairing with The Stag since it will help with Unfolding Doom’s uptime as well as passively reducing the cooldown of our dispell by 1 second. Extremely useful in dungeons with many dispels.
Blessings
Blessings are new to Fellowship as of Season 3. They further augment your gear the same way that gems and traits do. Much like with Gems, the ideal Blessings will depend on the build you are working with. The meta for what are the best Blessings for Aeona will emerge as the Season progresses.
Below are some general Blessings to consider focusing on, listed in order of priority:
- The Trickster – increases your Critical Strike chance after pressing any of your Power abilities, which include Oblivion, Amend Fate, and Restore Continuity.
- The Monarch – provides Cooldown Acceleration to our Unfolding Doom and Fleeting Hour abilities and scales off of our Haste.
- The Wayfarer – any bonus Haste is welcome as the tick-rate of our DoTs increases with Haste. This Haste also affects The Monarch, making it a great option in tandem. This is only ranked lower since the uptime of The Wayfarer is lower than The Trickster.
Apart from the Trickster, which seems to be core for any Aeona build, other builds will prioritize different blessings.
Aeona Legendaries
Bands of the Withering Shores (Wrist)
- Mass Entropy
- Your Entropy’s Claim now has 2 charges and its duration its increased by 2 seconds.
Signet of the Chrono Trigger (Ring)
- Chrono Trigger
- Your Unfolding Doom cooldown is reduced to 30 seconds, but its duration is also reduced to 15 seconds.
While Unfolding Doom is active, Time Shard has +100% critical strike chance and your Echoes of Ruin and Entropy’s Claim have +20% increased tick rate.
- Your Unfolding Doom cooldown is reduced to 30 seconds, but its duration is also reduced to 15 seconds.
Time-warped Drape of the Lone Diety (Back)
- Lonesome Song
- When casting Oblivion, your Converging Timelines now grants +200% Cooldown Acceleration for 0.5 seconds.
Changelog
Feb 22
- Created Guide
June 25
- Updated Guide for Season 3