Fellowship is a multiplayer online dungeon adventure (MODA) that focuses on cooperative, endgame-style dungeon crawling. Rather than a long single-player campaign or open world, the game is built around repeatedly tackling scalable dungeons with a team, gathering loot, facing bosses, and improving gear.
It combines design elements of MMOs and MOBA / hero-based games, with a fixed hero roster rather than full character creation.
This Fellowship Beginner Guide will introduce you to all the unique mechanics and core systems that Fellowship has.
Table of Contents
- What is the Premise?
- Dungeons, Leagues and Curses
- Heroes, Roles and Abilities
- Gearing & Hero Progression
- Stats, Substats and Diminishing Returns
- Currencies and Vendors
- Farming Currencies and Materials
- Combat Controls and Quality of Life
- Interrupting Casts and Crowd Control
- Beginner Tips
What is the Premise?
Fellowship, players select from a roster of pre-designed heroes (each belonging to one of three roles of the holy trinity: Tank, Healer, and DPS) and enter dungeons in teams of four. The world and lore are built around a fantasy setting where cooperation and execution matter more than isolated power.
As you progress, dungeons scale in difficulty, introduce extra modifiers, and new enemy abilities. The aim is not just to beat dungeons, but to optimize runs, improve gear, and climb leaderboards.
Dungeons, Leagues and Curses
Dungeon Basics
Dungeons are the main content within Fellowship. In dungeons, you will have to fight through enemy mobs with your party to get to a kill score of 100% and then defeat the boss at the end to complete it and get rewards at the end.
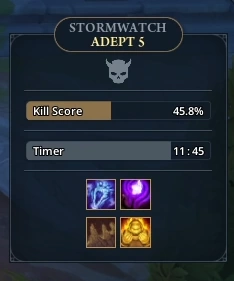
After a certain difficulty, each dungeon has a time limit allocated and the objective is to beat it before the time runs out. This is called timing a dungeon run. Even if you don’t time a dungeon, you still get rewards at the end. If you run too far into overtime, your rewards are reduced but it’s still worth completing.
Dungeons are timed and contain more enemies than needed for a 100% kill score and multiple branching pathways. Planning efficient routes through them is key to success.
Death in Fellowship has no penalty other than time loss. Within dungeons are various Campfires which act as respawn points, and can help mitigate time lost when dying.
Dungeon Types and Difficulties
The game features one-boss dungeons roughly 12-minutes long sometimes referred to as Adventures. These dungeons increase in difficulty from +1 to +3 within each league, increasing the power of the enemies and adding new enemy abilities and dungeon curses, but granting stronger loot.
As you progress through the game, you’ll be placed into 3-boss Capstone Dungeons. These dungeons are longer and more difficult, taking about 28-32 minutes to complete. They’re unlocked at +7 of each league. These have unique bosses, mechanics, and loot and offer a challenge that when beaten unlocks rewards and access to the next Challenger League.
Capstone Dungeons‘ rewards are considered one league higher when timed, so a Contender +4 dungeon can drop Epic gear, compared to only Uncommon and Rare.
Finally, there are end-game dungeons called Pinnacle Dungeons. These dungeons have three difficulties, and are designed to challenge players and gives gold, materials, and unique gear upgrading items.
Pinnacle Dungeons also have an additional weekly completion reward as an extra incentive to complete them each week.
Fellowship Gamemodes
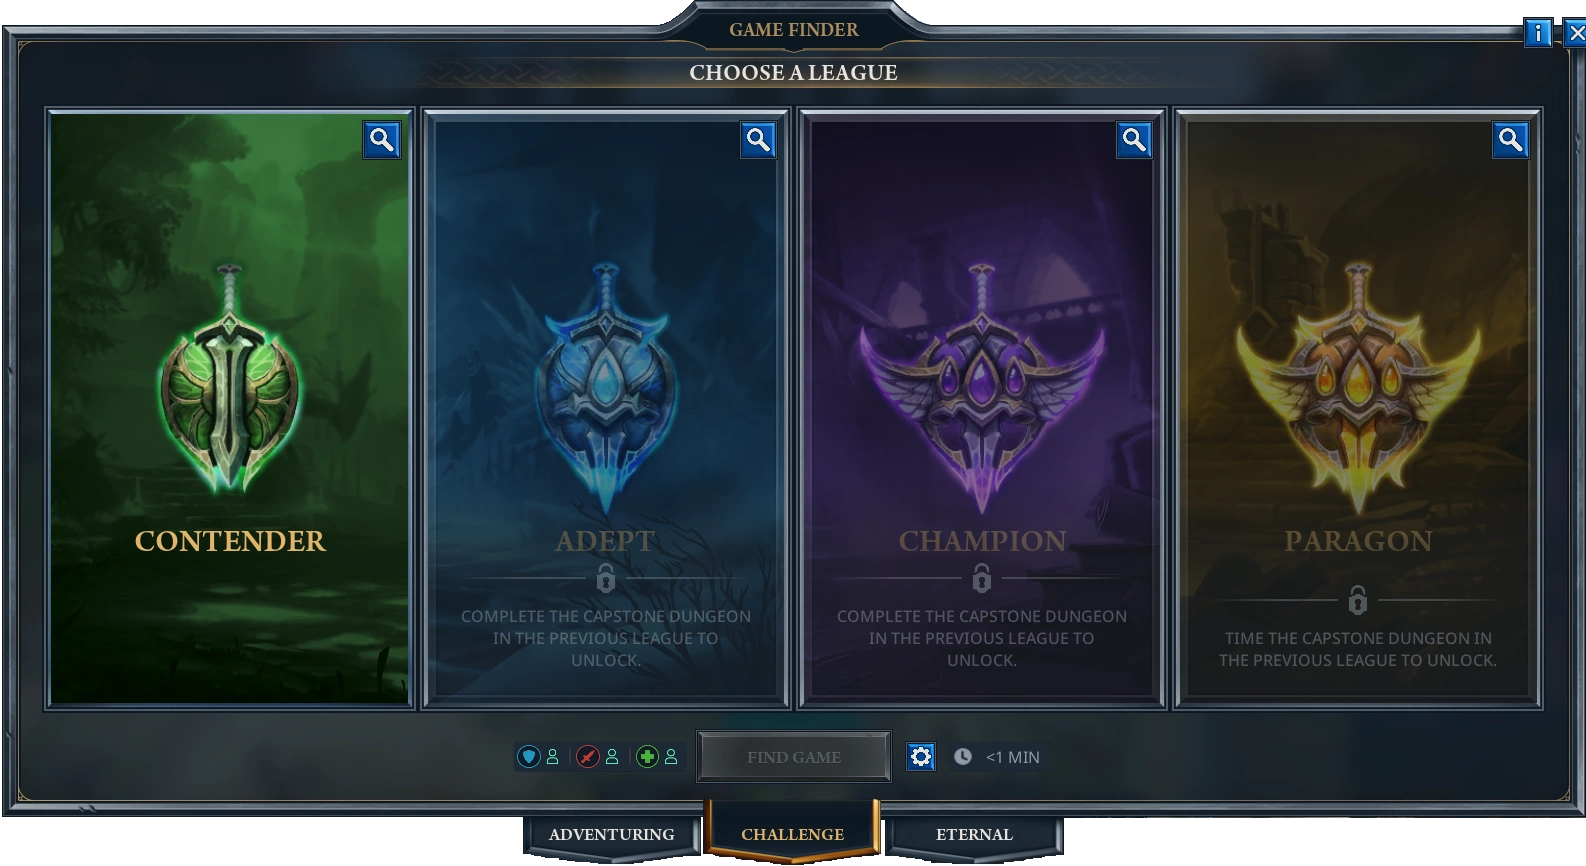
There are three main gameplay modes for Fellowship, Adventure, Challenger Leagues, Eternal
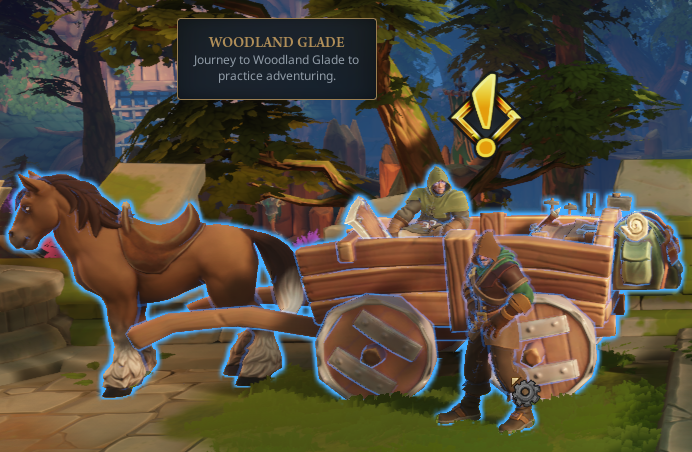
Adventure
Adventure is a mini-questing zone, set in the Woodland Glade. Here you can do small quests and boss events which give you Gold and Supplies, as well as a way to progress the Starmap, which unlocks new abilities and talent points for the hero you are playing. You can join each instance at any time solo, and will party with up to three others.
This is great for casual play, learning new heroes and roles, or playing with friends at different points of progression. You can also queue into dungeons while in Adventure mode.
Challenger Mode
Challenger is the game’s prominent system. Here you’ll start getting gear drops and progress your hero into higher level difficulties.
Instead of just cranking up the numbers, higher leagues unlock new abilities for mobs and bosses, and new dungeon curses that change the way you’ll play each of the dungeons. The difficulty sharply increases later in the game, and while it remains possible for experienced players and teams, more casual players can push their item level and gear progression safely to help overcome challenges.
Each Challenger League has difficulties +1 to +4, with +4 being reserved for the capstone dungeon.
The Leagues in Challenger mode are as follows:
- Contender
- Adept
- Champion
- Paragon
Eternal Mode
After defeating the capstone dungeon in Paragon, you unlock Eternal mode. This mode features capped rewards but uncapped, infinitely scaling difficulty, intended for limitless leaderboard climbing and achievement.
Each level of Eternal difficulty features a selection of 3 1-boss adventures with dungeon curses and rotates through 3-boss capstone dungeons. Completing an adventure will unlock the next difficulty and a capstone dungeon unlocks the next two difficulties.
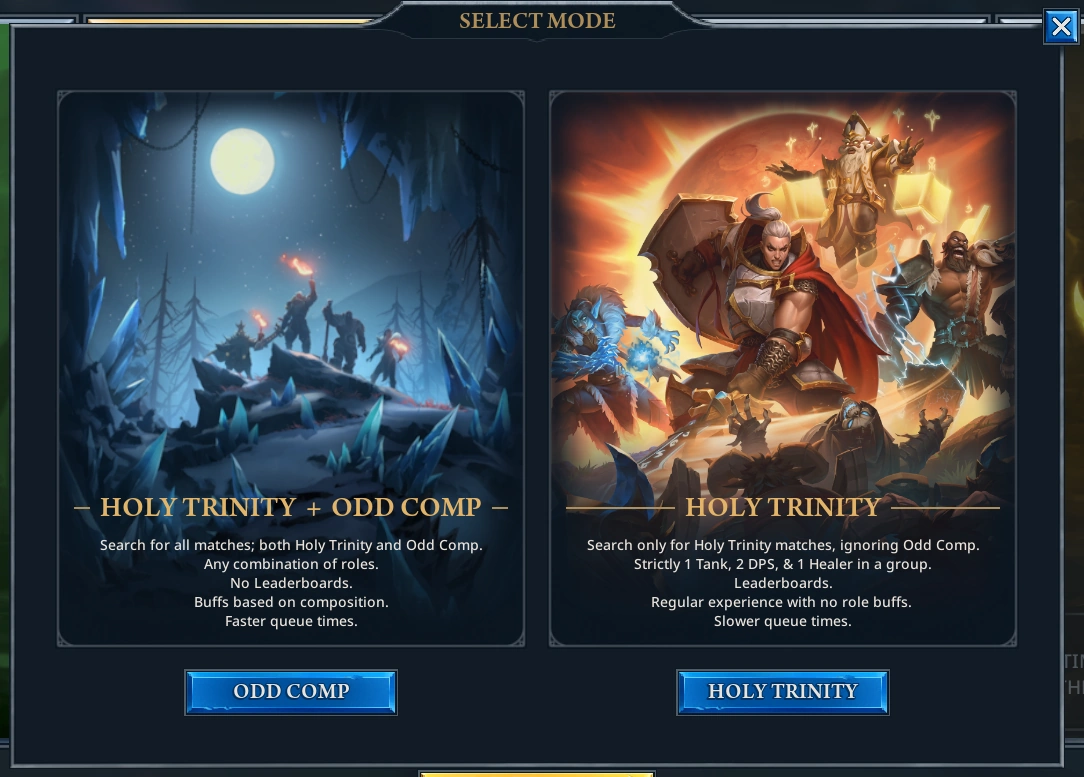
Odd-Comp Mode
Introduced in Early Access Season 3, Odd Comp is a search that works for Challenge and Eternal dungeons up to Eternal +20. It allows you to play with any composition of Tanks, Healers, and DPS, and speeds up queue times. To compensate for the lack of any roles, the group is given a buff to assist.
For example, group of 4 DPS gives all players lifesteal and damage resistance so they can survive without tanks, as well as make the enemies have more health so they don’t die immediately. Or, a group of 1 Tank and 3 Healers makes enemies deal more damage but take more damage due to the group’s missing DPS.
This mode does not have leaderboards, but still gives rewards, progression, and allows for players to queue into the game faster.
Dungeon Ascensions
At Champion +4, the Asha’s Dilemma Ascension is enabled. This is when dungeons start becoming timed, and must be completed within time to get full rewards and rating.
At Paragon +4, the Vayr’s Legacy Ascension is enabled. This grants enemies and bosses new abilities not seen before this difficulty.
Dungeon Curses
At Adept and higher difficulty, dungeons will have curses applied. Curses are a special modifier that often changes how you’ll need to treat the dungeon. For example, Empowered Minions might make you change course to avoid a strong mob. Curses also have a bonus that the players can interact with. In the case of Empowered Minion, when you defeat one you get a haste and movement speed buff.
These are static per difficulty and not random. For example, if an Adept +3 Stormwatch has Empowered Minions, it will have this curse every time. This lets you get used to any route changes or tricks per dungeon.
Dungeon Rating
As you complete dungeons, your dungeon rating will increase for that hero. This unlocks rewards and determines your rank on the in-game leaderboard.

Dungeon Rating is calculated based on the highest difficulty cleared of each unique dungeon. Finishing faster gives a slight boost to rating rewarded.
Heroes, Roles and Abilities
Hero Roles and Archetypes
Fellowship uses the classic trinity system: Tanks, Healers, and DPS. You’ll form a party of four (one tank, one healer, two DPS) in dungeon runs.
Each hero has unique mechanics (builders/spenders, pet mechanics, combo systems, etc.) that distinguish them.
The roster during Early Access includes:
- Helena (Tank): Generates Toughness through basic attacks and cooldowns, keeping damage received down.
- Meiko (Tank): More combo / chain based; uses combos, self-buffs, self-healing and finishers.
- Xavian (Tank): A paladin-themed tank that uses holy magic to deal damage and heal themselves and the party.
- Sylvie (Healer): Pet and nature themed healer support. Commands Flutterflies for Healing-over-Time effects and places damaging thorn pets.
- Vigour (Healer): Holy builder / spender healer with strong burst and damaging heals. Generates and uses Radiant Runes for healing or damage.
- Aeona (Healer): A temporal themed healer that delays damage through Stagger and heals through reversing time.
- Ardeos (DPS): A fire based ranged caster. Many skills apply burn / DoT effects and uses Burning Embers to detonate those DoTs for burst damage.
- Rime (DPS): Frost-based ice mage with builder / spender mechanics. Builds Winter Orbs which can be used for damage during burst windows.
- Mara (DPS): Stealth and rogue style melee DPS. Uses poisons and generates combo points used for burst attacks.
- Tariq (DPS): A beserker who wields thunder and a large hammer. Build/spends Fury and weaves lightning into his attacks.
- Elarion (DPS): A marksman-style ranged DPS. Uses a bow and Focus + cooldown management to deal damage while also having high mobility.
For further details on each Hero, check out our Hero guides:
Tanks
Healers
DPS
You can swap heroes between runs. Some progression such as currency and tokens are shared so you can experiment without penalty or having to re-roll entire new characters.
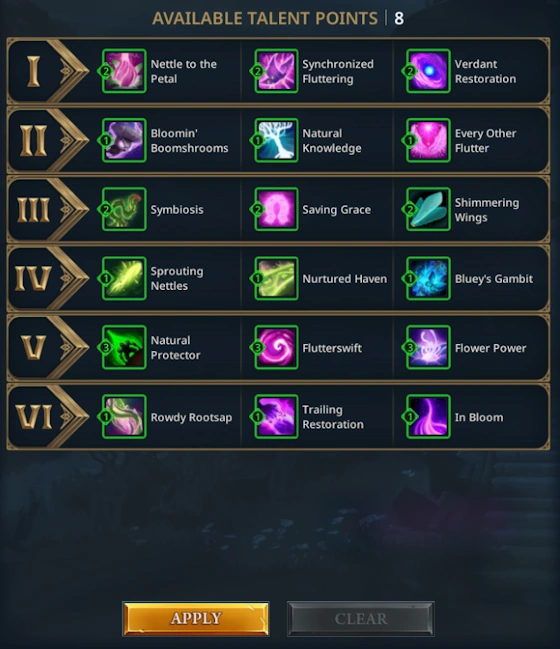
Talents and Respeccing
Each hero has a talent tree to choose from passive bonuses and upgrades to your abilities. Throughout the game you unlock a total of 14 points depending on which tier of difficulty you’ve reached and how much rating you’ve achieved. Points can be spent on any talent in any row, and you can respec any time for free between runs in the stronghold to experiment.
Starmap Rewards
The Starmap is a progression track that unlocks your talent points and abilities for each Hero. There are three tracks with different types of rewards:
- Left Track: Unlocked via dungeon completions of any difficulty. Rewards talent points, talent rows and unlocks abilities.
- Center Track: Unlocked via Rating and progression in Challenger League. Rewards extra talent points, gear, currency, materials, and cosmetics.
- Right Track: Account wide cosmetic mount rewards. Unlocked permanently when completing a Challenger League.
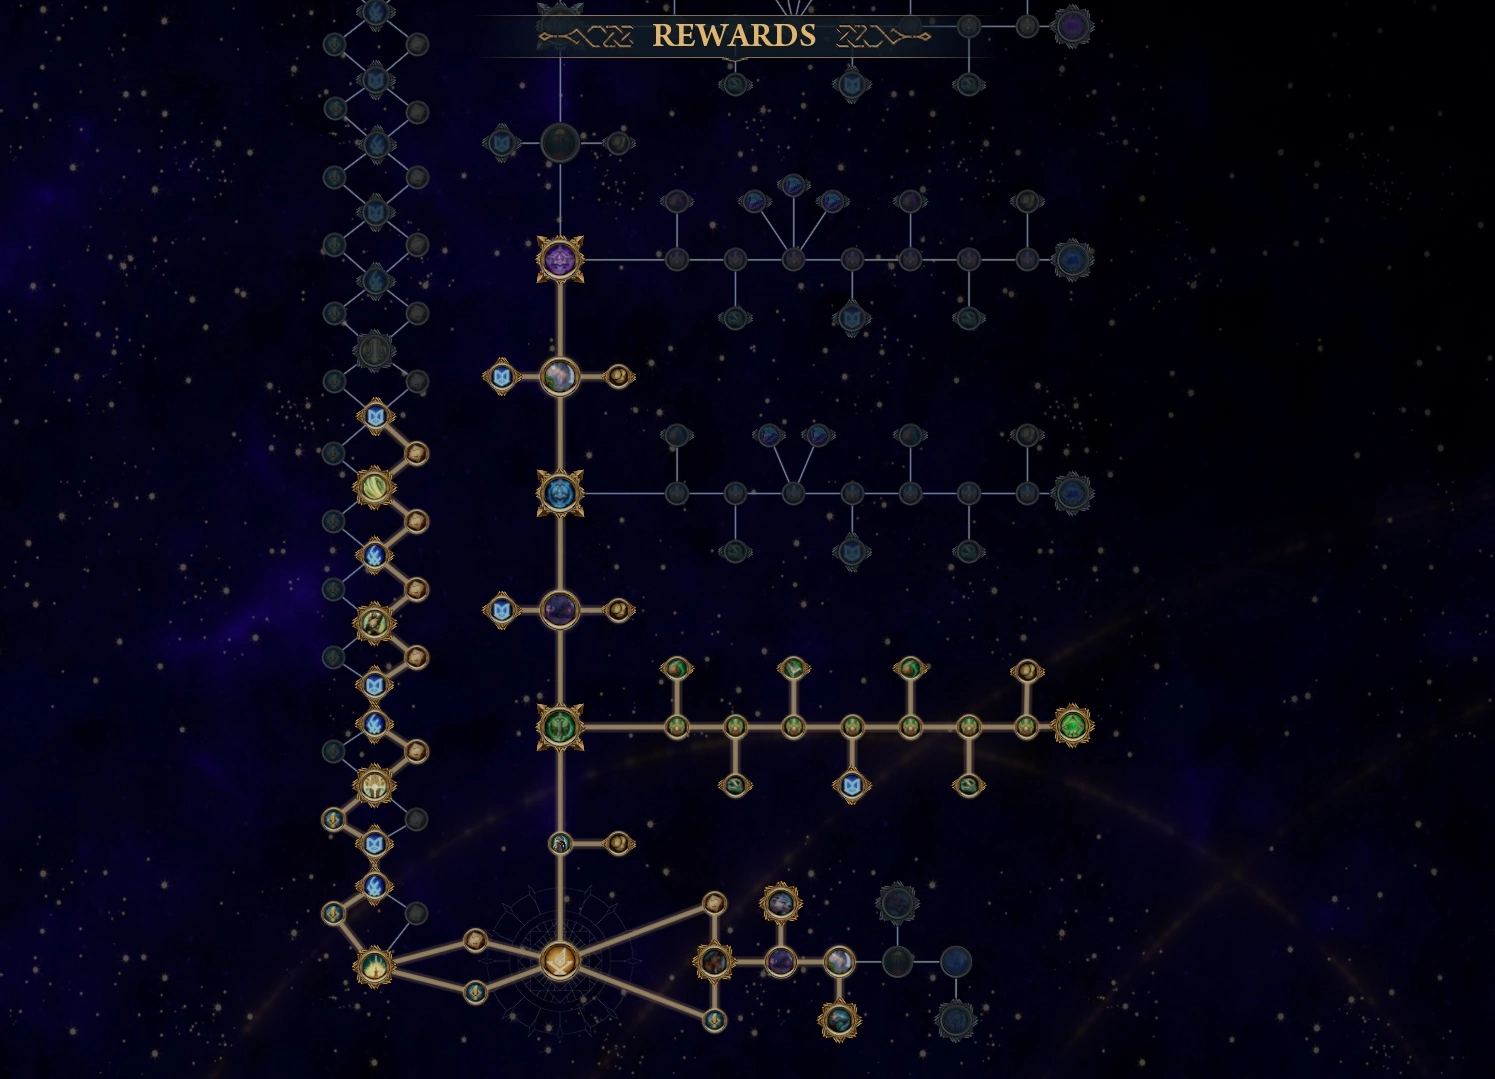
A common shortcut for progression used by players is to rush through Quests and Events in the Adventure Mode. This gives you enough Supplies to buy a full set of gear to fill every slot from the equipment vendor, and unlock your left-side track to get more of your abilities.
From there you can do Contender +3 to get some extra rewards off the center track, or it’s possible for experienced players to finish Contender +3 right away, especially as there is no time limit.
Gearing & Hero Progression
In Fellowship, hero power isn’t about leveling and more about gear, item level, gems, and progressing difficulty tiers.
Gearing your Heroes
Gearing works similar to MMOs and ARPGs. Upon completing a dungeon you’ll get random pieces of gear based on the type, difficulty and league of the dungeon you’re running.

Item Details
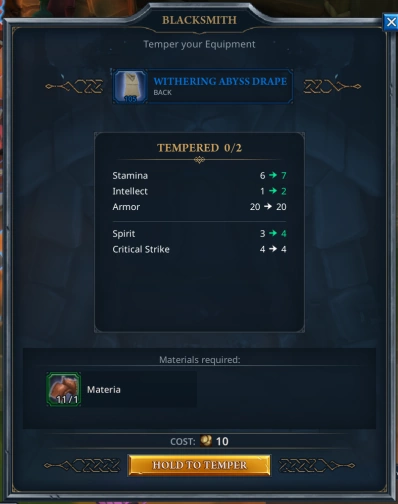
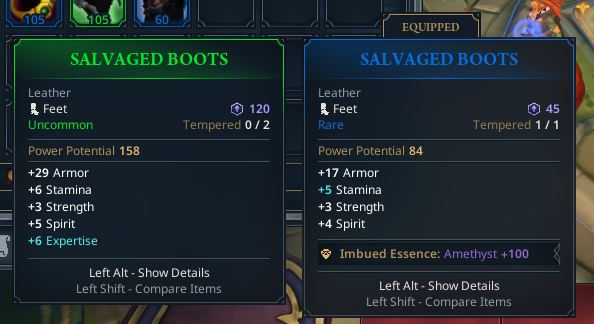
- Item Level: Every level of difficulty increases the base item level of the drop. Items can be tempered through gold and materials earned by dungeons and salvaging gear up to a cap based on the dungeon difficulty the item dropped from.
- Contender – 1 Temper
- Adept – 2 Tempers
- Champion – 3 Tempers
- Paragon – 4 Tempers
- Eternal – 4, 5, 6, 7, 8 Tempers Max based on rarity (Uncommon, Rare, Epic, Heroic, Regal)
- Each Temper adds +1 to the item’s base stats
- Item levels cap at 315 for Regal gear, and 330 for Legendaries dropped in Eternal difficulty.
- Item Rarity: Every time you reach a new rank of difficulty, dungeons drop pools increase in rarity.
- Contender: Can drop Uncommon and Rare items.
- Adept: Can drop Uncommon, Rare, and Epic items.
- Champion: Can drop Uncommon, Rare, Epic and Heroic items.
- Paragon: Can drop Uncommon, Rare, Epic, Heroic, Regal and Legendary items.
- Eternal: Can drop Uncommon, Rare, Epic, Heroic, Regal and Legendary items.
- Item Modifiers: As items increase in rarities, they gain additional Modifiers and Random Stats. These can include:
- Blessing
- Traits (Major / Heroic / Defensive)
- Gem Essence (+100 Gem Power in one random gem color)
- Bonus Stat (Stamina, Main Stat, Critical Strike, Haste, Expertise or Spirit)
- Set Bonus
- Weapon Ability
- Relic Ability
Different items get a guaranteed modifier on top of random ones – such as a weapon’s ability.
Relic Items
Heroes can equip two relic items and come with an extra utility abilities at Rare and higher. These items can give healing, party-wide buffs such as damage resistance or movement speed, or route-based items such as teleport portals and stealth to skip trash.
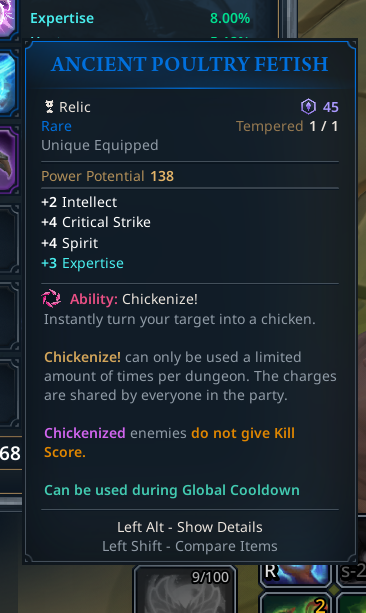
For a more detailed look at relics including a which relics are best to use where, take a look at our Fellowship Relic Guide.
Sockets and Gems
Gems can be purchased from the supplier for Marks of Fellowship, or can randomly drop in Adept difficulty and higher. Epic rarity Cloaks, Wrists, Rings and Legendary items have sockets for a total of 4.
Gems have gem power, which unlocks passive bonuses for your character that progressively get more powerful as you reach further within each color.
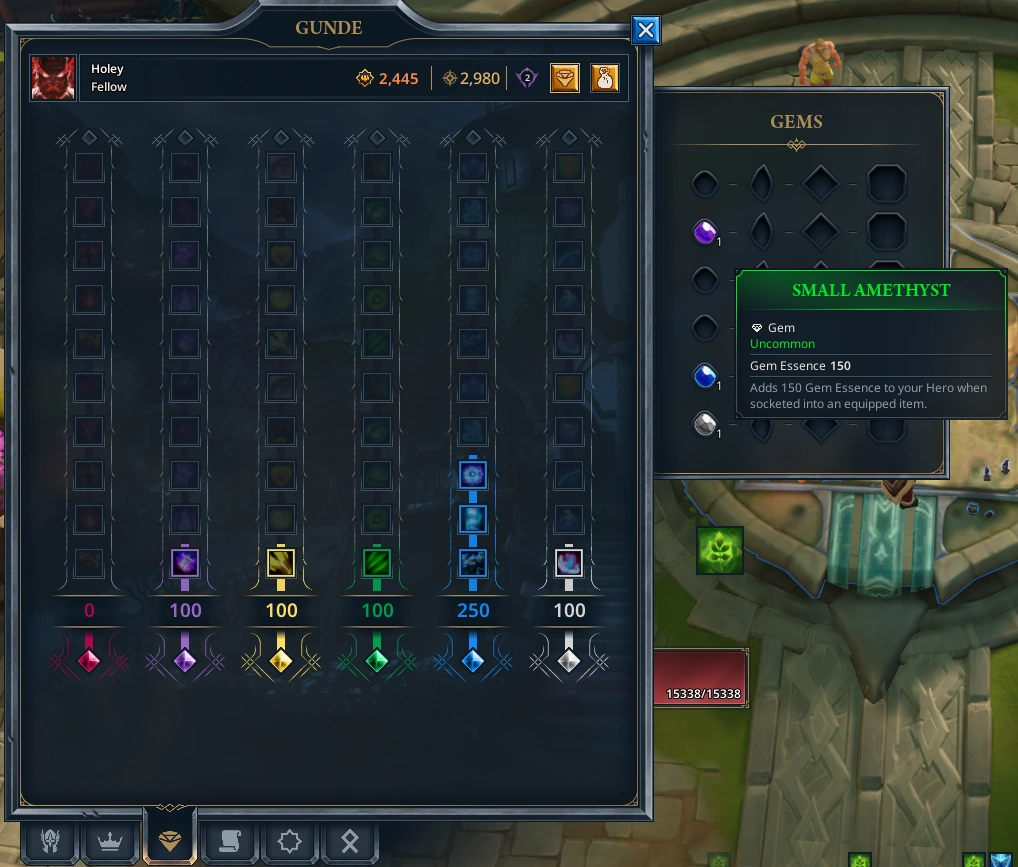
These bonuses can range from boosts to stats to conditional effects. These are also flat bonuses that are not affected by diminishing returns.
For a more detailed look at gems, view our Fellowship Gems Guide.
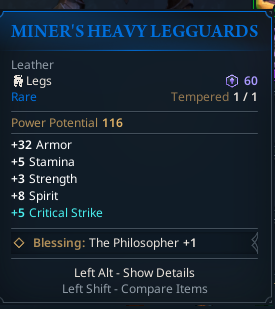
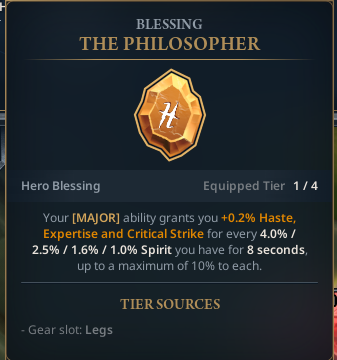
Traits and Blessings
Certain pieces of equipment have the ability to roll Major Traits, Heroic Traits, Defensive Traits and Blessings. When worn, each piece of gear will activate the respective Trait or Blessing’s effect. When wearing more of the same one, the effect increases in strength up to +4 times.

Below is an example of a piece of gear stacking a Blessing.
Weapon Abilities and Weapon Trees
Each type of hero (Tank, Healer, Melee DPS, Ranged DPS) has a pool of weapon items that can drop in any dungeon Adept difficulty and higher. These items come with a unique weapon ability, an additional ability to be used in combat that can deal high damage or grant powerful effects and buffs.
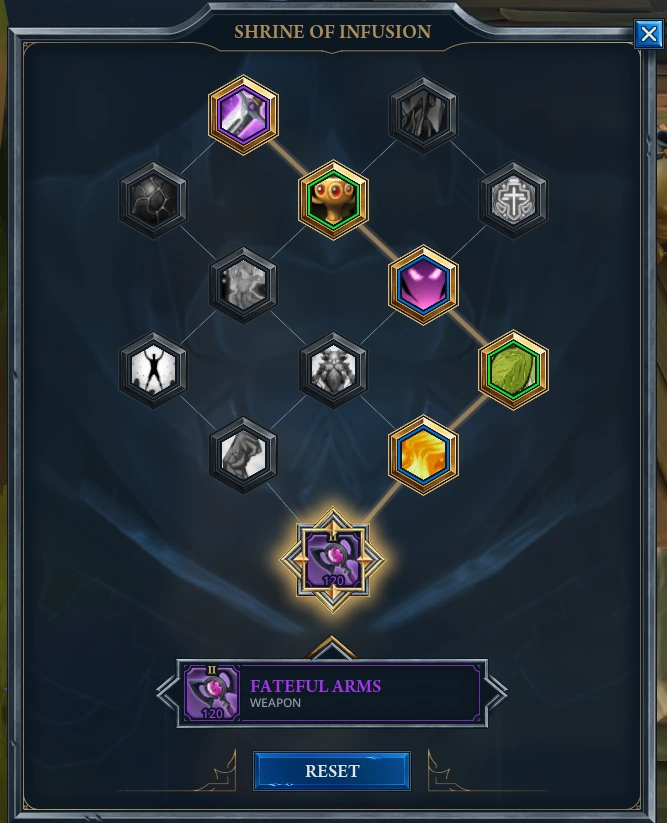
At Epic rarity and higher, weapons come with a randomly-generated weapon tree that grants up to 5 trait points – Two Heroic, Two Defensive, and one Major. These can be unlocked for Gold at the Shrine of Infusion, and be reset freely once unlocked.
For a more detailed look at weapons, view our Fellowship Weapons and Weapon Traits Guide
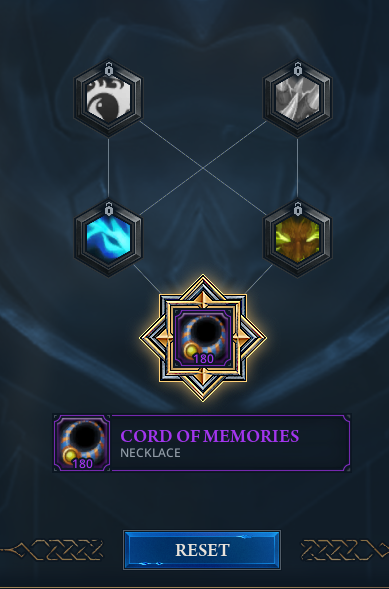
Necklace Traits
Necklaces at Epic rarity or higher can also be enhanced at the Shrine of Infusion. Here you’ll find necklace exclusive traits that can either actively or passively increase the defensiveness of your Hero.
The active effects are tailored to the specific hero, such as increasing defensiveness when using a certain ability.
Legendary Items
Each hero has a pool of Legendary items that can drop in any dungeon Paragon difficulty and higher. These items come with an affix that can significantly change the way the hero’s abilities work, and sometimes are even worth building entire talent trees around.
Legendaries also have three unique buffs that greatly enhance your Hero – 10% Cooldown Reduction, 10% Damage reduction, and 10% increased primary stat.

You can only wear one legendary at a time.
Stats, Substats, and Diminishing Returns
Heroes have two primary attributes and four secondary attributes that can be upgraded through gear, set bonuses, gem bonuses, passives, etc.

With the introduction of random effects on items in Early Access Season 3, you will have to use your best judgement to determine which items are better. Power Potential is a good idea to gauge power, but Traits, Blessings and Effects give most of your strength.
Primary Attributes include:
- Stamina: Each point of Stamina is additional HP depending on the Hero.
- Strength / Agility / Intellect: Damage scales off the hero’s respective primary stat.
Secondary Attributes are shown as percentiles. Secondary attributes include:
- Critical Strike – Chance for damage and healing effects to crit, doubling their effect.
- Expertise – Increases all damage, healing and absorption effects triggered by the Hero.
- Haste – Decreases cooldowns, Increases attack speed, casting speed and the tick rate of damage and healing effects.
- Spirit – Every % of Spirit gives a chance for a bonus effect, different for every Hero.
The formula for Spirit effects is Spirit% / (1 + Spirit%). 20% Spirit = 0.2/1.2 = 16.667% chance.
Diminishing Returns
Secondary attributes are affected by Diminishing Returns (DR). Beyond 10%, each rating point has less weight towards the stat percent.
- From 0-10% you get full value.
- From 10-15% you get approximately 0.95 value.
- From 15-20% you get approximately 0.85 value.
- From 20-25% you get approximately 0.72 value.
- Beyond 25% you get approximately 0.58 value
Due to these diminishing returns, even though heroes have their own stat priorities, it’s good to spread your secondary stats out into their other preferred stats. After reaching 25% in a secondary stat which is ~1,647 rating, it is generally better to start pursuing a different secondary stat instead of stacking it further.
Boosts to secondary attributes such as from set bonuses, gem bonuses or talent passives are added on top of rating after diminishing returns.
Fellowship Currencies and Vendors
In the Stronghold, you’ll be able to trade use various currencies, trade with vendors and use workbenches to improve and progress your character. Currencies are account bound and materials are hero bound.
Scrapper

Gear can be scrapped for Gold and Material / Essence at higher levels. Scrapping upgraded gear returns half of the gold and materials spent to upgrade it.
Bjorn the Blacksmith

The Blacksmith will upgrade your gear for a gold cost to a cap based on their rarity. Later item levels require extra Common Materia and Enchanted Materia as well, found as rewards from dungeons and from scrapping other high level gear.
Shrine of Infusion

Here you can choose your weapon talents for any Epic or higher weapon or necklace. Like talents, respeccing is free.
Master Craftsman Braggi

At the Craftsman you’ll be able to reroll item enhancement slots into other enhancements of the same or different types items using souldust and gold. The rarity of the souldust determines the type of reroll you can do.
- Uncommon Souldust: Randomize a specific type of slot (Blessing, Trait, etc.) into another slot of that category.
- Rare Souldust: Randomize a specific type of slot (Blessing, Trait, etc.) into another slot of that category, giving one of two choices.
- Epic Souldust: Upgrade the rarity of an item by one level. Existing modifiers are kept, and potential new modifiers are based on existing modifiers.
- Legendary Souldust: Reroll a specific slot (1, 2, 3) into another random type (Blessing, Trait, etc.)

Using Aether you can combine gems of the same color into larger ones:
- Unstable Aether: Combine 3x Small Gems into a Large Gem of the same color.
- Imbued Aether: Combine 3x Large Gems into a Splendid Gem of the same color.
- Arcane Aether: Combine 3x Splendid Gems into a large Flawless Gem of the same color.
- Divine Aether: Adds a +35% gem socket to a piece of gear that allows it.
Or reroll gems into random colors:
- Unstable Aether: Transform a gem into a different random color.
- Imbued Aether: Transform a gem into a different random color, between a choice of 3 colors.
- Arcane Aether: Transform a gem into any color of your choice.
You can also use Godstones to reroll various properties of a weapon, changing what is available on its Weapon Tree.
- Defender’s Godstone: Reroll all defensive traits of an item.
- Hero’s Godstone: Reroll all heroic traits of an item.
- Legend’s Godstone: Reroll all major traits of an item.
You can use all three materials of one rarity to create gems outright. This is good for excess crafting materials, or for kickstarting gems on alternate Heroes.
- Unstable Aether + Defender’s Godstone: Create 1x Small Gem.
- Imbued Aether + Hero’s Godstone: Create 2x Small Gems.
- Arcane Aether + Legend’s Godstone: Create 3x Small Gems.
Finally, using Bloodstones from the Pinnacle Dungeon, you can fully upgrade items to Regal and temper them.
- Basic Bloodstone: Upgrades the rarity of an item to Regal. Existing modifiers are kept, any added modifiers are based on existing modifiers. Tempers the item 3 out of 8 times.
- Powerful Bloodstone: Upgrades the rarity of an item to Regal. Existing modifiers are kept, any added modifiers are based on existing modifiers. Tempers the item 5 out of 8 times.
- Ultimate Bloodstone: Upgrades the rarity of an item to Regal. Existing modifiers are kept, any added modifiers are based on existing modifiers. Tempers the item 8 out of 8 times.
Cassian the Jeweler

At the Jeweler you’ll be able to extract gems from items for free.
Outfitter Brenhem

The Outfitter is a cosmetics vendor that sells outfits for heroes at some pretty steep prices (Up to 15,000 gold).
Storekeeper Keiren
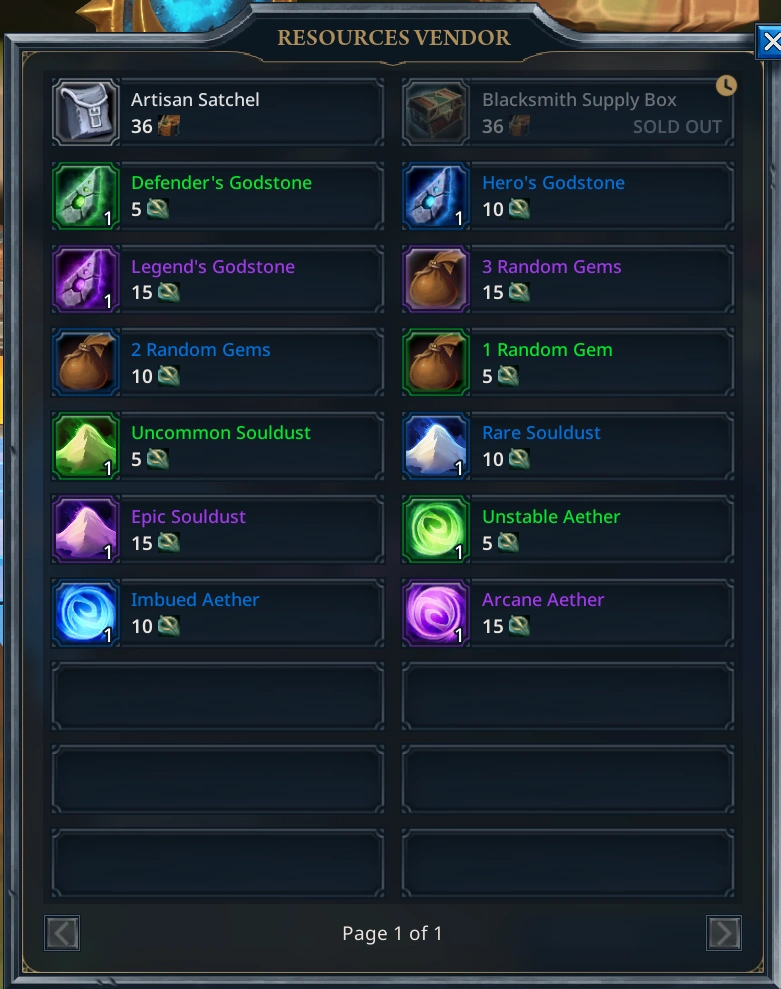
The Storekeeper / Resources Vendor sells materials used in upgrading and crafting for Supplies and Marks. Blacksmith Supply Boxes and Artisan Satchels have a 24-hour cooldown on purchasing, and the rest can be bought with no limit.
| Box | Cost |
|---|---|
| Artisan Satchel (30x Marks of Fellowship) | 36x Supplies |
| Blacksmith Supply Box (60x Gold, 3x Materia, 1x Magic Essence) | 36x Supplies |
| Uncommon Souldust | 5x Marks |
| Rare Souldust | 10x Marks |
| Epic Souldust | 15x Marks |
| Unstable Aether | 5x Marks |
| Imbued Aether | 10x Marks |
| Arcane Aether | 15x Marks |
| Defender’s Godstone | 5x Marks |
| Hero’s Godstone | 10x Marks |
| Legend’s Godstone | 15x Marks |
| 1 Random Gem | 5x Marks |
| 2 Random Gems | 10x Marks |
| 3 Random Gems | 15x Marks |
Unless you’re conserving resources to buy a mount or other cosmetic items, Blacksmith Supply Boxes and Artisan Satchels should be purchased as regularly as possible as these will help your Hero progression, and will push your item-level and allow you to progress faster.
Farming Currencies and Materials in Fellowship
To effectively target farm currencies in Fellowship you will need to choose the appropriate difficulty. Higher difficulties and harder dungeons offer more rewards, but easier dungeons can be completed faster and more consistently. Here are a few common strategies people use:
Early Game Gold Farming
If you’ve filled all your slots with gear and need to farm gold, repeating the hardest Adventure you can reliably complete is the best strategy. Capstone Dungeons drop higher rarity gear but are generally the hardest of that league’s difficulty.
Additionally, if you have completed a capstone dungeon, you should be able to reliably complete the +1 Adventure of the next league as the gap between the two is small.
Eternal Difficulty Scaling
If you’re looking to get gear and materials to max your build, one of the fastest ways to target farm materials is Eternal +1 Everdawn Grove. This is the fastest adventure dungeon in Eternal difficulty, and has become consistent within the playerbase, even by people with high or maxed gear.
It’s worth noting that Gold, Materia, and gear drops scale up in Eternal as well. Pick-up groups might be more comfortable spamming Eternal +1, but a pre-made or strong group might have better luck in Eternal +10 / Eternal +20 etc.
Combat Controls and Quality of Life
Alerts and Customizable UI
Fellowship has built-in alerts for boss mechanics, DPS / HPS meters, and fully custom UI. In the Edit UI screen you can change the size and position of various elements such as meters, timers, and your hotbars.
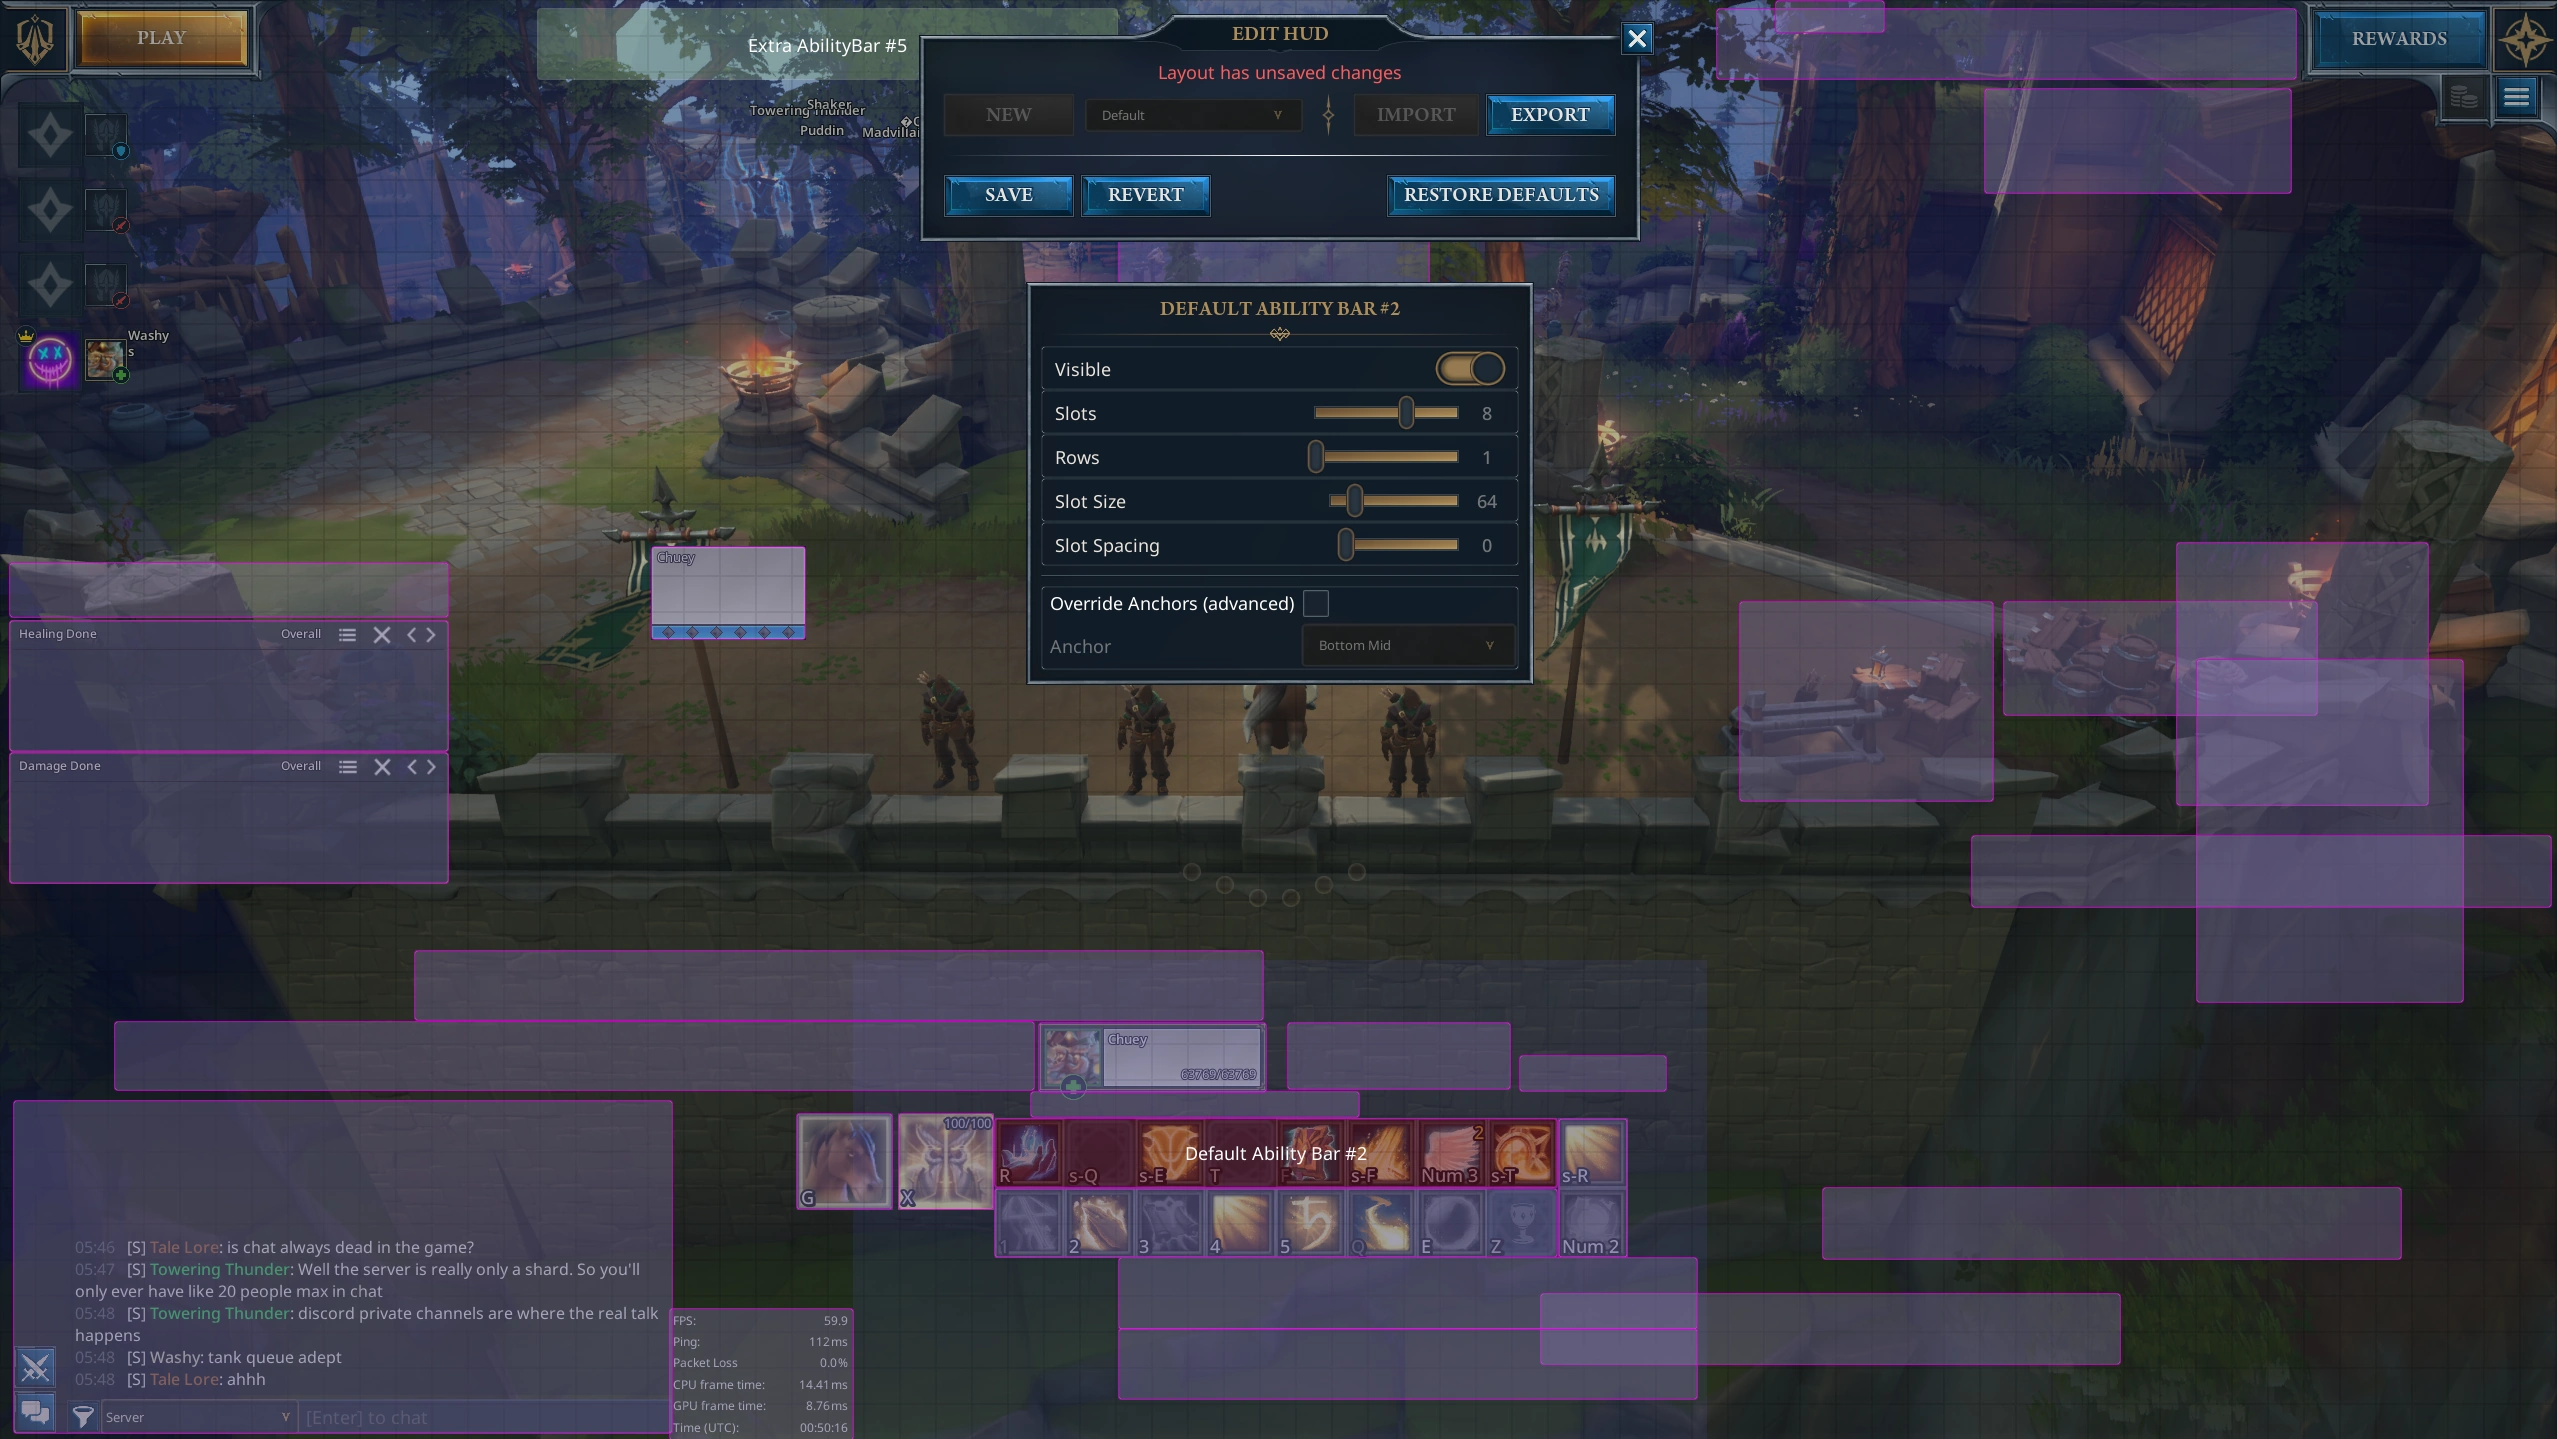
You can export and import UIs from the Edit UI screen, and find shared UIs online such as here.
Rebinding Abilities
To rebind your abilities, right-click on the respective ability on the bar and Set Keybind from there. Fellowship accepts CTRL, ALT and SHIFT modifiers as well as additional mouse buttons. These keys are saved per UI slot.
Interrupting Casts and Crowd Control
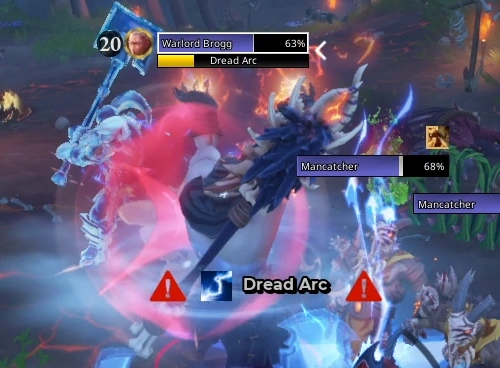
Even with careful mitigation usage, enemy spells can be devastating to the party. Spellcasters will often attack with filler spells that do damage to the tank (or a random target), and sometimes more dangerous spells. These spells are indicated by a yellow cast bar.
ALL TANK AND DPS HEROES have an Interrupt ability that can stop these spells (often dubbed as ‘kicking’). When starting out, you should prioritize the most dangerous ones, but as you get to higher difficulties, even the filler spells start to hurt a lot more, so you will need to coordinate with your party. After you interrupt the enemy, they will not be able to cast for 4 seconds (except dedicated boss timers).
In Fellowship, you can target an enemy with an interrupt marker and a cooldown. By default, this is V. This will show your allies who you are targeting with your kick, and whether or not it’s ready.
Another way to interrupt casts is through Crowd Control (CC). In a pinch, any type of stun or forced movement will interrupt an enemy’s cast, such as Cyclone or Charge.
Lastly, some enemies have some abilities indicated by a grey cast-bar. You can’t interrupt these abilities, but you CAN CC them. Sometimes these abilities can be powerful, so it’s worth doing if you have the opportunity.
Fellowship Beginner Tips
Getting started in Fellowship is pretty straightforward, but there are a few things that will make your first hours feel even better – and help you avoid some common pitfalls.
Heroes and Builds
- Don’t stress too much over your first hero pick. The game is designed for experimenting and trying new heroes out easily.
- Use Adventure Mode to practice unfamiliar heroes and roles.
- Experiment with talents and what feels right. Respeccing is instant and free.
- If you pick up a legendary, try building talents around it for better results.
- Don’t be shy to pickup defensive talents at later difficulties, enemies can seriously hurt late game.
Progression
- Speedrunning Quickplay is a great way to push your left-side reward track or gear secondary heroes through the Equipment Vendor.
- Don’t be shy to use your gold to upgrade your gear. You get half of it back when scrapping the item if you get an upgrade down the line.
- Save your expensive rerolls for Epic or higher, as you will want to chase a weapon or other upgrades.
Dungeon & Run Strategy
- Interrupt. DPS need to interrupt just as much as tanks.
- Quickplay can be speedran very, very quickly with much larger pulls than you could do in normal Challenger dungeons.
- Early difficulties are where you can experiment with routes and should still be able to effectively time dungeons.
- Dungeons still give loot during over-time. If the dungeon is clear-able, it’s always better to stay and finish it.