
This guide has been updated for Season 3.
Mara is an Agility-based melee DPS that excels at utilizing her Stealth and poisons to enhance her deadly knife skills. She accumulates Combo Points and Energy, converting them into devastating blows to assassinate her enemies.
This guide will go over the basics of what you need to know to play Mara, how to use her abilities, her best talent builds, and gear/stat priority.
Other Hero Guides
In the event you were looking for a different character guide for Fellowship, please use one of the buttons below to find what you’re looking for.
Tanks
Healers
DPS
Table of Contents
- Mara’s Abilities
- Energy & Combo Mechanics
- Talents and Build Progression
- Quick Reference Talent Table
- Ability Rotations
- Stat Priority
- Gearing
- High single-target damage potential.
- Scales well into Late-Game
- Has a lower Kick/Interrupt CD than her ranged DPS counterparts.
- Requires more thought on positioning than her ranged DPS counterparts.
- Weak early-game until she reaches her 9 talent point power spike.
- There are many resources to manage to avoid DPS loss.
Mara’s Abilities
| Ability/Icon | Name | Cast / Recast | Range / Radius | Effect |
|---|---|---|---|---|
 | Backstab | GCD | ↔ 5yd | Costs 20 Energy. Deals 83% Agility damage to target enemy. Deals 40% more damage when attacking from behind. Generates 2 Combo Points. Critical Strikes generate 3 Combo Points. |
 | Widow’s Bite | GCD 9.0s | ↔ 5yd | Plunges both daggers into single target, dealing 121% Agility with the right hand and 90% Agility with the left hand. Generates 2 Combo Points with each strike. Critical Strikes generate 3 Combo Points. Generates 30 Energy. |
 | Skittering Blades | GCD | ↻ 8yd | Costs 35 Energy. Spins and throws daggers in all direction, dealing 60% Agility to all nearby enemies. Generates 1 Combo Point for each enemy hit. Critical Strikes generate 2 Combo Points. |
 | Queen’s Fang | GCD | ↔ 5yd | Costs 40 Energy. Deals 160% Agility damage to target enemy. Damage is increased for each combo point spent. 1 Combo Point: +20% damage 2 Combo Points: +40% damage 3 Combo Points: +60% damage 4 Combo Points: +80% damage 5 Combo Points: +100% damage 6 Combo Points: +120% damage |
 | Brooding Shadows | Instant 15.0s | Self | Instantly enter Stealth, becoming more difficult for enemies to detect you. When used in combat, Brooding Shadows triggers a 15-second cooldown. Your Backstab, Widow’s Bite, and Skittering Blades abilities each apply Poison when used from Stealth. See Poisons Below. Backstab – Caustic Poison: Instantly deal 3,357 – 4,103 poison damage and generate 6 Combo Points. Widow’s Bite – Seething Poison: Applies Seething Poison to the target, dealing 837 – 1,023 poison damage every 2 seconds for 60 seconds. While Seething Poison is active on any enemy, you gain Predator’s Rush, granting you 40% increased Energy Regeneration. Seething Poison can only be active on 1 target at a time. Skittering Blades – Volatile Poison: Applies Volatile Poison to all enemies hit by your Skittering Blades, dealing 1,521 poison damage over 6 seconds. Upon expiration, Volatile Poison erupts dealing 360 – 440 poison damage to the target and nearby enemies within a 500 radius. Creeping Death: Caustic Poison, Seething Poison, Volatile Poison, and Corrosive Spill deals 1% increased Poison damage for every 1% Haste you have. |
 | Stalker Step | Instant 30.0s | ↔ 30yd | Instantly teleport behind target enemy or player and increase your movement speed by 50% for 4 seconds. Stalker Step does not break Stealth. |
 | Kick | Instant 16.0s | ↔ 5yd | Interrupt the target’s spellcasting and prevent it from casting for 4 sec. |
 | Arachnid Assault | GCD | ↻ 8yd | Costs 45 Energy. Deal 65% Agility damage to all targets in a radius around Mara. The damage is increased per combo point spent. 1 Combo Point: +20% damage 2 Combo Points: +40% damage 3 Combo Points: +60% damage 4 Combo Points: +80% damage 5 Combo Points: +100% damage 6 Combo Points: +120% damage |
 | Hemorrhaging Strike | GCD 6.0s | ↔ 5yd | Costs 20 Energy. Strike the target dealing 175% Agility damage and apply a bleed dealing 77% Agility damage every 3 seconds for 12 seconds. The Bleed’s duration is increased per combo point spent. 1 Combo Point: 15 seconds 2 Combo Points: 18 seconds 3 Combo Points: 21 seconds 4 Combo Points: 24 seconds 5 Combo Points: 27 seconds 6 Combo Points: 30 seconds Creeping Death: Hemorrhaging Strike deals 1% increased Bleed damage for every 1% Haste you have. Each tick of Hemorrhaging Strike’s bleed replenishes 2 Energy. |
 | Maiden of Death | Instant 60.0s | Self | For the next 10 seconds, you deal 20% more damage and all Combo Point generating abilities generate 6 Combo Points. Additionally, your Energy Generation is increased by 20% while Maiden of Death is active. |
 | Shadow Protection | Instant 30.0s | Self | You take 40% reduced damage for 4 seconds. |
 | Enveloping Web | GCD 30.0s | ↔ 5yd | Instantly Stun target enemy for 4 seconds. |
 | Final Stratagem | GCD 180.0s | Self | Your Energy and Combo Points are instantly refilled and all your Hero Ability cooldowns are reset. |
 | Matriarch Macabre | SPIRIT ABILITY | Self | For the next 20 seconds your Queen’s Fang and Arachnid Assault abilities summon two shadowy clones that imitate the attack for 100% of the damage each. Spirit Ability When you activate your Spirit ability you gain Spirit of Heroism, granting +30% haste for 20 seconds. |
Energy + Combo Mechanic

Mara has two resource to pay attention to. This consists of her Energy meter and her Combo Point counter. Mara’s Energy is capped at 200 and her Combo Points are capped at 6. Her Energy is used to activate her damage dealing abilities, including Combo Points spenders. Mara’s accumulated Combo Points are then used to activate her main damage dealing abilities, Queen’s Fang, Hemorrhaging Strike, and Arachnid Assault.
A flat amount of Energy is generated through the use of her Widow’s Bite. She can also increase her Energy regeneration by using the Brooding Shadows (Stealth) empowered version of Widow’s Bite, Maiden of Death, and Final Stratagem abilities.
Mara generates her Combo Points through the use of her Backstab, Widow’s Bite, and Skittering Blades.
Mara Talents and Build Progression
| Talent Icon | Talent Name | Description |
|---|---|---|
 | Red Ledger | When your Hemorrhaging Strike bleed is applied to an enemy, you gain +15% Critical Chance. You gain an additional +1% Critical Strike chance for every additional enemy that has your Hemorrhaging Strike bleed applied, up to a maximum of bonus of +10% Critical Strike chance. |
 | Corrosive Spill | Each Combo Point you spend has a 3% chance to cause you to coat the ground in front of you with a Corrosive Spill for 3 seconds. Enemies that stand in Corrosive Spill take 158% Agility poison damage every 1.5 seconds. Creeping Death: Corrosive Spill deals 1% increased poison damage for every 1% Haste you have. |
 | Assassin’s Guile | After attacking from Stealth, you gain Assassin’s Guile for 5 seconds, causing your Queen’s Fang & Arachnid Assault to deal 40% more damage. |
 | Bloodrush | Your Hemorrhaging Strike bleed ticks 20% faster. |
 | Venomous Delight | Each time you deal Poison Damage to an enemy you have a 10% chance to generate 10 Energy. |
 | Efficient Killer | Each Combo Point you spend causes you to generate 1 Energy. |
 | Gushing Blood | While Maiden of Death is active, your Hemorrhaging Strike applies its bleed to up to 4 additional nearby enemies. Your Hemorrhaging Strike bleed deals 50% more damage to enemies that are afflicted by your Seething Poison. |
 | Feed the Queen | Each time your Skittering Blades deals damage, you are granted Feed the Queen, causing the next Queen’s Fang you or your shadowy clones perform to deal 10% more damage per stack of Feed the Queen. Feed the Queen stacks up to 6 times. |
 | Deadly Scheme | For every 5 Energy you generate you gain 1 stack of Deadly Scheme. At 40 stacks, it activates for 12 seconds, causing your next Queen’s Fang or Arachnid Assault to have +100% Critical Strike chance. Note: Mara has 200 max energy baseline. |
 | Macabre Stratagem | Your Final Stratagem ability is replaced by Macabre Stratagem. Upon use, Macabre Stratagem grants you 10 seconds of Matriarch Macabre. If used while Matriarch Macabre is already active, its duration is extended by 10 seconds. |
 | Maiden’s Doom | When you deal damage to enemies with 30% or less health, the damage bonus of Maiden of Death is increased to 40%. |
 | Seething Burst | Each time your Seething Poison deals damage to an enemy, it has a 20% chance to erupt, dealing 150% Agility Poison Damage to all nearby enemies. |
 | Hemotoxin | When your Queen’s Fang or Arachnid Assault deals direct damage to an enemy that has both one of your Poisons and Bleed active on them, you instantly deal additional poison damage to them. Per Combo Point spent, Queen’s Fang deals damage equal to 0.6 seconds of the active Hemorrhaging Strike’s Bleed. Per Combo Point spent, Arachnid Assault deals damage equal to 0.3 seconds of the active Hemorrhaging Strike’s Bleed. |
 | Sinner’s Pride | Each Combo Point you spend reduces the cooldown of your Maiden of Death ability by 0.6 seconds. |
 | Malevolence | Your Queen’s Fang and Arachnid Assault abilities grant you 1 stack of Malevolence: Arachnid Assault or 1 stack of Arachnid Assault: Queen’s Fang respectively, for 20 seconds. Malevolence increases the damage of the matching ability by 100%. Each Malevolence buff type stacks up to 2 times. |
 | Arachnid Onslaught | Your Arachnid Assault deals 20% more damage against enemies that have your Hemorrhaging Strike Bleed active. |
 | Caustic Poison | Your Backstab has a 30% chance to apply Caustic Poison outside of Stealth if the target has Hemorrhaging Strike’s Bleed active on them. |
 | Puncture | Your Widow’s Bite has +100% increased Critical Strike chance. |
While Mara has many builds that she can utilize, in this guide we will focus on a simple and well-rounded build, the Bleed/Hemotoxin build. This guide will refer to the talents by their name and the row/column that they are located in.
Across all builds, Mara tends to take the same talents early on (between 2 – 4 talent points):
- 2 talent points: Corrosive Spill
- 3 talent points: Corrosive Spill + Venomous Delights
- 4 talent points: Corrosive Spill + Venomous Delights + Efficient Killer
Corrosive Spill provides extra AoE damage while synergising with Venomous Delights and Efficient Killer to help mitigate any Energy problems that Mara has early on.
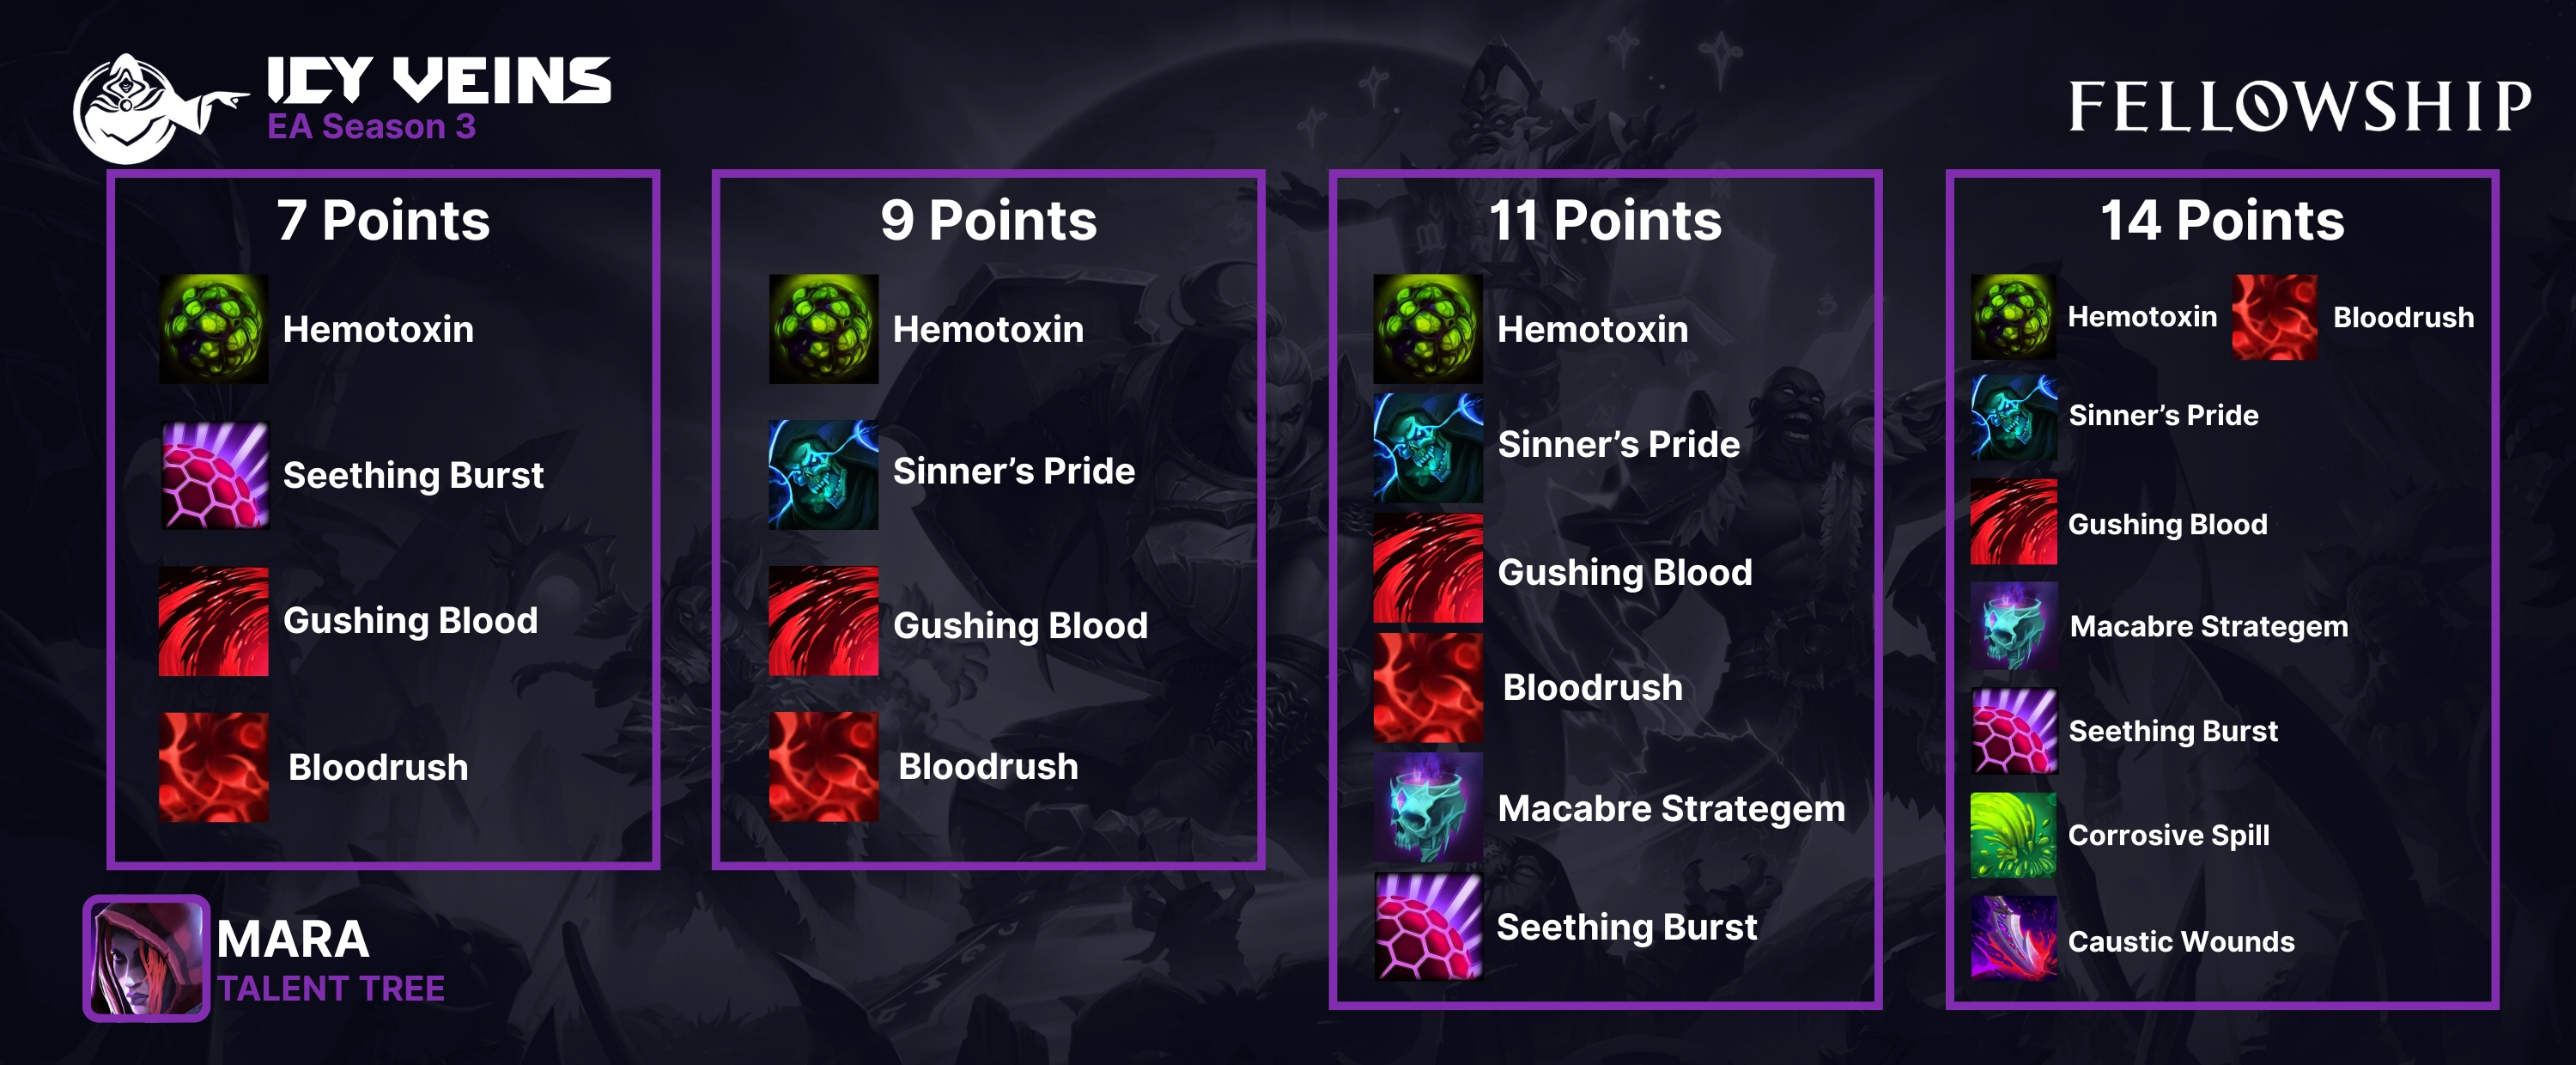
Quick Reference Talent Table
| Talent Point Total | Talent Tree (Row + Column) |
|---|---|
| 2 Points | 1B |
| 3 Points | 1B, 2B |
| 4 Points | 1B, 2B, 2C |
| 5 Points | 1B, 2B, 3C |
| 6 Points | 1B, 2B, 3C, 4A |
| 7 Points | 2A, 3A, 4C, 5A |
| 8 Points | 2A, 3A, 4A, 4C, 5A |
| 9 Points | 2A, 3A, 5A, 5B |
| 10 Points | 2A, 3A, 4A, 5A, 5B |
| 11 Points | 2A, 3A, 4A, 4C, 5A, 5B |
| 12 Points | 1B, 2A, 3A, 4A, 5A, 5B |
| 13 Points | 1B, 2A, 3A, 4A, 4C, 5A, 5B |
| 14 Points | 1B, 2A, 3A, 4A, 4C, 5A, 5B, 6B |
Remember to not take talent trees as is and adjust for any legendary or weapon trees you get, or content you are doing.
Mara Ability Rotations
Much like other heroes, letting your resources overcap is wasteful and leads to a loss in DPS. Here are a few things to keep in mind to avoid DPS loss regardless of how many enemies you’re engaging.
- Use Brooding Shadows (Stealth) before entering combat to avoid putting a charge of it on cooldown unnecessarily.
- Avoid letting Brooding Shadows charges sit at max.
- Avoid letting Widow’s Bite sit at max charges. Always make sure that you’re taking advantage of this ability as it’s a good way to keep up with your energy usage and generate Combo Points.
- Avoid letting your Energy sit at max.
- Avoid overcapping Combo Points.
Avoiding damage is always ideal, but there are times when the damage will be unavoidable. Use your defensive ability, Shadow Protection, when anticipating a large amount of damage. Preventing damage helps you survive, which is important because dying is the biggest loss of DPS anyone can have.
Mara’s ideal skill rotation will depend on how many targets you have. This guide will cover rotations for a single target and for groups of 3 or more enemies.
Single-Target Rotation
- Stealth
- Widow’s Bite
- Hemorrhaging Strike
- Maiden of Death
- If less than 6 Combo Points: Backstab. 6 Combo Points: Queen’s Fang.
- Backstab -> Queen’s Fang x 5 (approx. when Maiden of Death expires)
- Use Widow’s Bite as needed for Energy.
Open out of Stealth with Widow’s Bite to apply a poison DoT and increase your Energy regeneration by 40% for 60 seconds. Use Hemorrhaging Strike to apply a bleed DoT that generates 3 Energy per tick of damage. Maiden of Death will also increase your Energy regeneration by 20% for its duration of 10 seconds.
If the Widow’s Bite poison DoT is close to falling off, use the Stealth empowered Widow’s Bite, otherwise use the Stealth empowered Backstab to gain an easy 6 Combo Points to use for Queen’s Fang. Use regular Backstab as a Combo Point generator and filler. Weave in Widow’s Bite when you need Energy.
Make sure to use Hemorrhaging Strike on targets that have the Hemotoxin debuff/DoT to burst that target with the detonation damage. Hemotoxin lasts for 9 seconds, so you should have about a 5 global cooldown (GCD) window to detonate Hemotoxin on the affected target.
Use Maiden of Death off cooldown to increase your overall DPS unless you’re close to your ultimate (~20 seconds or less from having ultimate available). In that case, delay using Maiden of Death to have it line up with your ultimate usage. To maximize damage dealt while you’re in your ultimate, make sure your Maiden of Death and Final Stratagem abilities are available so that you can use Maiden of Death back-to-back.
Make sure to keep your Widow’s Bite poison DoT and Hemorrhaging Strike bleed DoT up on your target to help your Energy regeneration and passive damage throughout the encounter.
Multi-Target (3+ Enemies)
- Stealth
- Open with Widow’s Bite on target with most max health
- Maiden of Death
- Hemorrhaging Strike
- Stealth
- Skittering Blades
- Arachnid Assault
While running Corrosive Spill and Venomous Delight, you should only need to upkeep 1 – 2 bleeds on a group in order to keep up on Energy management.
Make sure to use Maiden of Death BEFORE Hemorrhaging Strike in order to apply the bleed in an AoE.
Using the Stealth empowered version of Skittering Blades applies an AoE DoT that detonates on expiration. Make sure to NOT refresh this DoT. Not letting this DoT fall off will result in DPS loss.
As seen in the Single-Target rotation, you will have ~5 GCD window to detonate one stack of the Hemotoxin DoT with your Hemorrhaging Strike.
Stat Priority
- Critical Strike – Chance for damage and healing effects to Crit, doubling their effect. Hitting a Crit with the Backstab, Widow’s Bite, & Skittering Blades abilities will also generate an additional Combo Point.
- Expertise – Increases all damage, healing and absorption effects done by Mara.
- Haste – Increases attack speed, casting speed, and the tick rate of damage and healing effects. It also reduces your global cooldown (GCD), allowing you to cast more frequently.
- Spirit – Increases the rate you charge your spirit ability. Every 1% of Spirit gives 0.5% chance to refund any Energy and Combo Points spent when using abilities that cost Combo Points.
Crit affects Mara’s damage as well as Combo Point generation. Going above 100% Crit gives additive damage.
Expertise increases all damage by a flat percent. Crit is calculated after the extra damage from Expertise is added, meaning that more Expertise will mean higher Crit damage.
Haste increases your DoT tick rate, increases your attack speed, and decreases your GCD. This is our main stat to prioritize.
Spirit can refund Energy and Combo Points. Spirit is not our primary focus for Bleed build. It works best with you have the legendary ring, Stalker’s Crimson Loop. If you have this legendary and wish to utilize it, aim to have at least ~18% Spirit to maximize the uptime of the buff.
It’s worth noting that secondary stats on gear have diminishing returns.
Gearing
Set Bonuses
Set bonuses on gear can be huge boosts to our power, but time consuming to accomplish. It’s generally a good idea to hold off on farming for a specific set until you hit Paragon or if you’re feeling stuck at any particular capstone.
You can equip up to 4 set bonuses total: 2 Minor sets (non-capstone dungeons) and 2 Major sets (capstone dungeons). Keep in mind that gear pieces cannot have both a set bonus and a socket.
Below are the different set bonuses that are worth the time to farm for.
| Set Bonus | Dungeon(s) | Reasoning |
|---|---|---|
| Seal of the Heskyr | – Scryer’s Peak – Ruins of Regath – Xul, the Blood Molnolith | BiS for every hero this season, this increases our overall gem power and enables us to activate more gem bonuses. |
| Torment of Bael’Aurum | – Wraithtide Vault | It combines increasing our damage and healing through increasing our Intellect and survivability with the emergency heal when we reach a low threshold. |
| Dark Prophecy | – Heart of Tuzari | When this procs, it greatly increases our Haste. The Haste gained by this is not affected by diminishing returns. |
| Sin Warding | – Empyrean Sands, – Sailor’s Abyss | Increases our max HP, allowing us to survive more damage, as well as increasing our base healing & damage through the Expertise increase. The extra Expertise gained from set bonuses and gems is not affected by diminishing returns. |
You can learn more about set bonuses here.
Gems
Gems are powerful augments to socketed gear that grants you additional effects when you reach the threshold of each tier.
A breakdown of each Gem:
- Topaz gems grant Haste, which significantly impacts our damage output.
- Emerald increases Expertise which is a flat healing increase, and provides CDR to all abilities, including our weapon ability.
- Amethyst increases Critical Strike which increases the impact of our damage and our healing.
- Rubies increase Aeona’s primary stat, Intellect.
- Diamonds increase all secondary stats but at a much lower rate than specific gems.
- Sapphires increases the benefits of your Epoch Break spirit ability and grants passive stats.
Many heroes in Season 3 are looking to prioritize rank 15 of Emerald and Sapphire, but with Bleed build, our priorities differ. Our gem priority will be achieving rank 6 of the Ruby, Topaz, Amethyst, and Emerald gem power.
Weapons
Once you obtain a Rare or higher rarity weapon, you gain access to that weapon’s ability. When you obtain an Epic or higher rarity weapon, you gain access to its weapon traits. Below are Mara’s weapon options.
- Sahril’s Reckoning is an AoE damage option and gives us a stacking Critical Strike buff for 20 seconds when hitting an enemy with this weapon ability.
- Void-touched Dagger is a single-target focused weapon that gives us additional priority target damage.
- Fateful Dagger is a great late-game option for our weapon slot. It gives us Cooldown Recovery, which reduces the cooldown of our important buffs Maiden of Death and Brooding Shadows. It also gives a lower cooldown to our defensive ability, Shadow Protection, and our CC utility, Enveloping Web, while active.
- Earthbreaker is great for providing extra utility through its crowd control (CC). Earthbreaker can enable your group to make larger pulls with less risk. This weapon does less damage than other options we have, but makes up for it in the utility provided by the AoE stun at the beginning and end of Earthbreaker’s duration.
Gearing Priority
- Necklace Traits
- Substat Priorities
- Weapon Ability
- Legendary Item
- Completed Set Bonus
Substat Priorities
- Haste
- Expertise
- Spirit
- Crit
Hero Traits
Formerly Weapon Traits, Hero Traits are tied to any piece of gear that drops, as well as any weapon of Epic or higher rarity. There are 3 categories of Hero Traits: Major, Defensive, and Heroic. You can choose 2 Defensive, 2 Heroic, and 1 Major trait per weapon.
Defensive Traits
The Defensive Traits that we want to take will either increase our overall health pool and decrease damage taken. The best Defensive Traits include King of the Hill and Heart of Stone.
| Icon | Name | Description |
|---|---|---|
 | King of the Hill | This trait reduces all damage taken and will be active as long as you stay above 80% health. Our BiS defensive trait. |
 | Heart of Stone | Synergises with King of the Hill and gives us more health to survive more/bigger hits from enemies. Not necessary for us to have, but it can be useful if you are struggling to survive unavoidable damage. |
Heroic Traits
Heroic Traits are weapon traits that increase your secondary stats and/or your primary stat. The Heroic Traits we want to take increase our primary stat or the secondary stats that we wish to prioritize. The best Heroic Traits to take include Hunter’s Focus, Hidden Power, and Kindling.
| Icon | Name | Description |
|---|---|---|
 | Hunter’s Focus | This is our #1 focus for any trait. Haste is incredibly important for Mara’s Bleed build. Try to stack as many as you can. |
 | Hidden Power | This is a great option for increasing our damage dealt, as DoTs are dynamic in Fellowship, meaning any changes to our stats will affect the DoTs we already have applied. PIt’s particularly effective to pool our Spirit Ability when this is active. |
 | Kindling | Kindling is particularly good if you’re looking to increase your priority damage. It’s also a passive, making it one of the easier options to increase your DPS. |
Major Traits
Major traits augment your weapon by enhancing its effects. The best Major Traits we can take depend on which weapon you use. We typically want the option between one cooldown-reduction-focused trait and one that focuses on healing and damage output.
| Icon | Name | Description |
|---|---|---|
 | Martial Initiative | This trait increases your survival through the defensive stats it grants on weapon use. Try to pair this with Visions of Grandeur to increase uptime. |
 | Visions of Grandeur | This trait gains increased Spirit generation on hit and resets the cooldown of our weapon ability upon the use of our Spirit Ability. It’s amazing on its own, but even better when paired with Martial Initiative. |
 | Brave Machinations | Another way to decrease the cooldown of our Weapon Ability while providing additional Critical Strike chance to it. |
Necklace Traits
New to season 3 are Necklace traits. These are unlocked once you obtain a necklace that is Epic rarity or higher. To view and choose your necklace traits, visit the Shrine of Infusion.
The best Necklace traits give us a second chance at life when things go south.
- The Mountain is our first pick for preventing getting killed by a single instance of big damage.
- The Boar is another trait in the same vein as The Mountain.
- The Lake helps us take less damage from AoE sources. Especially helpful for when we cannot avoid the AoE damage.
Blessings
Blessings are new to Fellowship as of Season 3. They further augment your gear the same way that gems and traits do. Much like with Gems, the ideal Blessings will depend on the build you are working with.
Below are some general Blessings to focus on for Bleed build, listed in order of priority:
- The Monarch – provides Cooldown Acceleration to our Maiden of Death and Final Strategem abilities and scales off of our Haste.
- The Wayfarer – any bonus Haste is welcome as the tick-rate of our DoTs increases with Haste. This Haste also affects The Monarch, making it a great option in tandem.
- The Subduer – a great utility option for reducing the cooldown of our Web Crack ability while giving us more damage when enemies are low.
Mara Legendaries
Mara’s BiS legendary for Bleed build is the legendary cloak, Assassin’s Shadow-Lined Cape. The other legendaries will require different substat, gems, traits, and blessings than Bleed build focuses on.
- Stalker’s Crimson Loop (Ring)
- Drenched in Blood: Each time you trigger a Spirit Refund, you gain Drenched in Blood for 8 seconds, increasing your Expertise by +25%.
- Wristbands of Vexira’s Prey (Wrist)
- Vexira’s Venom: Your Queen’s Fang and Arachnid Assault critical strikes apply Vexira’s Venom to enemies, adding 45% of the initial damage accumulatively as poison damage dealt over 6 seconds.
- Assassin’s Shadow-Lined Cape (Cloak)
- From the Shadows
Your Hemorrhaging Strike’s bleed effect has 15% faster tick rate.
Each time you deal damage to an enemy with Hemorrhaging Strike’s bleed effect, you have a 16% chance to summon a Shadowy Clone to assault that enemy with a 6-combo-point Queen’s Fang.
- From the Shadows
Changelog
- July 4th: Updated for Season 3.