Tariq is a Strength-based melee DPS that uses his power to calls upon lightning to enhance his attacks. He generates Fury, using it to unleash devastating blows to obliterate his enemies.
This guide will teach you the basics of playing Tariq in Fellowship, how to use his abilities, and which talents to use for the best build.
Other Hero Guides
In the event you were looking for a different character guide for Fellowship, please use one of the buttons below to find what you’re looking for.
Tanks
Healers
DPS
Table of Contents
- Tariq’s Abilities
- Fury & Swing Timer Mechanics
- Basic Ability Guide
- Talents and Build Progression
- Lightning Build
- Schism Build
- Gearing and Stat Priority
- Set Bonuses
- Gems
- Weapons
- Weapon Traits
- Tariq Legendaries
- Changelog
- Versatile in both single-target and AoE damage.
- Scales well Mid to Late-Game.
- Has a lower Kick/Interrupt CD than his ranged DPS counterparts.
- Requires more thought on positioning than his ranged DPS counterparts.
- Can easily lose DPS if his Fury and related CDs aren’t well managed.
- Requires higher APM than other DPS characters.
Tariq’s Abilities
| Ability/Icon | Name | Cast / Recast | Range / Radius | Effect |
|---|---|---|---|---|
 | Heavy Strike | Instant | ↔ 5yd | Swing your hammer in a wide arc toward the target enemy, dealing 1,170 – 1,430 physical damage to it and any nearby enemies. Recklessness – Enemies have an increased chance to Dodge Wild Swing. – Wild Swing cannot Critically Strike. – Damage of Wild Swing is increased by an amount equal to your Critical Strike chance percentage. Generates Fury relative to damage dealt. |
 | Wild Swing | GCD 9.0s | ↔ 5yd | Swing your hammer in a wide arc toward target enemy dealing 1,170 – 1,430 physical damage to it and any nearby enemies. Recklessness – Enemies have an increased chance to Dodge Wild Swing. – Wild Swing cannot Critically Strike. – Damage of Wild Swing is increased by an amount equal to your Critical Strike chance percentage. Generates Fury relative to damage dealt. |
 | Face Breaker | Instant | ↔ 5yd | Instantly attack the target enemy, dealing 4,203 – 5,137 physical damage. Face Breaker can only be used after one of your attacks Misses or is Dodged by an enemy. Generates Fury relative to damage dealt Can be used during Global Cooldown. If Face Breaker is used with the Face Breaker Proc active, it deals +400% damage. If Face Breaker is used without the Face Breaker Proc, it incurs a cooldown of 9 seconds and resets the Swing Timer. |
 | Skull Crusher | GCD | ↔ 5yd | Instantly deal 6,696 – 8,184 physical damage to target enemy. Skull Crusher resets the Swing Timer. Thunder Call Skull Crusher beckons a thunder bolt to strike the target from above, dealing 2,007 – 2,454 lightning damage. |
 | Hammer Storm | Instant | Self | Spin with your Hammer up to 4 times, dealing 810 – 990 physical damage to all nearby enemies every 0.7 seconds. Hammer Storm has an initial cost of 26 Fury, and an additional 8 Fury every 0.7 seconds until you have spent a maximum of 50 Fury per use. Hammer Storm resets the Swing Timer. Thunder Call Hammer Storm causes lightning to strike you as you spin, shocking enemies for an additional 243 – 297 lightning damage each time they are hit. |
 | Leap Smash | Instant 30.0s | ↔ 30yd | Instantly Leap to target area and smash the ground, dealing 3,591 – 4,389 physical damage to all nearby enemies. Generates 25 Fury. Can be used during Global Cooldown. |
 | Pummel | Instant 16.0s | ↔ 5yd | Instantly interrupt target enemy’s spell cast, and silence them for 4 seconds. Can be used during Global Cooldown. |
 | Thunder Call | Instant 45.0s | Self | Call on Thunder to charge your hammer with immense power, enhancing your abilities for 20 seconds. Can be used during Global Cooldown. |
 | Chain Lightning | GCD 8.0s | ↔ 30yd | Conjure an arc of lightning onto target enemy that chains between you and other enemies until it has dealt damage a total of 6 times. Each hit of Chain Lightning deals 810 – 990 lightning damage. Chain Lightning does not deal damage to you. Thunder Call You can only cast Chain Lightning while Thunder Call is active. Generates Fury relative to damage dealt. |
 | Culling Strike | GCD 5.0s | ↔ 5yd | Instantly deal 2,772 – 3,388 physical damage to target enemy. Culling Strike spends up to 20 Fury, increasing the damage it deals by up to 400%. The more Fury it consumes, the higher the damage it deals. Culling Strike has no effect on the Swing Timer. Execution Can only be used against enemies that have 30% or less health. |
 | Focused Wrath | Instant 90.0s | Self | Your next two casts of Skull Crusher or Hammer Storm cost 50% less Fury and deal 40% increased damage. Can be used during Global Cooldown |
 | Intimidating Roar | Instant | Self | Instantly intimidate up to 20 enemies around you for 12 seconds. If an Intimidated enemy takes damage equal to 2000% of your Strength, they will break out of the effect. Can be used during Global Cooldown. |
 | Unbreakable Will | Instant 30.0s | Self | You take 40% reduced damage for 4 seconds. Can be used during Global Cooldown. |
 | Raging Tempest | SPIRIT ABILITY | Self | Instantly Leap to target area and smash the ground, dealing 9,054 – 11,066 lightning damage to all nearby enemies.You also gain an Enhanced Thunder Call for 20 seconds that causes you to release Raging Currents at enemies over time. Raging Currents Strike a random nearby enemy every 1 seconds with lightning, dealing 1,386 – 1,694 lightning damage with each strike. Each time Raging Currents hits an enemy your Expertise is increased by 1%, stacking up to 20 times. Spirit Ability When you activate your Spirit ability you gain Spirit of Heroism, granting +30% haste for 20 seconds. Can be used during Global Cooldown. |
Fury and Swing Timer Mechanic
For all damage made apart from Tariq’s Fury spenders, he generates Fury. More damage means more Fury generated. Accumulated Fury is used to activate his Fury spending abilities: Hammer Storm and Skull Crusher. Tariq’s Fury caps at 100.
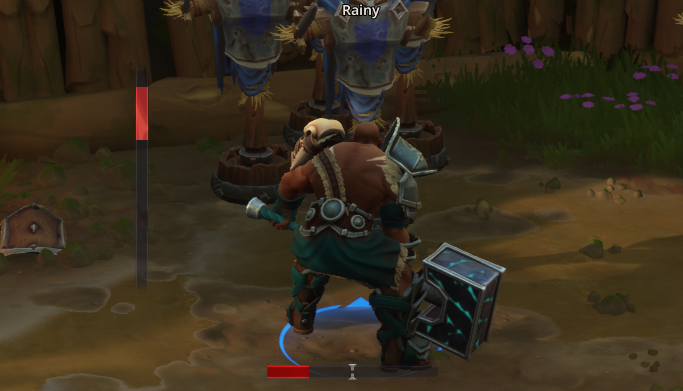
Tariq’s Swing Timer is represented by the white bar to the right of Tariq. It has a thicker section near the top and a white line, representing the countdown, that runs perpendicular to the bar. The thicker section of the bar will turn from grey to red as the white line approaches it. An auto attack will be executed when the white line reaches the end of the red section of the bar. You can enhance your auto-attack by using your Heavy Strike ability within this red section.
Beware of using your Heavy Strike outside of the red section, as it will deal reduced damage and go on a long cooldown before being able to use it again.
How to Play Tariq — Basic Ability Guide
Heavy Strike can be queued up while mounted since queuing the ability does not dismount you. If you move out of range of your target, your Swing Timer will pause at the end of the red section until you are in range again. The Swing Timer will also pause if you are stunned when it reaches the end of the red section.
Beware of spamming your Heavy Strike and Facebreaker abilities as they have penalties for using them in this way. Heavy Strike will deal less damage on go on a significant cooldown if it’s used outside of the red section of the Swing Timer. Facebreaker will deal less damage, go on a long cooldown, and cause the Swing Timer to reset.
Your Fury spending abilities, Hammer Storm and Skull Crusher, will reset your Swing Timer on use. Despite costing up to 20 Fury on use, Culling Strike will not reset your Swing Timer. Both Hammer Storm and Skull Crusher will consume 50 Fury.
When in doubt, it is a good idea to use the Fury you have before it can overcap. The only time to be holding onto Fury is when you’re looking to pool your Fury resource into buffs, such as your Thunder Call, Focused Wrath, and your Spirit Ability, Raging Tempest.
Notable cooldowns to manage include Thunder Call, Focused Wrath, Pummel, and Unbreakable Will.
- While you have the Thunder Call buff active, your Heavy Strike, Skull Crusher, and Hammer Storm abilities deal Lightning damage.
- Focused Wrath is a buff to two of our Fury spending abilities, Skull Crusher and Hammer Storm, causing them to deal more damage and cost less Fury.
- Pummel is our kick ability and will be vital for interrupting potentially deadly casts our enemies cast.
- Unbreakable Will is our defensive skill and is a survival tool. In some cases, unavoidable damage will occur. This is one of the best times to use Unbreakable Will.
When things get dicey, you can utilize your Intimidating Roar to Fear all enemies within its radius. This skill can help you buy time for your party to stabilize. Don’t worry about breaking the Fear with damage, as those affected will have a high tolerance to damage before breaking.
Using Raging Tempest will overwrite your Thundercall. If your Thundercall is off cooldown, it will be unable to be cast for the duration of Raging Tempest.
Tariq Talents and Build Progression
| Talent Icon | Talent Name | Description |
|---|---|---|
| Left Hand Path | When Face Breaker deals critical strike damage, 30% of the damage dealt is also dealt to enemies near your target, reduced beyond 5 targets. Face Breaker’s critical strike chance is increased by +50%. |
 | Concatenation | Your Attack Speed is increased by 50%. |
 | Blood & Thunder | Your Heavy Strike has a chance to cast a free Chain Lightning at the target. (2.0 PPM) |
 | Bloodline | You generate 1 Fury every 1 second. You no longer lose Fury while out of combat. |
 | High Road | When your Leap Smash ability does not hit an enemy, its cooldown is reduced by 14 seconds and your movement speed is increased by 50% for 4 seconds. Your Leap Smash has +20% increased critical strike chance. You now only generate Fury with Leap Smash when it deals damage to an enemy. |
| Ride the Lightning | Your Thunder Call generates 60 Fury over its duration. |
| Them Bones | Your Skull Crusher has a 30% chance to have +100% increased critical strike chance. GRIEVOUS CRITICAL STRIKE Any critical strike chance you have beyond 100% causes a grievous critical strike. Grievous critical strikes increase the base damage of the hit by an amount equal to the overflowing critical strike chance. |
| Kill ‘Em All | Your Hammer Storm now spins 3 times per use for the same Fury cost, but each consecutive spin deals 35% more damage. |
 | Thunderstruck | Your Chain Lightning bounces 2 additional times. |
 | Pneuma | While Thunder Call is active you take 10% reduced damage and you passively restore health equal to 5% of any damage you deal for the duration. |
 | Far Beyond Driven | Each time you use Heavy Strike you gain 1 stack of Far Beyond Driven for 20 seconds, increasing your Spirit by +2%. Far Beyond Driven stacks up to 5 times. |
 | Magic Ward | You take 10% reduced Magic damage. |
| Mouth for War | When your Leap Smash ability deals damage, you are granted 1 charge of Focused Wrath. |
 | Schism | Your Skull Crusher has a chance to make your next Hammer Storm deal 250% increased damage. Your Hammer Storm has a chance to make your next Skull Crusher deal 250% increased damage. (3.2 PPM) |
| Square Hammer | Wild Swing, Face Breaker, Leap Smash & Chain Lightning each grant you 1 stack of Square Hammer, up to 5 stacks. SQUARE HAMMER Your next Heavy Strike consumes all stacks of Square Hammer and deals 20% more damage per stack consumed. |
 | Spit It Out | Your Critical Strike Power is increased by 10%. |
 | Spirited Fortitude | You take 10% less damage from Area of Effect attacks. |
 | Crack the Sky | Your Lightning damage has +25% increased critical strike chance. |
Tariq has a few builds that he can utilize, but this guide will focus two of his most consistent and well-rounded talent builds: Lightning Build and Schism Build.
Lightning build is simpler to pick up and pilot. The build has a lower skill floor and comes more intuitively than the Schism build. The only things to worry about is making sure you’re not overcapping your Fury and that you’re executing your Builder and Spender rotations effectively. This build can be used at any stage of the game, whether you’re first starting out or gearing into Eternal.
With Schism build, your spender rotation changes from simply spending and unloading all the Fury you’ve accumulated to fishing for the right proc for the encounter your party is in. This is a late-game build that requires a minimum of 11 talent points.
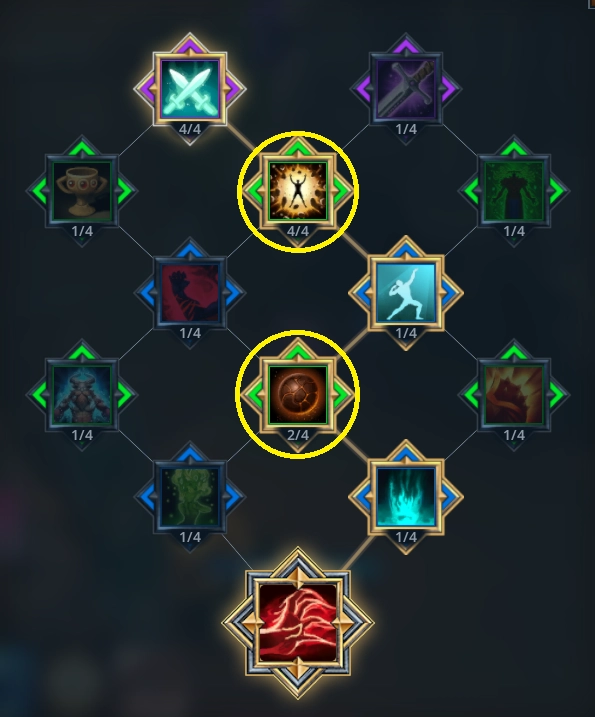
This guide will refer to the talents by their name and the row/column that they are located in.
Lightning Build
Our core talents for our Lightning Build are Blood & Thunder (1c), Thunderstruck (3c), Crack the Sky (6c), and Spit it Out (6a) since they all work together in a multiplicative manner.
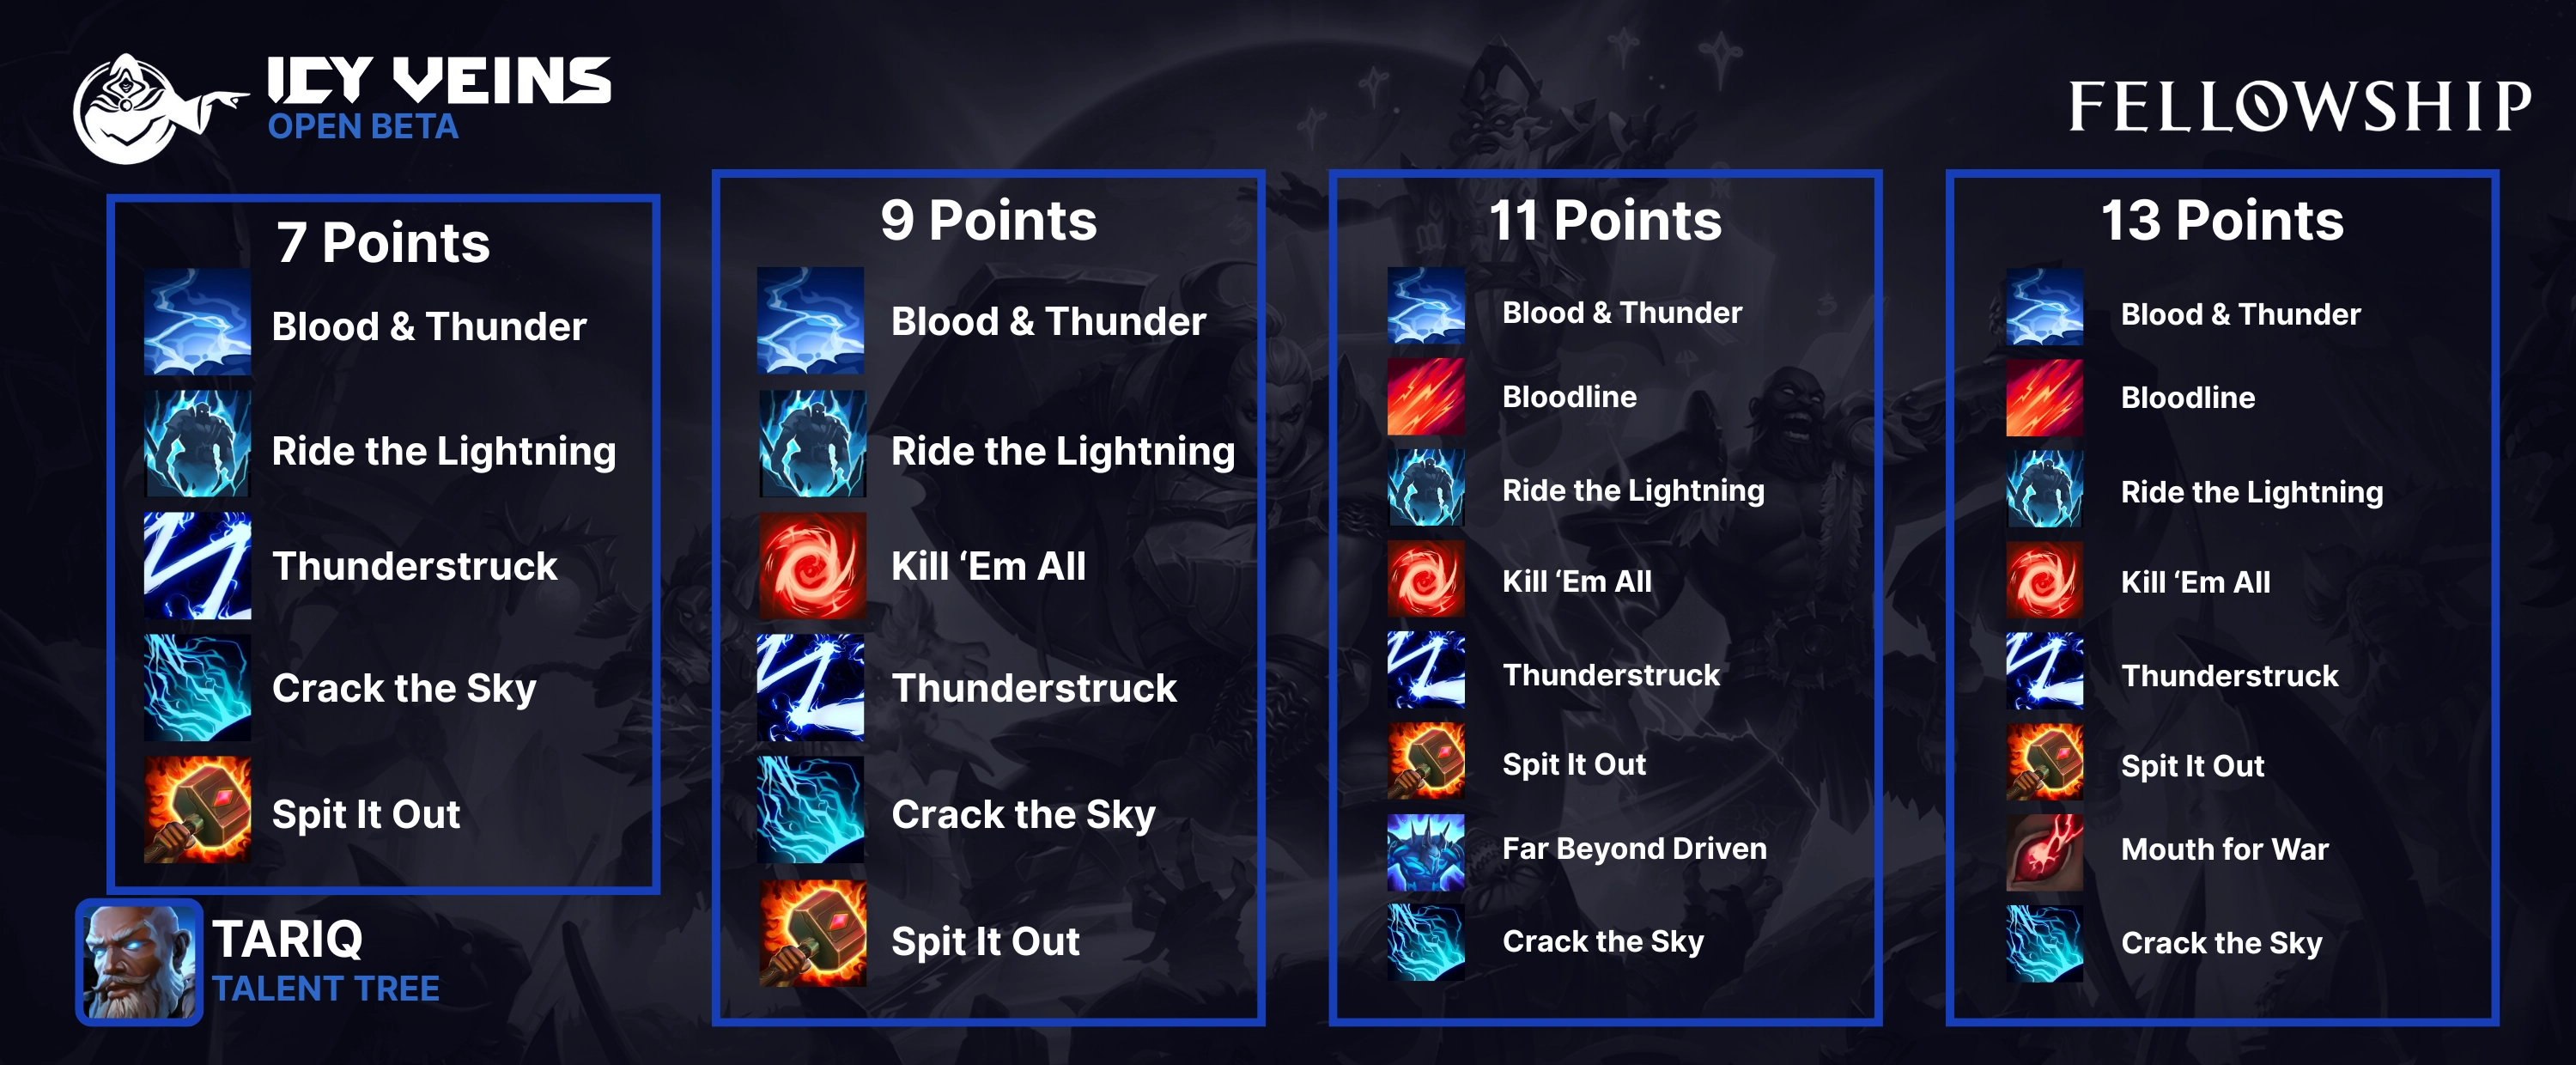
- Blood & Thunder (1c) gives us a chance to cast a free Chain Lightning on our target when we land a Heavy Strike. This talent scales well with Haste as Haste increases your PPM, auto attack speed, and lowers your global cooldown (GCD). The more Haste we have, the more often we’ll be able to proc Blood & Thunder with our Heavy Strike.
- Ride the Lightning (2c) adds Fury generation during Thunder Call, allowing you to cast more of your Fury spenders Skull Crusher and Hammer Storm.
- Kill ‘Em All (3b) increases the damage dealt by your Hammer Storm with each spin, which also affects the Thunder Call enhanced version. It also reduces the amount of time you are locked into the animation for Hammer Storm.
- Thunderstruck (3c) increases the amount of times that your Chain Lightning bounces. This also affects the Chain Lightning that comes from Blood & Thunder (1c).
- Mouth for War (5a) enhances our Leap Smash ability, granting us 1 charge of Focused Wrath when we deal damage with Leap Smash. The Focused Wrath buff gained from this talent stacks with and refreshes Focused Wrath‘s standalone ability.
- Crack the Sky (6c) increases the Critical Strike chance of your lightning damage, meaning that it’ll increase our DPS while Thunder Call is active.
- Spit It Out (6a) increases your Critical Strike power, meaning that your critical hits will deal increased damage.
Both Spit It Out (6a) & Crack the Sky (6c) scales well as you progress later into the game since they both have an effect on your Critical Strike and offer a fair amount of DPS for their cost of 1 talent point. Best when these two are paired together.
Later on when survivability becomes more important (Champion+), you may want to drop the Bloodline (2a) talent for Pneuma (4a).
Quick Reference Talent Table
| Talent Points Total | Talent Tree (Row + Column) |
| 2 Points | 1c |
| 3 Points | 1c, 2c |
| 4 Points | 1c, 2c, 2a |
| 5 Points | 1c, 2c, 3b |
| 6 Points | 1c, 2c, 3b, 4b |
| 7 Points (Contender) | 1c, 2c, 3c, 6c, 6a |
| 8 Points | 1c, 2c, 3c, 6c, 6a, 2a |
| 9 Points (Adept) | 1c, 2c, 3b, 3c, 6a, 6c |
| 10 Points | 1c, 2a, 2c, 3b, 3c, 6a, 6c |
| 11 Points (Champion) | 1c, 2a, 2c, 3b, 3c, 4b, 6a, 6c |
| 12 Points | 1c, 2c, 3b, 3c, 6a, 6c, 5a |
| 13 Points (Paragon) | 1c, 2a, 2c, 3b, 3c, 5a, 6a, 6c |
Remember to not take talent trees as is and adjust for any legendary or weapon trees you get, or content you are doing.
Lightning Build Ability Rotations
Tariq’s rotation cycles between building his Fury and spending it.
Please keep in-mind that these rotations may change based on your talents and if you have a legendary equipped. These rotations are based on the talent build mentioned above.
Builder
This Builder rotation is going to focus on building up our Fury resource so that we can cycle to our Spender rotation.
- Heavy Strike
- Thunder Call
- Chain Lightning
- Culling Strike when you have more than 20 Fury.
- Wild Swing
- Leap Smash if you have less than 75 Fury, unless needed for movement.
- Use Face Breaker when it’s available.
- Heavy Strike
- Repeat 2-6 until you have enough Fury where doing another Fury Builder rotation would overcap your Fury.
Our Swing Timer will continue until it reaches the end of the red portion of the bar. Due to this, we should be looking to open the fight with our Heavy Strike. With an early Blood & Thunder (1c) proc on our Heavy Strike and our Chain Lightning, we might end up at full Fury and ready to go into the Spender Rotation.
Be cautious about using any other abilities while you’re near the end of the Swing Timer bar to avoid missing Heavy Strike.
Keep in mind that, if you take the Concatenation (1b) talent, your auto attack will be fast enough where you can only fit 2 GCD into your rotation. Prioritize casting Chain Lightning off cooldown then fill the rest with Wild Swings. When Wild Swing misses, you will have the opportunity to use Face Breaker, an off-GCD ability.
Typically, it is best to use your off-GCD abilities whenever they are available. However, there will be situations where it’s better to hold onto these abilities instead of using them if using them would overcap your Fury.
Spender
Once you have enough Fury built up to cast your Fury spenders, transition into your Spender rotation.
- Raging Tempest/Thunder Call if you’re doing a big pull or on a boss. See Boss rotation below for additional information.
- If you have Mouth for War (5a): Leap Smash if you have less than 75 Fury.
- Groups 3+: Hammer Storm. Single Target: Skull Crusher.
- Focused Wrath
- Groups 3+: Hammer Storm x2. Single Target: Skull Crusher x2.
- Additional Hammer Storm/Skull Crusher if above 50 Fury.
- Repeat 6 until you run out of Fury, using Leap Smash off CD to enhance our spenders via Mouth For War (5a) and/or if you have the legendary cloak, Drape of the Slayer King.
We open with Leap Strike to gain the charge of Focused Wrath to use on our spenders. Depending on how many enemies we are facing, we will either use Hammer Storm (3+) or Skull Crusher (1-2). Using Hammer Storm on less than 3 targets will do less damage than Skull Crusher would.
Use your Fury spenders until you are below the threshold required to cast it. Avoid casting Hammer Storm when you’re below 50 Fury as you will lose out on the final spin. Losing your final spin is a huge loss in DPS.
If the enemies are still alive, cycle back to the beginning of the Builder Rotation.
Boss Rotation
When we go into boss, we should look to have our Thundercall and Spirit Ability, Raging Tempest, available for use. We want to open with Thundercall then use Raging Tempest once Thundercall ends to maximize our DPS. Thundercall should be up again by the time Raging Tempest ends, allowing us to enhance our abilities for a total of 60 seconds (1 minute).
1st Thundercall -> Raging Tempest -> 2nd Thundercall
Follow the usual Builder/Spender rotations while focusing your buff uptime.
Drape of the Slayer King & Fateful Basher Rotations
When using the legendary cape, Drape of the Slayer King, your rotations will look a little different. By this point, you may also have the Fateful Basher weapon. If you have Visions of Grandeur as your active Master Trait for the weapon, your rotations may look like this:
- Focused Wrath before combat begins (up to 10s before).
- Thundercall/Raging Tempest.
- Chain Lightning.
- Fated Strike.
- Leap Smash into Spender Rotation.
Leap Smash refreshes the Focused Wrath buff and adds a stack to the buff, allowing us to start the fight with a lower cooldown for Focused Wrath. With the Drape of the Slayer King legendary, we want to put as much of our resources into the 5 second window of the Leap Smash buff. You’ll want to pool your resources into your Leap Smash.
We want to be using Focused Wrath and Thundercall off cooldown. Leap Smash is a cooldown you should save to open into your Spender rotation. When possible, we want to pool both our Focused Wrath and Leap Smash into Raging Tempest.
Schism Build
This build feels best when you have 11 or more talent points to work with. The build gets better as you gain your milestone power spikes: more talent points, your first legendary, and gaining a Champion+ tier Fateful Basher. This build is more late-game oriented than Lightning build.
Our core talents for our Schism build are Schism (5b), Ride the Lightning (2c), Kill ‘Em All (3b), Mouth for War (5a), Spit it Out (6a).
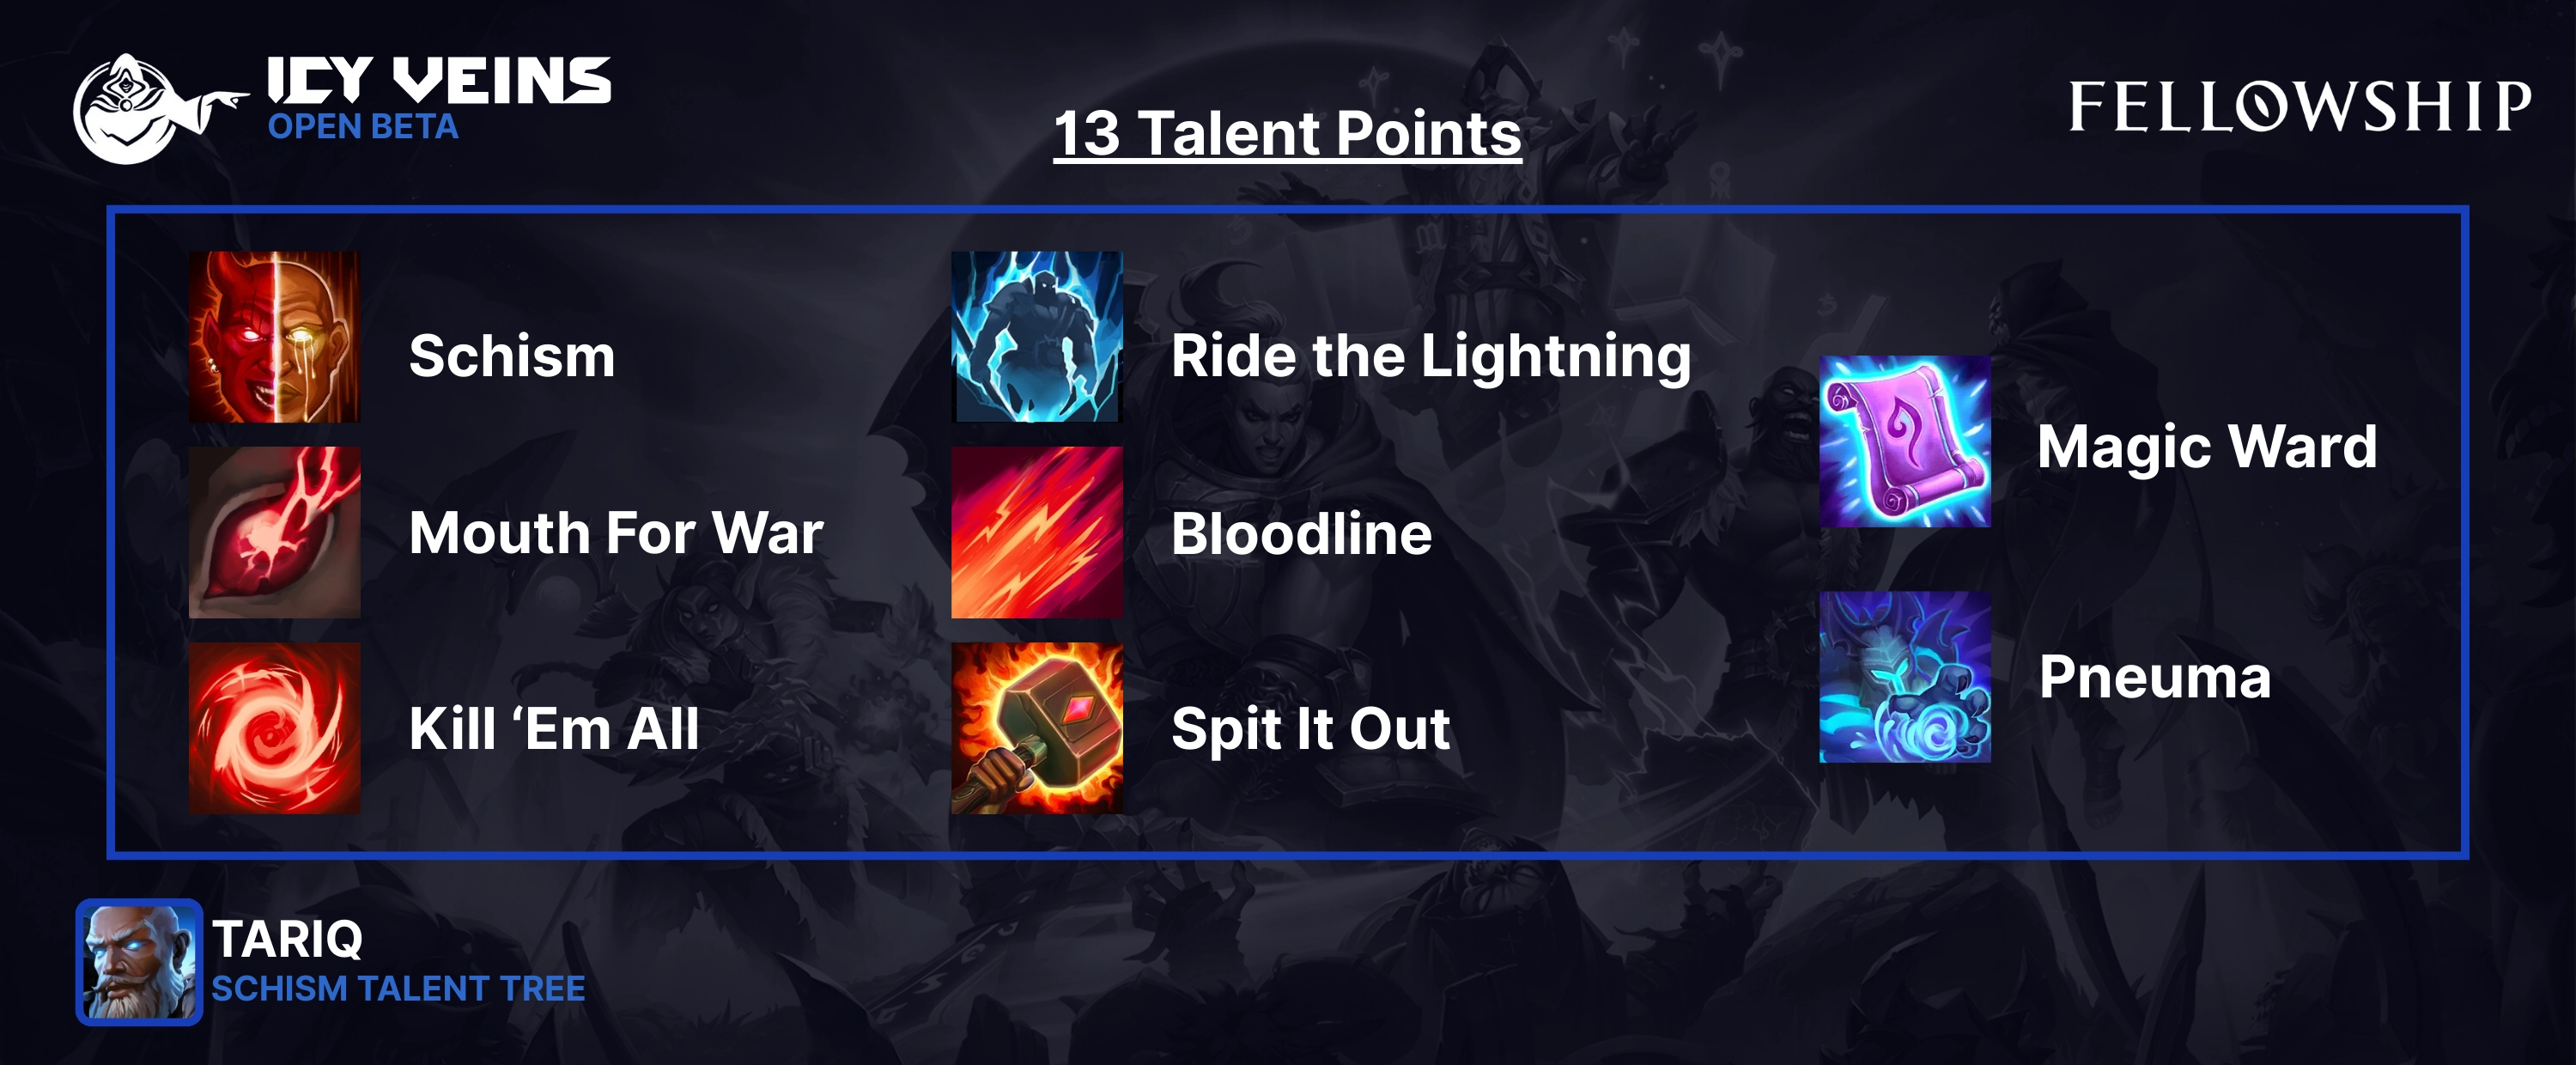
- Schism (5b) is the core talent for this build. It changes how we play Tariq by switching up our Spender rotation from spamming the optimal ability for the size of the pull to fishing for the optimal Schism proc for the pull.
- Pneuma (4a) enhances our defensive ability, Unbreakable Will, and helps us sustain through unavoidable damage and takes some of the pressure off the healer when things get dicey.
- Magic Ward (4c) helps us survive unavoidable damage that could kill us in higher Eternal difficulties.
Schism Build Ability Rotations
Building and spending are a part of Tariq’s core gameplay and apply to both Schism and Lightning build. The only difference is that you are now going to look for the correct ability that you want buffed by your Schism talent proc.
When to Fish
When fishing for a Schism proc, it’s essential to understand when the best time to do so is. It’s important to know that chaining spenders together does not increase your chances of triggering Schism. Any increase in the chance of proccing Schism depends on the passage of time and the total PPM. Schism’s PPM of 3.2 is affected by Haste. We can calculate the new PPM total below:
Base PPM x (1.Haste%)
So, with Schism at 3.2 PPM and 20% Haste, the PPM for Schism is now 3.84 PPM. Below are two tables showing the time it would take for Schism’s proc chance to reach each milestone %.
At 0% Haste:
| Time Elapsed | Proc Chance % |
|---|---|
| 0 s | 0% |
| 4.7 s | 25% |
| 9.4 s | 50% |
| 14 s | 75% |
| 18.75 s | 100% |
At 20% Haste:
| Time Elapsed | Proc Chance % |
|---|---|
| 0 s | 0% |
| 3.9 s | 25% |
| 7.8 s | 50% |
| 11.72 s | 75% |
| 15.63 s | 100% |
Keeping in mind the information from the tables above, we can find optimal timing to begin fishing for Schism procs. If less than 6.5s have passed, use your normal spender for that encounter (ie, Hammer Storm for 3+ targets). If more than 6.5s have passed, you’re free to go fishing.
How to Fish
Just like with the Lightning Build’s rotations, we would like to build to 100 Fury and avoid overcapping Fury. Usually, building from 0 to 100 Fury allows us enough time to build up our Schism proc chance so that we can open our Spender phase with the appropriate fish for the encounter.
After 6.5s have passed:
- 1 target: Fish with Hammer Storm [Enhance Skull Crusher]
- 2 targets: Spam Hammer Storm
- 3 targets: Fish with Skull Crusher [Enhance Hammer Storm]
Our timing for when we want to Leap Smash changes with the use of Schism, since we will want to use it just before we use our Schism-enhanced ability. We generally want our Schism proc when our Leap Smash is available. If Leap Smash won’t be up soon after you hit your Schism proc, it’s best to use the Schism-enhanced ability without Leap Smash.
If the encounter is going to end before your Leap Smash comes off cool-down, it’s a good idea to spam fish for the enhanced ability that would work best for the subsequent encounter.
- For larger groups of trash mobs, spam Skull Crusher to get that Schism-enhanced Hammer Storm ability.
- For going into any single-target encounters, spam Hammer Storm to get the enhanced Skull Crusher ability.
Once you have the optimal Schism-enhanced ability, save that enhanced spender for the next pull/encounter and finish the current one with Culling Strikes.
Spending Rotations
AoE (3+ Targets)
Most ideally, we will want to have the Legendary cloak, Drape of the Slayer King, equipped to increase our damage further when using Leap Smash and to have our Thundercall buff active when we go into our Schism-enhanced Hammer Storm.
- Build to 100 Fury.
- Skull Crusher to fish.
- Build back to 100 Fury.
- Leap Smash.
- Enhanced Hammer Storm.
Single Target/Priority
This build especially shines when we are looking to deal priority damage to a single target within a larger pack of mobs.
- Build to 100 Fury.
- Hammer Storm to fish.
- Build back to 100 Fury.
- Leap Smash.
- Enhanced Skull Crusher.
When there are only 2 targets in a pull, it’s best to spam Hammer Storm and use the Schism-enhanced Skull Crusher rather than to fish for a Hammer Storm.
Gearing and Stat Priority
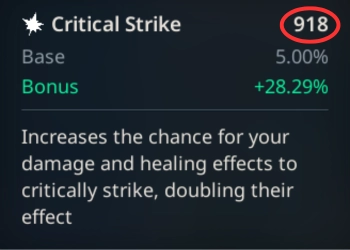
- Critical Strike – Chance for damage and healing effects to crit, doubling their effect.
- Expertise – Increases all damage, healing and absorption effects done by Tariq.
- Haste – Increases attack speed (aka, how fast your Swing Timer is), casting speed and the tick rate of damage and healing effects. It also reduces your global cooldown (GCD), allowing you to cast more frequently.
- Spirit – Increases the rate you charge your spirit ability. Every 1% of Spirit gives 0.5% chance to refund Fury when using one of your Fury spenders.
Champion league is when you will want to be prioritizing obtaining gear that have the secondary stats you’re looking for. Legendaries and Champion+ tiered weapons that can be augmented at the Weapon Master. Legendaries will start appearing in the loot pool in Paragon+. Obtaining these will be another huge power boost for Tariq. Prior to that, item level is the main priority.
Higher item level is king, having greater effect on your damage and survivability than any secondary stat will on its own.
Crit is our #1 priority for secondary stats for Tariq in both builds. Crack the Sky (6c) increases our Critical Strike chance when dealing lightning damage and Spit It Out (6a) increases our Critical Strike power.
Expertise increases all damage by a flat percent. Crit is calculated after the extra damage from Expertise is added, meaning that more Expertise will mean higher Crit damage. Expertise is tied with Haste as our second priority for secondary stats in this build.
Haste increases how fast our Swing Timer is and increases the rate of our PPM talents/abilities. This will enable us to proc Blood & Thunder (1c) more often, increasing our DPS. Higher Haste will also increase how fast we spin during Hammer Storm, allowing us to get out of the spin animation faster so that we can use our other abilities.
Spirit is our lowest priority early on since it doesn’t increase our DPS as much as any of the other 3 secondary stats do.
It’s worth noting that secondary stats on gear have diminishing returns. While Crit and Expertise are our best stats, the diminishing returns make it less efficient to stack only Crit and Expertise. Keeping this in mind, we should look to spread our secondary stats out.
Set Bonuses
Set bonuses on gear can be huge boosts to our power, but time consuming to accomplish. It’s generally a good idea to hold off on farming for a specific set until you hit Paragon or if you’re feeling stuck at any particular capstone.
You are able to equip up to 4 set bonuses total: 2 sets from any non-capstone dungeon and 2 sets from any capstone dungeon. Keep in mind that gear pieces cannot have both a set bonus and a socket. Many of the top Tariq players on the leaderboard opt to have the Drakheim’s Absolution set bonus and the rest of their gear to have Essence Bonus sockets.
Below are the different set bonuses that are worth the time to farm for until we can fill out our gear with more Essence Bonus socketed gear.
| Set Bonus | Reasoning |
|---|---|
| Drakheim’s Absolution: Grants you a buff when activating your Spirit Ability, increasing your Strength by 20% for 20 seconds. Capstone Gear Set. | This is a massive damage boost for the duration of Raging Tempest. Once you obtain this set, it is a good idea to pivot into Sapphire gems alongside your Amethysts. |
| Draconic Might: Grants a chance (0.9 PPM) on a Critical Strike to increase your Strength by 18% for 15 seconds. Capstone Gear Set. | We are always wanting any way to boost our primary stat as that is the main factor for increasing our overall damage. |
| Death’s Grasp: Grants +3% Spirit and +15% damage to low health enemies. Non-Capstone Gear Set. | We want this set to further our spirit gain as we will want to increase the uptime of our Spirit Ability as we gain more Sapphire gem power. |
| Sin Warding grants +3% Expertise and +5% Max Health. Non-Capstone Gear Set. | This is a great option for providing even more buffer for your health to stabilize after an instance of high damage. Extra expertise is a great thing to have, as well, since it affects your base damage before your Critical Strike is calculated. |
Set Bonus Honorable Mentions
| Set Bonus | Reasoning |
|---|---|
| Torment of Bael’Aurum grants +4% Strength. When dipping below 20% Health, you are instantly healed for 35% of your maximum health (180 second cd). Capstone Gear Set. | This is a consistent increase to our primary stat, allowing us to survive a dicey situation once every 3 minutes. The only downside is that the primary stat bonus is not as strong as Draconic Might or Drakheim’s Absolution. |
| Dark Prophecy grants your abilities to have a chance (0.8 PPM) to increase your Haste by 25% for 20 seconds. Capstone Gear Set. | A great set for if your Haste seems to be lacking. It boosts the PPM of our Blood and Thunder (1c), increases our attack speed, and decreases our GCD. |
| Eldrin Deceit grants +3% Critical Strike Chance and -15% Threat Generation. Non-Capstone Gear Set. | A solid option for the non-capstone set bonus to use if you happen to often take aggro from your tank and/or you would like to stack more Crit. |
Gems
When deciding which gems to use, we should refer to our priority stats. Gems aren’t too important until Paragon league as we won’t be getting many gem or socket drops until then.
Generalizing the gems:
- Topaz gems grant Haste,
- Rubies increases your Strength,
- Diamonds increase all stats slightly,
- Sapphires increases your Spirit and your stats while your Spirit Ability is active,
- Emerald increases Expertise,
- Amethyst increases Critical Strike.
When beginning to socket gems into your gear, don’t be concerned about focusing on any one gem type until you’re able to begin fusing them. You can fuse 3 gems of the same type and tier to upgrade them to the next tier.
Avoid rerolling Tier 1 gems; It’s more efficient with your materials and gold to reroll gems that are at Tier 2 or above. Prioritize placing your highest-tier gems into any gear piece that has a gem power bonus. Normal gear has a chance to drop with +35% gem power. Legendary items give +100% gem power.
When working with Tier 1 gems, the priority is:
- Amethyst
- Ruby
- Emerald=Diamond
- Topaz
- Sapphire
The priority shifts once you’re able to gain more gem power. As you progress, the primary gem you’ll want to invest in is Amethyst since we scale well with Critical Strikes, and it will increase our DPS more than the other gem effects will on their own.
The priority when using higher tier gems is:
- Amethyst
- Emerald
- Sapphire
- Ruby
- Topaz
- Diamond
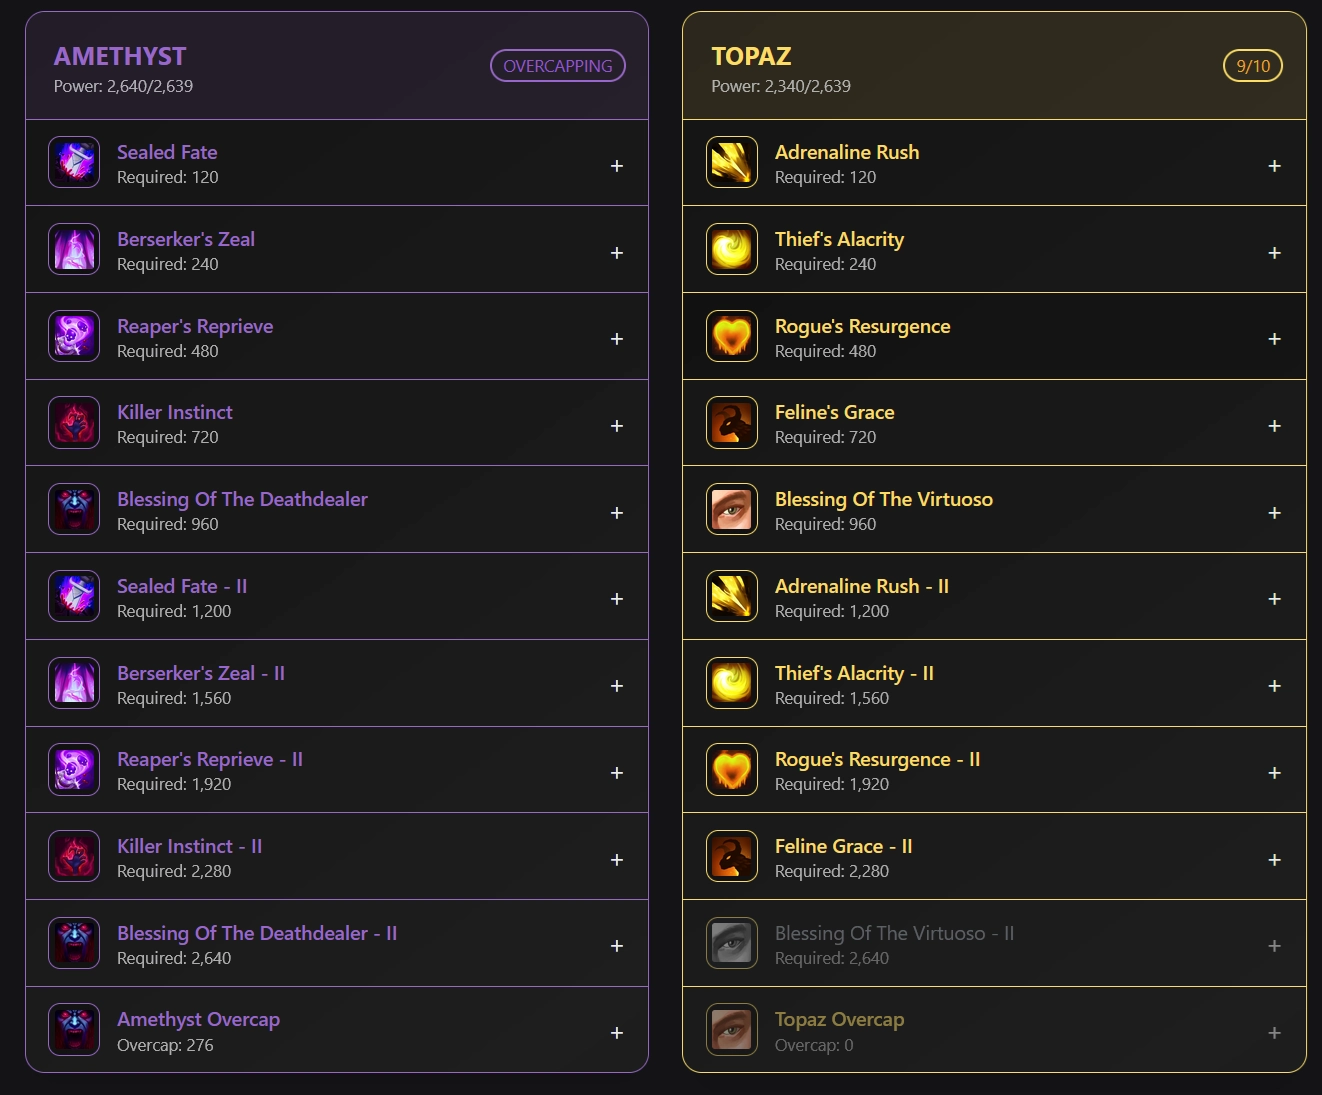
Many high-Eternal players aim to have a gem power distribution consisting of Amethyst at tier 10 and Sapphire at tier 6, with any leftover gem power put into Ruby or Amethyst for the overcap bonus. Some may opt to drop all set bonuses altogether in favor of having more gem power.
Using Fellowsguide’s Gem Calculator, we can show the optimal gem distribution for each distribution type. The one you pursue will be solely based on your playstyle and preferences.
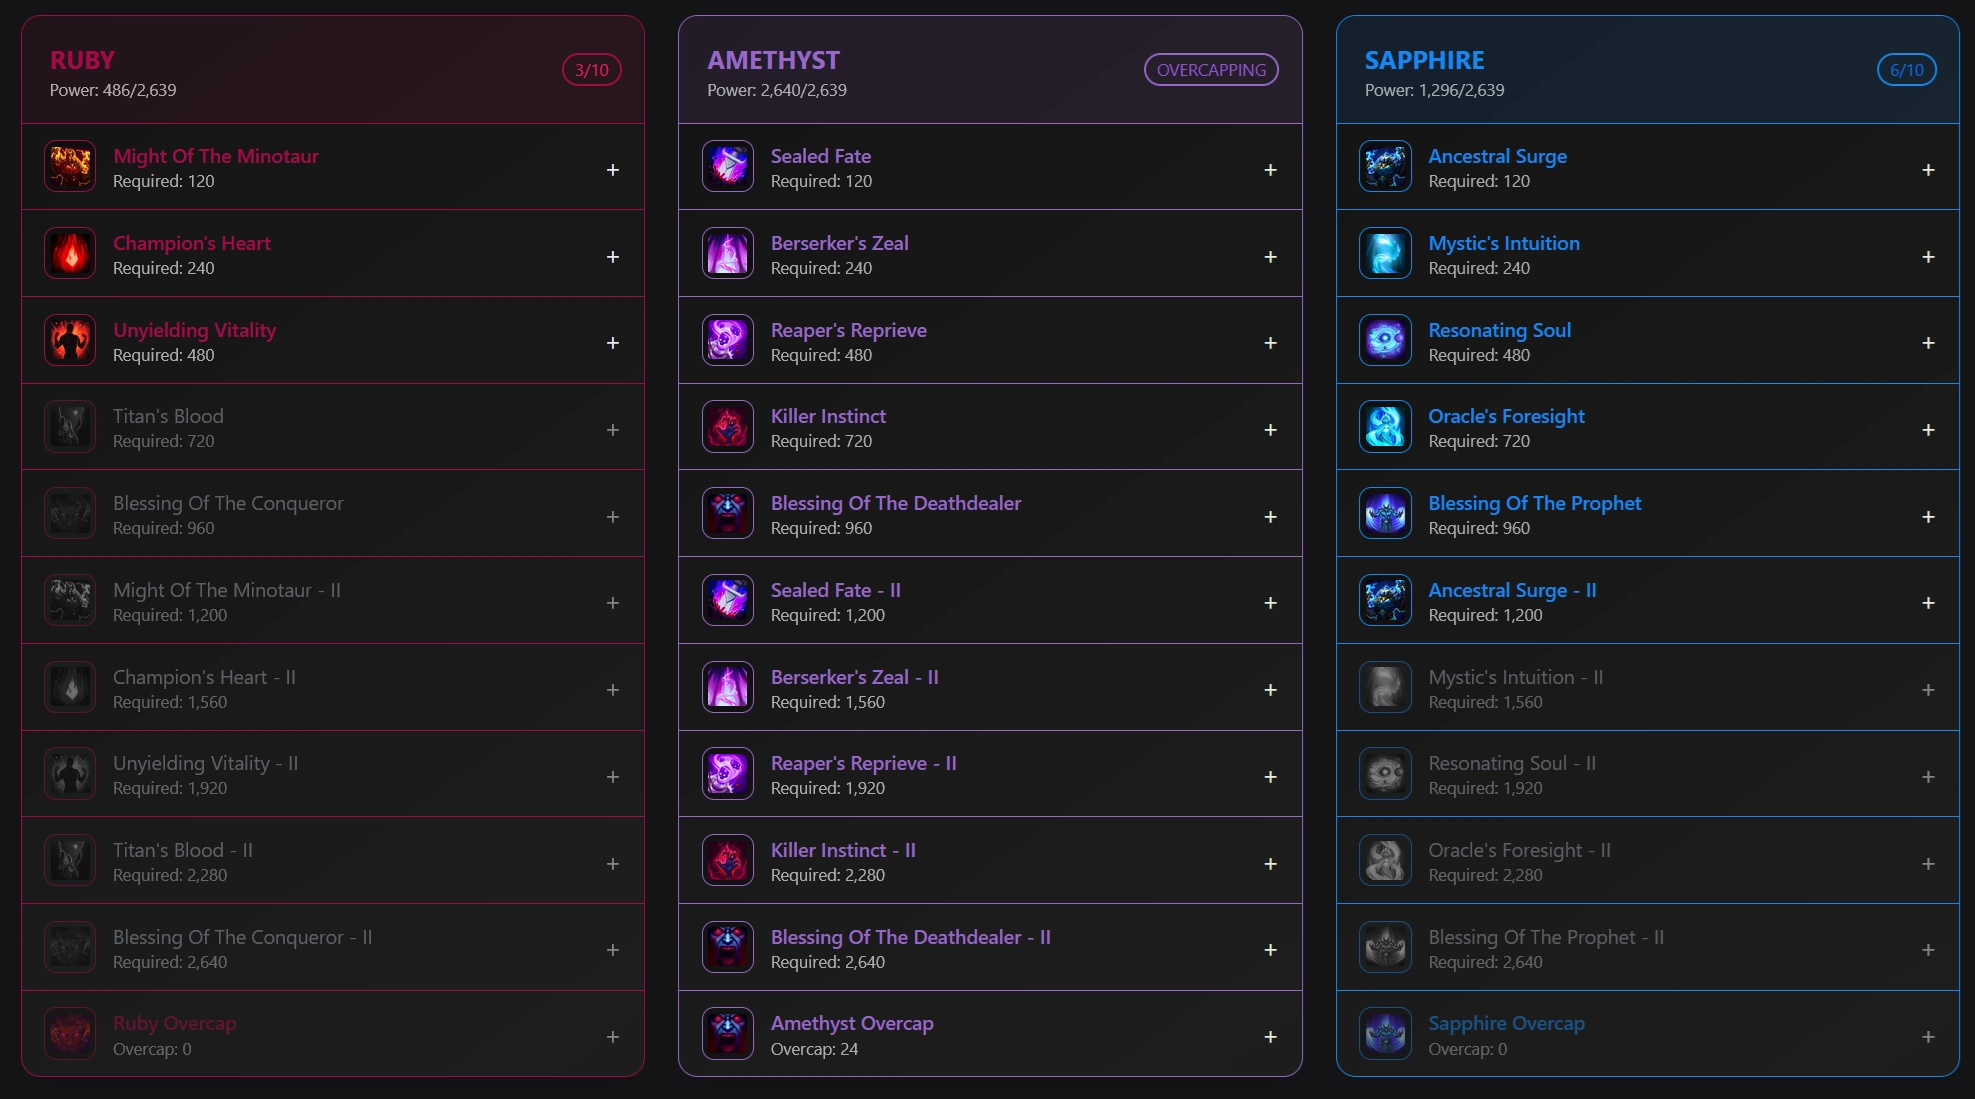
1 Set Bonus Gem Distribution
10 Amethyst, 6 Sapphire, 3 Ruby
This is the standard setup when using Drakheim’s Absolution set bonus. Amethysts are the default gem for Tariq no matter the build chosen. Sapphires pair well with Drakheim’s Absolution as they both increase the damage you deal after activating your Spirit Ability. The early bonuses from Ruby’s tier 1-3 are a solid choice for your remaining gem power. These effects will increase your Strength, Stamina, and will heal you periodically while in combat.
0 Set Bonus Gem Distribution
10 Amethyst, 6 Sapphire, 6 Ruby
This build is much like the gem build with the Drakheim’s Absolution set bonus. Since we will have access to more sockets for gem power, we will look to gain more Ruby gem effects for more overall DPS, more DPS in a boss encounter, and more Stamina.
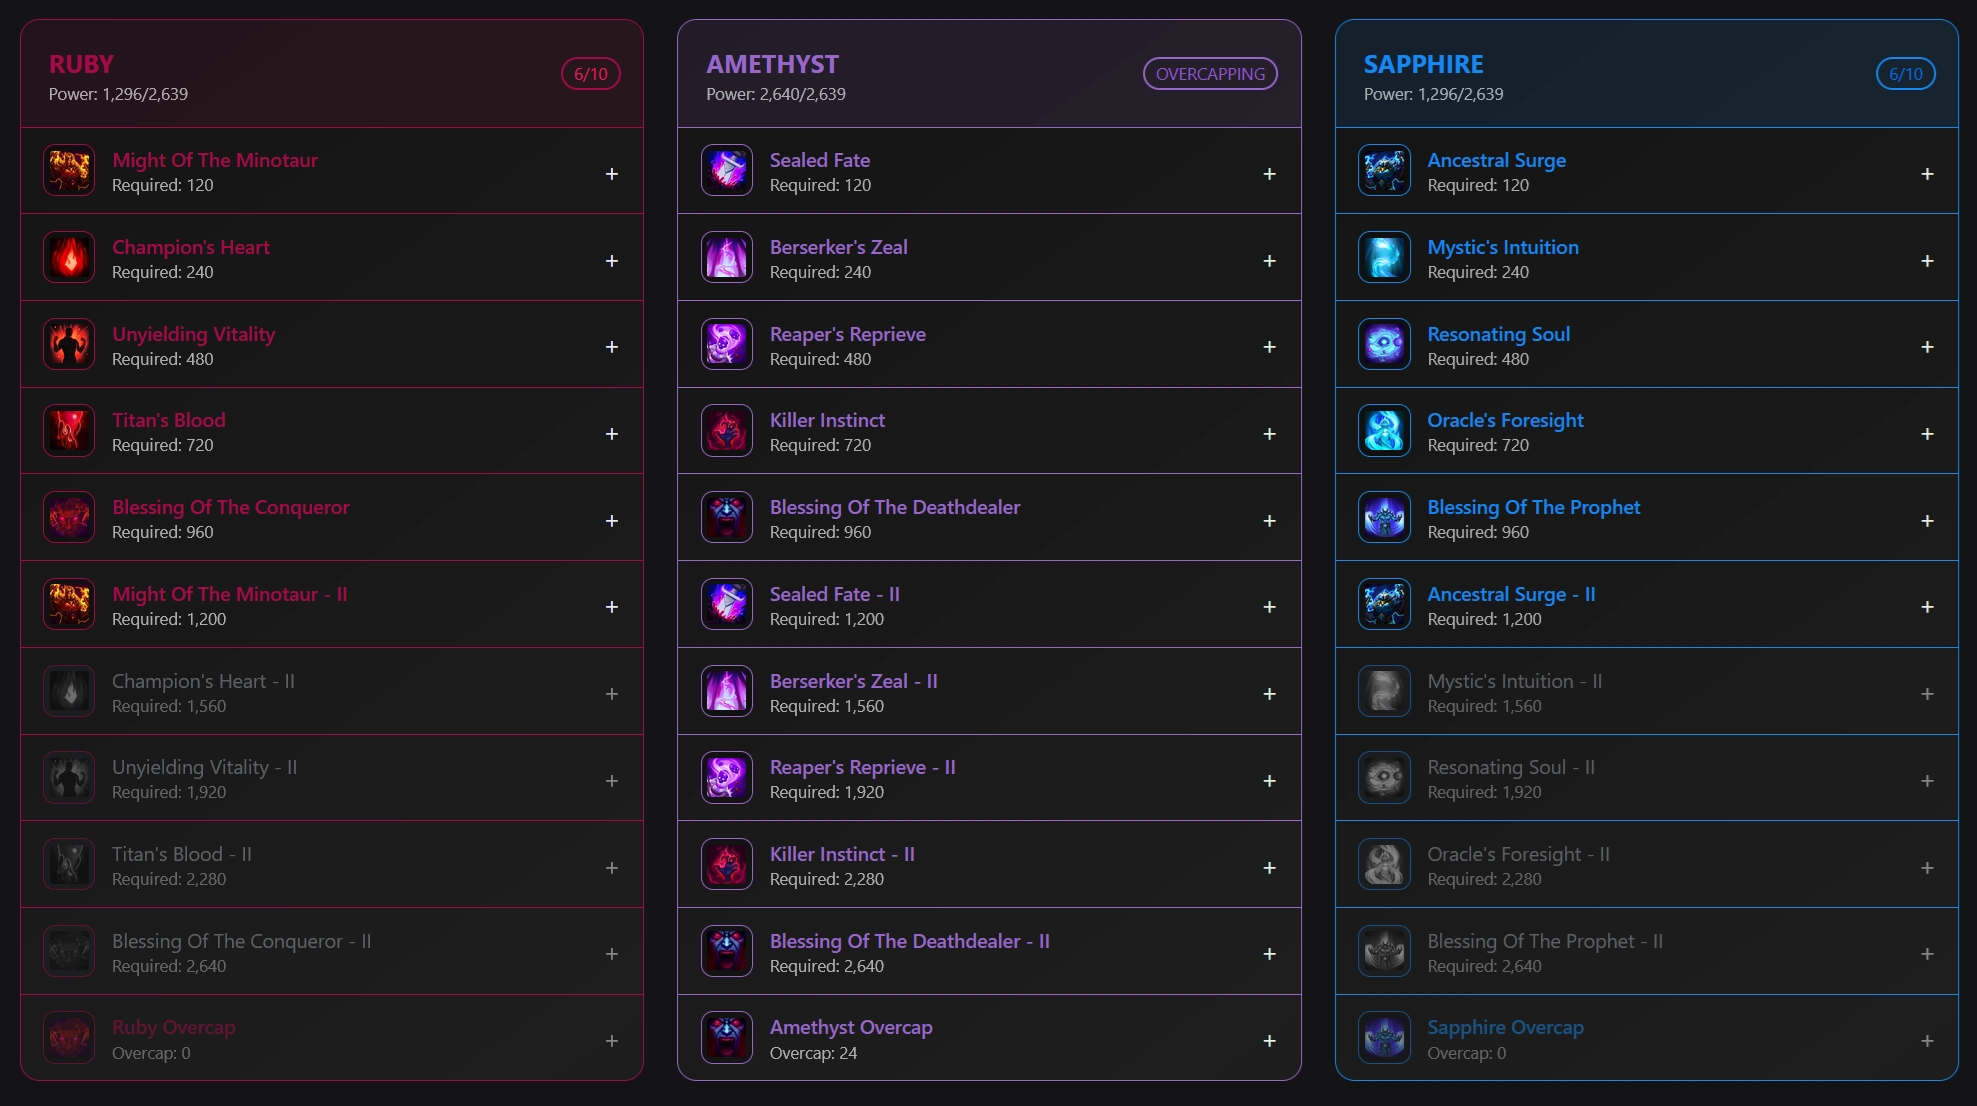
This gem build has become less popular since the Shadow Lord’s Trial dungeon curse got buffed on November 20th. The buff to the Shadow Lord’s Trial allows heroes to use their ult more often within a dungeon. However, the additional Haste is fun to play with, especially if you’re a fan of higher APM and prefer the Left-Hand Path and/or Concetenation talents.
Weapons
Once you pass Cithrel’s Fall and get into the Adept league, you’ll have access to Weapons and Relics with active abilities. In this section, we will discuss the best option for this build and go over all the other options available.
Fateful Basher is our best weapon choice for both builds since it lowers our important cooldowns: Thundercall, Focused Wrath, Chain Lightning, and Leap Smash abilities. It will also affect our defensive, Unbreakable Will, and our Intimidate cooldowns as well.
Below are the 4 different weapons available to Tariq.
- Fateful Basher has some single-target damage with a cleave effect as well as some mobility by charging at your target if you cast this weapon at a range. It also applies a buff to you, increasing your 20% Expertise and granting 200% increased Cooldown Recovery for 6 seconds.
This weapon is easily BiS for Tariq, regardless of build, and is versatile in its use.
Keep in mind: Cooldown Recovery is not haste. Cooldown Recovery only affects the cooldown timers for any skill with a cooldown, including this weapon’s ability. - Wildstone Crusher is great for AoE damage and crowd control (CC). Its Earthbreaker ability can enable your group to make larger pulls with less risk and acts as another way to Stun an enemy that might be casting a deadly ability.
- Sahril’s Reckoning is great for increasing your critical strike chance for 20 seconds, increasing your damage potential against multiple mobs. This weapon has a lot of potential if you can stack buff by hitting multiple enemies and synergizes with our build since we want juicy critical hits on our Lightning damage.
- Void-Touched Hammer is a great choice for single-target damage, helping ensure that your target is taken down quickly by storing 20% of all the damage you deal until the effect expires. On expiration, it detonates on the target dealing up to 85,000 damage.
Weapon Traits
Once you reach the Champion league, weapons will begin to drop with weapon traits. To use these weapon traits, go to the Shrine of Infusion within the Stronghold. Each weapon will roll different traits. You will be able to choose 2 Defensive Traits, 2 Heroic Traits, and 1 Master Trait.
Please keep in mind that, even though you gain the ability to Empower your weapon traits once you have a Paragon level weapon, refrain from using your resources empowering your weapon until you have an Eternal tier weapon. It is much more cost-effective to focus on Empowering the gear that you won’t be replacing in the near future.
If you would like to read more about weapons and their traits, here‘s an in-depth guide regarding them.
Ideally, our best defensive traits will roll to be in the center of the tree. Having our best defensive options in the center allows us to choose any Heroic and Master traits we please without compromising them. It is much cheaper to buy and use Defender’s Godstones to reroll weapon defensive traits. The best practice when trying to obtain your BiS weapon traits is to focus first on your defensive traits so that rolling for your Heroic and Master traits is much cheaper and simpler, as you won’t be looking for the optimal traits to be in specific spots in the tree.
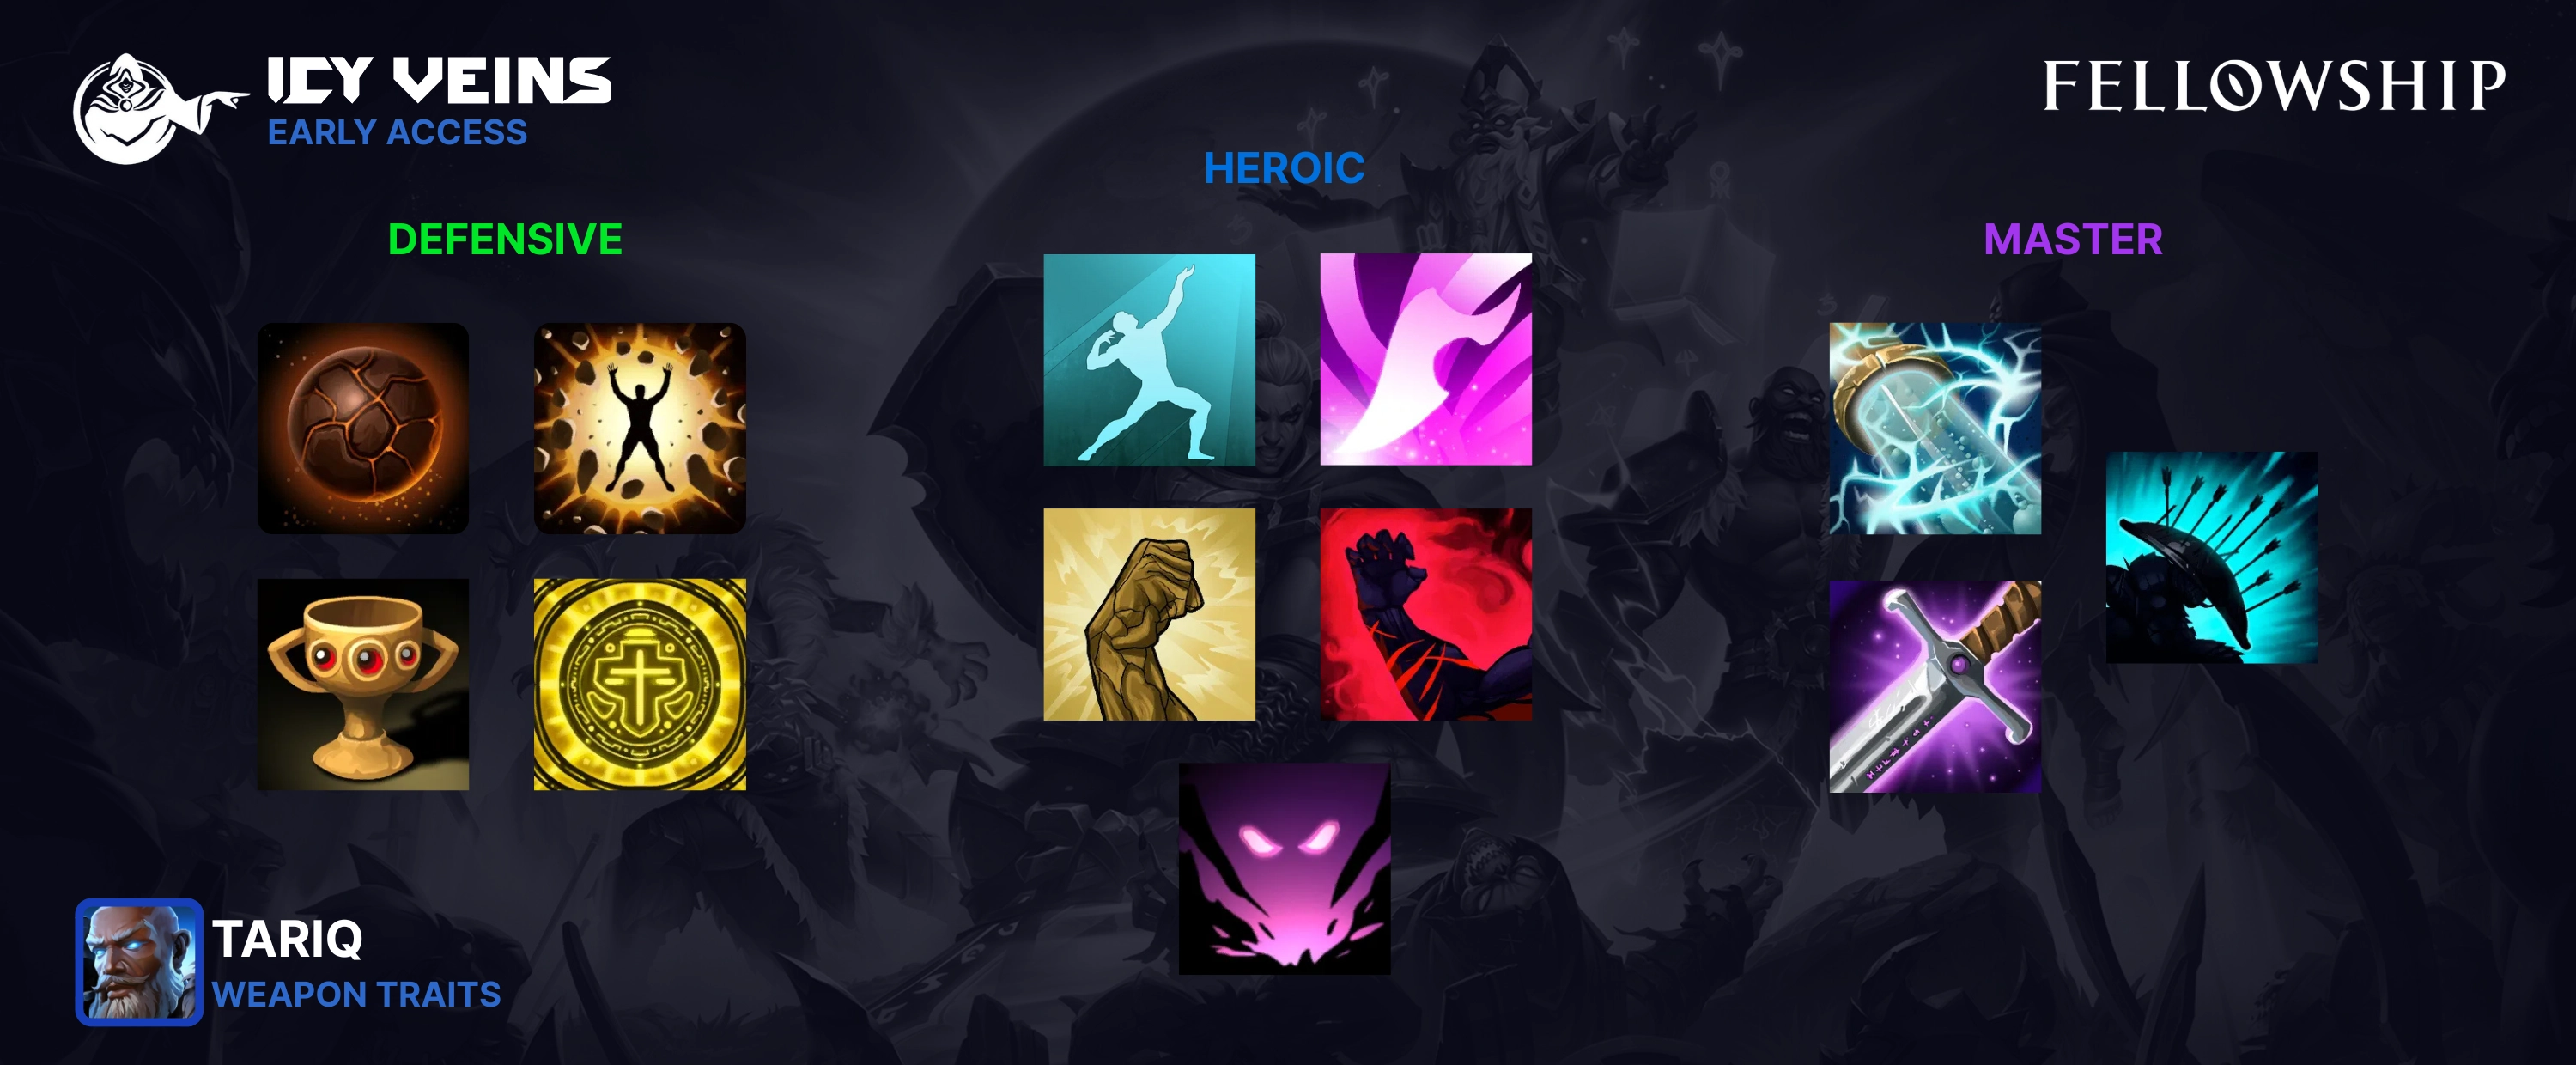
Defensive Traits
The Defensive Traits that we want to take will either increase our overall health pool and decrease damage taken. The best Defensive Traits include Heart of Stone, King of the Hill, Treasure Hunter’s Delight, and Divine Mediation.
| Icon | Name | Description |
|---|---|---|
 | Heart of Stone | One of the best defensive talents to take since it increases our Stamina, which affects our max health. This is something that can be invaluable the higher you climb as it will give you and your healer breathing room if you get hit by an instance of high damage. |
 | King of the Hill | This trait is a great companion to Heart of Stone as it functions in tandem to prevent an instance of high damage from bringing you down. It doesn’t have a cooldown, so as long as you are above 80% health you will benefit from this talent. |
 | Treasure Hunter’s Delight | Synergises well with the Sinbinding Stone relic that grants all party members 15% damage reduction as you will also gain an additional 20% damage reduction on use. While this damage reduction is conditional and dependent on your relic cooldowns, this can be an invaluable survival tool to cycle along with your Unbreakable Will ability. |
 | Divine Mediation | An honorable mention. This trait is an option that benefits your party as well as yourself. Any instance of damage taken has a chance to give you a HoT that grants a party-wide shield to mitigate damage on expiration. |
Heroic Traits
Heroic Traits are weapon traits that increase your secondary stats and/or your primary stat. The Heroic Traits we want to take increase our primary stat or the secondary stats that we wish to prioritize. The best Heroic Traits to take include Vengeful Soul, Inspired Allegiance, Seized Opportunity, Hidden Power, and Navigator’s Intuition.
| Icon | Name | Description |
|---|---|---|
 | Inspired Allegiance | When this trait procs, it increases the Haste rating for youself and your allies. The main attraction is that it also decreases your weapon’s ability cooldown. Due to the nature of Tariq and how we want as much uptime for our abilities, this weapon trait is arguably our BiS option for Fateful Basher. |
 | Vengeful Soul | This trait is one of our best options as it has a chance to increase our primary stat, Strength, whenever we land a Critical Strike. It also has a built-in HoT that triggers whenever you are put below 50% health. |
 | Seized Opportunity | This increases our Critical Strike rating by a flat amount after landing 20 Critical Strikes. This is a simple damage increase and gives more value to our Spit it Out (6a) and Crack the Sky (6c) talents. |
 | Hidden Power | This trait gives us a buff that increases our Strength. A solid choice for increasing our overall damage at 2.6 PPM. |
 | Navigator’s Intuition | Increases your highest secondary stat by a flat amount. The amount gained can be a substantial increase, especially once you Empower the trait. The highest secondary stat is determined by the flat amount rather than the percentage shown in the Character Info screen. |
Master Traits
Master traits are traits that augment the weapon by enhancing its effects. The best Master Traits we can take depends on the weapon you use. If you choose to use Fateful Basher, the best Master Traits are Visions of Grandeur and Brave Machinations, with an honorable mention to Martial Initiative. Since our DPS is closely tied to our cooldowns, we are always looking to reduce their cooldown timers.
| Icon | Name | Description |
|---|---|---|
 | Visions of Grandeur | This weapon ability gains increased Spirit generation on hit and resets the cooldown of our weapon ability upon the use of our Spirit Ability. This is arguably our BiS Master Trait for Fateful Basher as it ensures that we can have our Leap Smash cd reduced to ~7 seconds and reduce the cooldown timers for our other important abilities such as Thundercall, Focused Wrath, and Unbreakable Will. |
 | Brave Machinations | This increases the Critical Strike of our weapon ability and decreases the cooldown of our weapon ability if it lands a critical strike. This is our second best Master Trait as it reduces the cooldown of our weapon by ~21 seconds. |
 | Martial Initiative | When using your weapon ability, you gain a buff that increases your primary stat (Strength) by 10% and your damage reduction by 15%. The duration depends on the cooldown length of your weapon ability and the level of empowerment the trait is at. At the base value for Fateful Basher, this trait will last 14 seconds. |
Gearing Priority
- Purple+ Weapon Tree
- Legendary Item
- Item Level
- Completed Set Bonus
- Substat Priorities
Substat Priorities
- Crit
- Haste
- Expertise
- Spirit
Tariq Legendaries
The best legendary to compliment our Lightning build is the legendary cloak. The boots is our next best pick, with the necklace being our lowest pick. The reason for this is that the cloak is consistent in that it will always activate when using Leap Smash. The boots can increase our DPS, but it is RNG based. The necklace feels underwhelming in comparison to the other two.
- Drape of the Slayer King (Back)
- Slayer’s Mosh
Enemies that take damage from your Leap Smash ability take 20% more damage from you for 5 seconds.
- Slayer’s Mosh
- Executioner’s Unsanitary Boots (Feet)
- Executioner’s Grin
Your Abilities have a 6% chance to grant you Executioner’s Grin for 8 seconds, causing your next Culling Strike to have no cost and deal damage as if it spent 40 Fury.
- Executioner’s Grin
- Bloodied Brass Pendant (Necklace)
- Splintered Bone
Face Breaker critical strikes deal an additional 350% of the damage it dealt over 24 seconds.
- Splintered Bone
Changelog
For a full list of Open Beta -> Early Access updates, please see our post documenting all changes.
For the information about the latest update to Tariq, check out the November 27th patch notes.